
Getting Started Guide


/
Getting Started
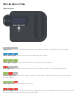
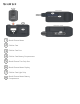
How to Assemble Your Connected BGM
Step 1: Insert batteries into the BGM.
Included in the small box with the BGM will be two coin cell (3.0 V lithium) batteries. Make sure the
BGM is turned off and, pressing down on the battery compartment, slide its tray off of the Cellular
Case. Insert two batteries firmly into the compartment with the + side facing up. Then, place the cover
back on the battery compartment, pushing down until you hear the tab click into place.
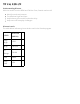
Step 2: Slide the BGM into the cellular case.
Looking at both pieces top-down, line up the right side of the BGM with the opening on the left side of
the Cellular Case. Slide the BGM into the Cellular Case until you hear a click. (The buttons on the BGM
are intentionally covered by the Cellular Case. While using the BGM with the Cellular Case, you’ll no
longer need to interface with that part of the BGM.)
Step 3: Remove the plastic tab from the back of the cellular case.
The Cellular Case is already loaded with three AAA batteries. To activate the device, flip the Cellular
Case, so it’s front faces down, and remove the plastic tab from the battery compartment. When the tab
is removed, a blue light sequence will flash, and the Cellular Case will automatically search for a
network to connect to and update its internal clock.
The BGM and Cellular Case are now connected and ready to transmit glucose readings to
Omada.
Taking a Reading
Step 1: Wash hands and the site from where the blood sample will be drawn thoroughly with warm,
soapy water. Rinse and dry.
Step 2: Unscrew and remove the adjustable tip on the lancing device.
Step 3: Insert a new disposable lancet firmly into the lancet holder. Twist off the protective cover of
the lancet and set it aside, then replace the adjustable tip. Keep the protective cover to replace on top
of the used lancet after testing.
Step 4: The lancing device has five puncture depth settings, numbered 1 through 5. The smaller
numbers are for a shallower puncture, and the larger numbers are for a deeper puncture. Choose a
depth of penetration by rotating the top portion of the adjustable tip until the setting number matches
the arrow.
Step 5: Cock the lancing device by holding the body in one hand and pulling on the sleeve with the
other hand until the device clicks.
Step 6: With the contact bars facing up, insert a test strip into the BGM's test strip port.