
Installation and Operating Instructions


15
OPERATION
IMPORTANT: When unit is first started, high humidity conditions can cause condensation to form on
discharge grille. Keep doors and windows closed. Room humidity will decrease and moisture will
evaporate.
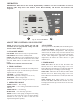
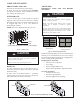
Fig. 26 – E-TAC CONTROLS
ABOUT THE CONTROLS ON YOUR UNIT
NOTE: In case of a power failure, the unit will
remember the last programmed settings and will
restart to those settings.
2. TEMP CONTROL
Temp Control is used to maintain room temperature.
Compressor will cycle on and off to keep room
at the
requested level of comfort.
COOLER -- Lowers temperature.
(Minimum temperature setting is 61° F/16° C)
WARMER -- Raises temperature.
(Maximum temperature setting is 86° F/30° C)
3. OPERATING MODE
MODE--COOL
MODE--DRY -- For cooling with addition moisture
removal.
-- For cooling
MODE--HEAT -- For heating
NOTE: If unit is a heat pump, raising the heat setting
5° F (2.8°C) will cause unit to use its electric heating
elements for one cycle in order to reach the new
requested temperature quickly.
MODE--FAN --
For fan--only operation
TEMP CONTROL
FAN, MODE& OPERATION
DRY
5. TIMER MODE
Timer ON: When the unit is ON, the Timer ON
function can be set. Time setting range is 0.5 to 24
hours. When the selected time is reached, the unit will
turn ON and operate according to system settings.
Timer OFF: When the unit is OFF, the Timer OFF
function can be set. Time setting range is 0.5 to 24
hours. When the selected time is reached, the unit will
turn OFF.
Timer Setting: Press Timer button to set timer
function. The Timer LED will turn ON and “88” will
be displayed. Press the up or down arrows to select the
desired time.
AUTO FAN MODE – Adjust the indoor fan speed to
balance room comfort and quietness. The fan speed
will increase the farther away from the selected room
temperature to quickly reach desired room temperature.
As the room temperature approaches the selected
temperature, the indoor fan slows down to a quiet
comfort level.
4. FAN SPEED
Set fan operation for HI, MED, LO and AUTO speed.
1. ON and OFF MODES
ON MODE - Places unit in ready or operation mode.
OFF MODE - Places unit in standby mode.
NOTE: The LED above the ON/OFF button will be
green when unit is ON and red when the unit is OFF.
All other LEDs will be off when unit is set to OFF
mode.
NOTE: Power remains connected to unit.