
Installation Guide

25 26
START-UP
Step 12
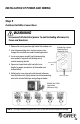
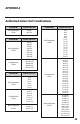
Installing Photocatalytic Filter (optional)
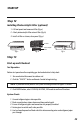
1. Lift front panel and remove air filter. (Fig. a).
2. Attach photocatalytic filter onto air filter. (Fig. b).
3. Install air filter as shown; close panel. (Fig. c).
Step 13
Start-up and Checkout
Test Operation
Perform test operation after completing gas leak and electrical safety check.
1. Turn on electrical disconnect to outdoor unit.
2. Push the “ON/OFF” button on Remote Control to begin testing.
NOTE: A protection feature prevents the system from being activated for approx. 3 minutes.
3. Push MODE button, select COOLING, HEATING, FAN mode to confirm all functions.
System Checks
1. Conceal refrigerant pipes where possible.
2. Make sure drain hose slopes downward along entire length.
3. Ensure all refrigerant pipes and connections are properly insulated.
4. Fasten pipes to outside wall, when possible.
5. Seal and weatherproof wall hole which the interconnecting wires and refrigerant pipes
pass through.
Fig. a
Air Filter
Photocatalytic
Filter
Fig. b Fig. c
START-UP
Indoor Unit
1. Do all Remote Control buttons function properly?
2. Do the display panel lights work properly?
3. Does the swing louver function properly?
4. Does the drain work?
Outdoor Unit
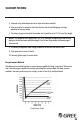
1. Push the mode button to COOL and adjust the room setting to 61° F deg. Wait up to 3 minutes
from compressor time guard. Does compressor and outdoor fan turn on in cooling mode?
2. Push the mode button to HEAT and adjust the room setting to 85° F deg. Wait up to 3 minutes
for compressor time guard. Does compressor and outdoor fan turn on in heat mode?
Explain Following Items To Customer With The Aid Of The Owner’s Manual:
1. How to turn system on and off; selecting COOLING, HEATING and other operating modes;
setting a desired temperature; setting the timer to automatically start and stop system
operation; and all other features of the Remote Control and display panel.
2. How to remove and clean the air filter.
3. How to set air with the swing louvers.
4. Explain care and maintenance.
5. Present the Owner’s Manual and installation instructions to customer.
TWD-0813-017 Multi install rev:Layout 1 9/27/13 12:53 PM Page 27