
Installation Guide


109
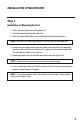
INSTALLATION OF INDOOR UNIT
Step 2
Installation of Mounting Bracket
1. Attach the mounting bracket to the indoor unit.
2. Find the horizontal center of the indoor unit.
3. Mark the center of the indoor unit on mounting bracket for future reference.
NOTE: The center of the mounting bracket is not the center of the indoor unit.
4. Remove the mounting brackets from the indoor unit and position the mount
ing
bracket on the wall in desired location. Use centering mark on mounting bracket
for centering the indoor unit on the wall.
5. Mounting bracket must be installed horizontally and level right to left.
NOTE: Condensate drain pan has built-in pitch for proper drainage.
6. Secure mounting bracket to wall with a minimum of five screws, evenly spaced to
properly support indoor unit weight.
NOTE: It is recommended to install screw anchors for sheet rock, concrete block,
brick and such type of walls.
INSTALLATION OF INDOOR UNIT
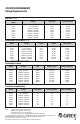
21 3/8
1 5/8
1 5/8
5 5/8
3 1/8
5 1/8
6 3/4
Φ2 1/8
5 1/8
Φ2 1/8
27
5 1/2
7 1/4
3 1/2
2 1/2
1 3/4
12 3/8
Φ2 3/4
Φ2 3/4
1/2
4 3/4
7 5/8
2
11 3/4
1 3/4
27 3/8
Φ2 1/8
Φ2 1/8
9 3/4
13 1/8
29 3/8
11
1/4
1
5/8
Φ2 3/4
Φ2 3/4
4
2
1/8
12 3/4
9 3/4
13 1/8
29 3/8
11
1/4
1
5/8
Φ2 3/4
Φ2 3/4
4
2
1/8
12 3/4
Mounting Bracket Diagrams and Dimensions
09K and 12K Unit
18K Unit
24K Unit
30K and 36K Unit
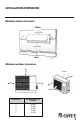
Right
(Rear piping hole)
Left
Wall Wall
(Rear piping hole)
TWD-0813-032 Neo install REV:Layout 1 9/27/13 12:15 PM Page 11