
Installation Manual

Start-up Checklist
□ Turn on main power to indoor and outdoor units.
•
Verify the system is not displaying an error code on the indoor unit display.
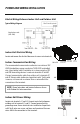
□ Point the Remote Controller at the
Floor/Ceiling unit and Press the On button.
• Verify the remote controller display turns ON
and the Power Indicator lights up on the
Floor/Ceiling unit.
□ Press the Mode button to Cooling.
Adjust the room setpoint to bring the system on in cooling mode. The system should start
cooling mode within 3-5 minutes.
• Verify the setpoint lights up on the Floor/Ceiling unit display.
• Verify the outdoor fan and compressor are operating.
• Verify the indoor fan is operating.
• Verify the indoor discharge air is cooling the room.
□ Press the Mode button to Heating.
Adjust the room setpoint to bring the system on in heating mode. The system should start
heating mode within 3-5 minutes.
• Verify the new setpoint lights up on the Floor/Ceiling unit display.
• Verify the outdoor fan and compressor are operating.
• Verify the indoor fan is operating.
• Verify the indoor discharge air is heating the room.
□ Press the OFF button on the Remote Controller.
• Verify Remote Controller display turns OFF and the system shuts OFF.
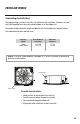
TESTING AND INSPECTION
□
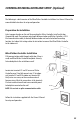
Test the Drain Piping.
The Ceiling Cassette contains a condensate pump and float
switch. Test the condensate disposal system by the following:
1.
Remove grille and frame from the unit and
find the drainage port.
2.
Locate and Remove the access cover.
3.Place the unit in cooling mode and wait until the compressor turns on.
4.Slowly add 20 to 24 oz. of a water bottle to the drain pan.
5.Water must drain freely from the unit with condensate pump energized. If not, check the
pipe slope or see if there are any pipe restrictions. Verify all piping joints are leak free.
Note: This unit is equipped with a safety float switch to de-energize the compressor if
the water level gets too high.
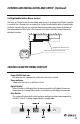
Use plastic water bottle
with a minimum 4-inch pipe
Drain hose Test hole cover
Test hole
28