
Installation Manual


20
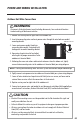
POWER AND WIRING INSTALLATION
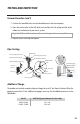
Outdoor Unit Wire Connections
Disconnect all electrical power to unit including disconnects, fuses and circuit breakers.
Lockout and tag all disconnect switches.
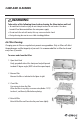
1. Remove the service panel on right side of the outdoor unit.
2. Insert interconnecting wires and main power wires through the wire holes on conduit
mounting bracket.
3. Secure main power conduit (and inter-
connecting wire conduit, if required) with
locking nuts to conduit mounting bracket.
4. Open wire clamp/strain relief and adjust
wire lengths for proper connections to the
outdoor unit terminal block.
5. Following the same wire colors and terminal references from the indoor unit, tightly
connect interconnecting wires to the outdoor unit terminal block per wiring diagram.
NOTE: Crossing interconnecting wires will cause system malfunction and possible damage.
6.
Tightly connect main power wires to outdoor unit terminal block per system wiring diagram.
7. Secure all wires inside wire clamp/strain relief. Verify wires are secure, not loose and no
external force on wires affects the connections at the terminals.
8. Replace service panel on right side of the outdoor unit.
9. Connect main power wires and conduit to unit disconnect switch box (field supplied) per
manufacturer’s instructions, National Electrical Code (NEC) and local electrical codes.
Cable Cross Board
Wire Hole
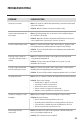
WARNING
CAUTION
• Electrical Disconnecting means must be provided and shall be located within sight and
readily accessible from the unit.
• Failure to follow this caution may result in equipment damage or improper operation.
• All wires running from the indoor to outdoor unit must comply with National Electrical
Code (NEC) and local codes.
• All wires must be connected firmly to terminal block to avoid unit malfunction,
overheating and possible fire hazard.