
Installation Sheet

4
October 2021
HELPFUL POINTERS & PREPARING FOR INSTALLATION:
• Work area should be well lit. Proper visibility ensures that color is consistent and that visually defective planks are
detected and removed. Subfloor must be clean and free of debris.
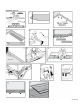
• Undercut doorjambs and casings using a handsaw laid flat on a piece of scrap flooring. Never undercut metal door
casings.
• Carefully remove the existing base, shoe molding or thresholds. They can be reused to cover the ¼" expansion gap
around the edge of the room.
• Must be flat to within 3/16” in a 10ft radius; no bumps or low spots. Subfloors should not slope more than 1" per 6ft.
• The minimum length of the first and last plank is 8". If the last plank will be less than 8", adjust the length of the first
plank. The remainder of the last plank can be used as a starter plank on the following rows.
• The minimum end-joint stagger is 8". Keeping this in mind, vary the distances from end joints row-to-row for a more
random and realistic installation.
•
Shade Variations
: Randomly pull planks from three or more different cartons to ensure good color and shade
mixture. Carefully inspect each plank for visual defects prior to installation. Do not install damaged planks.
AVAILABLE MOLDINGS:
Select moldings and transitions are available at www.versatrim.com
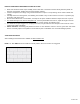
NOTE
: 12” Tiles
ONLY
must be installed in a brick pattern, where the seams are staggered