
Installation Sheet
5
October 2021
INSTALLATION:
Inspect each plank. Blend planks from several cartons at the same time to ensure good color and shade mixture
throughout the installation.
1.
Set spacers to allow a minimum gap of ¼" around the perimeter of the subfloor for movement or product
expansion. Do not remove the spacers until the installation is complete. The expansion gaps should be covered
by molding. See diagram 4.
2.
Measure the length of the room in inches. Divide it by the width of the planks that are to be installed. If the
resulting number is less than the to be installed plank width, you will need to cut your first-row planks
accordingly to avoid having planks that are less than the plank width on the opposite end of the room.
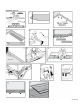
Note: To cut a plank, simply measure and mark the plank. Then, use a straight edge and utility knife to score
and snap. You may also need to back-cut the under pad on the bottom of the plank. If you have difficulty using
this method, you can use a jig saw, circular saw or miter saw.
3.
Begin installation of flooring from a corner of the room and working from left to right. Install spacers between the
plank and the wall at the end and edges where the plank and wall come together. See Diagrams 5 & 6.
4.
Begin the first row with a whole plank. First saw off the tongue on both the long and short sides of the first
plank. See diagram 3.
5.
Lock short end of plank 2 by inserting tongue into groove at an angle. Then drop into place. Continue this step
to the end of the row.
6.
The end joints of the planks in the first row are assembled by inserting the tongue side into the groove side of
the previous plank at a low 20-30° degree angle. Gradually lower the plank down flat, applying pressure inward
and downward clicking and locking the end of the new plank into the end of the existing plank until the end joint
closes. Ensuring that the planks are perfectly aligned. Install remaining full planks in the first row.
7.
Cut the last piece of the row to fit and allow for the ¼" expansion gap (if you have not already done so). Install
as shown. See Diagram 7.
8.
Use a tapping block and soft faced rubber mallet to close any gaps between the planks.
INSTALLING SECOND & REMAINING ROWS:
9.
Cut the first plank of the second row to two-thirds its length or make sure there will be at least an 8" stagger between end
joints. Gradually lower the plank down flat, applying pressure inward and downward.
Note: When starting a new row, you can use the cut piece from the previous row, as long as it is more than 8" and
the stagger between seams still is greater than 8". See Diagram 8.
10.
When installing the first plank of the second row, remember to place a ¼” inch spacer between the wall and the
short side of the plank. Insert the long side tongue into the groove side of the plank in the first row at a low angle
and lower flat to the substrate.
11.
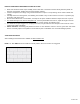
Install the second plank of the second row. Position the long side of the second plank with the tongue side of the
existing plank overlapping the groove of the planks in the previous row approximately 1/8” inch. Then, angle the
long tongue edge of the plank into the long groove edge of the first plank at 20°-30° (Refer to Figure 9). Angle
the plank down and gently push in until the plank locks into the previous row (Refer to Figure 10). Continue
installing remaining planks in the second row.