
Installation Sheet
6
October 2021
MAKE SURE THAT THE FIRST TWO ROWS ARE STRAIGHT AND SQUARE, OR THIS WILL AFFECT THE
ENTIRE INSTALLATION
12.
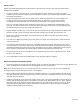
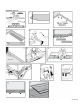
Continue working from left to right, row by row, making sure to install the planks with the long side seam first,
then slide back to drop the end joint into place. Tap the ends to ensure a tight fit.
13.
Install remaining rows, one row after the other, and maintain the required 8" stagger throughout the install. Tap
and square each plank as in step 12-14.
INSTALLING THE LAST ROW:
14.
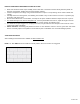
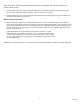
Most often the entire length of the last row will need to be cut so that it is narrow enough to fit the remaining
space. Cut the first plank of the last row to length (if necessary to follow stagger pattern). Place directly on top of
the previously installed row. Then, take another plank and place it against the wall on top of the plank to be cut
for width. Mark the plank (length-wise), cut to size. Remember to allow for the ¼" expansion gap against fixed
objects. See diagram 15.
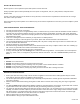
Install the plank with the cut side always facing the wall. Continue to cut and
install remainder of the planks in the last row. Use of a pull bar and rubber mallet
to lock the joints together in the last row may be necessary. Always use a pull bar
on the cut edge of the plank. Factory edges can be damaged if the pull bar is used
directly against them.
Note: Be sure to leave a minimum of ¼" expansion space around all fixed objects, cabinetry, and metal door jambs.