
User Guide

6
Vektor ERS-MD Energy Recovery Plenum Laboratory Exhaust
5. Set the Vektor fan bypass air plenum
Before moving the Vektor fan BAP into position,
gasketing must be installed to seal the plenum
sections against leakage.
This
gasketing is
attached to the
ERS plenum cabinet
prior to shipment. Verify
that it is in place and not
damaged or missing prior to joining
the two plenums together.
The assembly
hardware (stainless
steel bolts) required
to join the sections is
located in the Vektor
fan bypass air plenum
accessory kit.
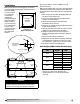
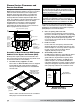
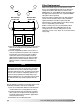
Lift and set the Vektor fan BAP on the curb
against the ERS plenum. Follow rigging and
lifting instructions in the Vektor-MD installation
instruction (part number 464652). Push fan bypass
air plenum tight against ERS plenum, making sure
to line up bolt holes. Be certain to compress foam
gasket to form an airtight seal.
Assembly Hardware Kit
5/16 - 18 UNC x 2-1/2 lag bolts
5/16 inch flat washers
1/2 inch flat washers
3/4 inch flat washers
Quantities in hardware kit will vary
by unit size and configuration.
Roof Curb
ERS
Plenum
Cabinet
Fan Bypass
Air Plenum
(BAP)
Push
Plenum
ERS
Plenum
Cabinet
Fan Bypass
Air Plenum
(BAP)
ERS and Vektor Fan Bypass Plenum
Assembly Installed on Roof Curb
FOR GENERAL INFORMATION ONLY. CONTACT FACTORY FOR CERTIFIED DRAWINGS AND SPECIFICATIONS.
REFERENCE CAPS FOR VEKTOR-MD DIMENSIONS.
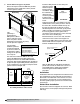
VK-ERS
SKIRT BRACKET
Attach to ERS plenum
section
Attach to fan bypass air
plenum section
Skirt Bracket
Slot Detail
Inside the ERS plenum are slots along the
marrying sections
which accept the
bolt and washer
assemblies. Using
the hardware kit,
attach the unit
sections by bolting
together frame
extrusion from the
inside.
Tighten the bolt-washer assemblies to the top
and both sides of the joining sections. Start on
the lower sides and work towards the top. As
the bolts are tightened, the plenum sections
will draw together. Use anti-seize gel to prevent
galling / welding of all stainless steel fasteners.
If necessary, pull the units together with a
mechanical come-along device at the structural
base of the unit or at lifting lugs.
External brackets, one for each side, transition
and connect lower section of the bypass air
plenum to the ERS cabinet. These brackets ship
with the BAP and also complete the connection
between the BAP and roof curb.
After the ERS plenum and Vektor fan BAP are
joined and secured, the Vektor fans can be set
on the BAP. Refer to Vektor Fan installation
instruction (part number 464652) on this
procedure.
Installation
Installations with inlet configurations that deviate from
this standard may result in reduced fan performance.
Restricted or unstable flow at the fan inlet can cause
pre-rotation of incoming air or uneven loading of the
fan wheel yielding large system losses and increased
sound levels.
Vektor Riser Installation
Check curb or structural supports for levelness. Both
must be level to ensure proper drainage from plenum
and fan(s).
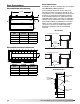
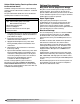
Gasketing
DETAIL A
DETAIL B
FOR GENERAL INFORMATION ONLY. CONTACT FACTORY FOR CERTIFIED DRAWINGS AND SPECIFICATIONS.
REFERENCE CAPS FOR VEKTOR-MD DIMENSIONS.
VK-ERS
MARRIAGE WALL
1/2 x 1/2 inch tape
around entire opening
1/2 x 1/2 inch tape
around entire opening
Slots
around perimeter on
each side of plenum
1/2 x 2 inch tape along
outside edge of holes
Gasketing