Owner’s Manual
TABLE OF CONTENTS About pureHeat GARAGE & PATIO. . . . . . . . . . . . . . . . . . . . . . . . . . . . . . . 4 Features . . . . . . . . . . . . . . . . . . . . . . . . . . . . . . . . . . . . . . . . . . . . . . . . . . . . . 4 Specifications . . . . . . . . . . . . . . . . . . . . . . . . . . . . . . . . . . . . . . . . . . . . . . . . 4 Product Contents . . . . . . . . .
ABOUT PUREHEAT GARAGE & PATIO Thank you for your purchase of pureHeat GARAGE & PATIO. This heater provides consistent warmth to outdoor spaces using carbon infrared heating technology, warming your friends and family directly instead of just heating the surrounding air. pureHeat GARAGE & PATIO can be mounted using easy-to-install bracket, or it can be placed on an adjustable iron stand for mobility. Either way, the silent and odorless heating element is a safe distance from children and pets.
PRODUCT CONTENTS 1 - Owner’s Manual 1 - Stand Base 1 - pureHeat GARAGE & PATIO Heater 3 - Cord Clips 1 - Remote Control 1 - Grille Guard (Batteries Not Included) 1 - Telescoping Stand Thread Diameter is denoted in mm by the first number. (i.e. M5*12 = 5mm diameter) Screw Length is denoted in mm by the second number. (i.e.
UNIT DIAGRAM Control Panel Telescoping Lock Power Cord Top Post Middle Post Cord Clips Mounting Bracket Power Switch Bottom Post Base Cover 6 Stand Base
IMPORTANT INSTRUCTIONS When using electrical appliances, basic precautions should always be followed to reduce the risk of fire, electric shock, and injury to persons, including the following: • Read all instructions before using this heater. • This heater is hot when in use. To avoid burns, do not let bare skin touch hot surfaces. If provided, use handles when moving this heater. Keep combustible materials, such as furniture, pillows, bedding, papers, clothes, and curtains at least 3 feet (0.
UNIT SETUP - Floor Stand INSPECT THE UNIT FOR DAMAGE BEFORE SETUP OR USE. 1. Begin by connecting the Bottom Post (Post with a Flat Base) to the Base, using the provided Four (4) M6*30 Screws. 2. Slide the Base Cover over the connected post to cover the screws and then slide One (1) Large Cord Clip over the post. 3. Place the Middle Post (Optional for extra 17.5” height) onto the Bottom Post and fasten them together using Three (3) M5*6 Screws on the sides.
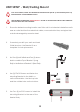
UNIT SETUP - Floor Stand 5. x2 Use Two (2) M6*14 Bolts and Two (2) Acorn Nuts to combine Top of Bracket 1 (Long End) to the Bottom of Bracket 2 (Short End) . 6. Use Two (2) M6*35 Screws and Two (2) Wing Nuts to install the Front of Bracket 2 (Long End) to the rear of the Telescoping Post. 7. Use Two (2) M5*12 Screws to install Bracket 1 (Short End) to the rear of the Heater Body. 8. Use the Two (2) remaining M5*12 Screws to mount the Grille Guard to the rear of the Heater Body.
UNIT SETUP - Wall/Ceiling Mount FOR YOUR SAFETY, READ ALL IMPORTANT INSTRUCTIONS (PAGE 7) AND USAGE (PAGE 13) BEFORE USING YOUR PUREHEAT PATIO. HEATER MUST BE MOUNTED HORIZONTALLY OR THE TIP OVER SAFETY SWITCH WILL ENGAGE AND THE UNIT WILL NOT OPERATE. 1. Ensure the desired mounting location can fit the unit in a horizontal orientation and is near an outlet but free from electrical cables, communication lines, and pipes that could be damaged by excessive heat. 2.
CONTROL PANEL/REMOTE DIAGRAMS Control Panel Function ON LED 88 24 Power Mode/Timer Hours Mode Button Timer Button MODE TIMER Remote LED Power Button Power Mode 1 (500W) Power Mode 2 (1000W) P1 P2 P3 TIMER Timer Button Power Mode 3 (1500W) 11
USING PUREHEAT GARAGE & PATIO READ ALL IMPORTANT INSTRUCTIONS (PAGE 5) BEFORE USING YOUR PUREHEAT GARAGE & PATIO. Power pureHeat GARAGE & PATIO starts in Standby Mode when first turned on. The unit has power but is not actively heating. To turn the unit on, toggle the Power Switch to “ - ”. Modes Changing the Power Mode increases the Heat Output. P1 is the Lowest Heat Output Mode and P3 is the Maximum Heat Output Mode. P1 Press the Mode Button once to change to Power Mode 1(500W).
MAINTENANCE Your pureHeat GARAGE & PATIO should be maintenance free for many years, but sometimes the unexpected happens. If you have any trouble with your unit, contact GreenTech Environmental by phone or visit www.GreenTechEnv.com/Support. CLEANING TURN PUREHEAT GARAGE & PATIO OFF AND DISCONNECT FROM THE OUTLET BEFORE CLEANING. To extend the life of your pureHeat GARAGE & PATIO, perform regular cleanings with a damp cloth. Do not disassemble the unit; clean only the exterior.
LIMITED WARRANTY INFORMATION Your pureHeat GARAGE & PATIO (Product) is warranted to be free from all defects in material and workmanship in normal household use for a period of 3 Years from date of purchase. The warranty is granted only to the original purchaser. The warranty is subject to the following provisions: Any damages or malfunctions caused by negligence, abuse, or use not in accordance with the Product Owner’s Manual are not covered by this warranty.
www.GreenTechEnv.