Owner’s Manual
TABLE OF CONTENTS PRODUCT CONTENTS . . . . . . . . . . . . . . . . . . . . . . . . . . . . . . . . . . . . . . . . . . . . . . . . . . . . . . 2 RECORDS . . . . . . . . . . . . . . . . . . . . . . . . . . . . . . . . . . . . . . . . . . . . . . . . . . . . . . . . . . . . . . . 2 ABOUT. . . . . . . . . . . . . . . . . . . . . . . . . . . . . . . . . . . . .
ABOUT pureAir 3000 by GreenTech Environmental is a Whole Home Air Purifier with four different technologies that each contribute as part of a complete air and surface purification solution for your home. Using Photocatalytic Oxidation, Ionization, easily controlled Activated Oxygen, and Filtration you can enjoy noticeably cleaner and fresher air. pureAir 3000 is very easy to set up and use following the instructions included in this manual.
WARNINGS Review this list before using or maintaining your purifier! • Never operate purifier near heat source, open flame or flammable/combustible fluids. • Do not operate purifier unless all parts (including PCO CELL, ACTIVATED OXYGEN PLATE, REAR FILTER ASSEMBLY and REAR COVER) are properly installed. • Directly viewing the ultraviolet lamp inside the PCO CELL in this purifier when it is powered on may result in eye damage. Lamp is not directly visible when mounted in completely assembled purifier.
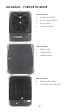
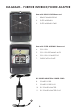
DIAGRAMS - PURIFIER EXTERIOR 1 Front of Purifier Front of Purifier 2 1. IONIZATION NEEDLE 2. FRONT GRILLE SCREWS 3. FRONT GRILLE 4. CONTROL PANEL 1. Ionization Needle 3 2. Front Grille Screws 3. Front Grille 4 4. Control Panel Side of Purifier Side of Purifier 5. REAR COVER 6. PURIFIER REAR 7. PURIFIER FRONT 5. Rear Cover 6. Purifier Rear 5 7. Purifier Front 6 7 Rear of Purifier Rear of Purifier 8. REAR COVER SCREW 9. DC POWER ADAPTER INLET 8. Rear Cover Screw 9.
DIAGRAMS - PURIFIER INTERIOR/POWER ADAPTER Rear - Rear Cover Removed 1 Rear with REAR COVER Removed 2 1. BRASS THUMBSCREWS 2. FILTER ASSEMBLY 3. FILTER ASSEMBLY TABS 1. Brass Thumbscrews 3 2. Filter Assembly 3. Filter Assembly Clasps Rear - Filter Assembly Removed Rear with FILTER ASSEMBLY Removed 4. PCO CELL 5. PCO CELL RETAINING NUTS 6. PCO CELL CONNECTOR 7. PURIFICATION PLATE 4. PCO Cell 4 5 5. PCO Cell Nuts 6 7 6. PCO Cell Connector 7.
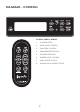
DIAGRAMS - CONTROLS 4 3 1 7 6 5 8 Control Panel & Remote CONTROL PANEL & REMOTE 1. POWER BUTTON MODEButton CONTROL 1. SLEEP Power 2. 1 3. 2 FAN SPEED CONTROL RESET BUTTON 2. REMINDER Sleep Mode Control 4. 5. 6 3 INFRARED RECEIVER 3. PURIFIER Fan Speed Control LEVEL CONTROL 6. 7. AWAY MODE TOGGLE 4. NORMAL/HIGH ReminderMODE Reset TOGGLE 8. 8 7 5. Infrared Receiver 6. Purifier Level Control 7. Away Mode Toggle 8.
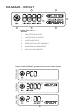
DIAGRAMS - DISPLAY 2 4 5 1 3 6 DISPLAY LCD Display 1. FAN SPEED INDICATOR 1. Speed Indicator 2. Fan MODE SPECIFIC DISPLAY 3. MODE INDICATOR 5. MAINTENANCE REMINDERS 2. Specific Display 4. Mode PURIFICATION LEVEL WARNING 3. Mode Indicator 6. AWAY MODE WARNING 4. Purification Level Warning 5. Maintenance Reminders 6. Away Mode Warning Away Mode High Mode PCO (Normal) Here’s how the DISPLAY appears when in each of the modes.
SETTING UP This is going to be easy. 1. Unpack Your pureAir 3000 Remove everything from the box. Check and make sure you have everything listed in “PRODUCT CONTENTS” on page 2. Keep your packaging in case you need to return or exchange your purifier. When you are satisfied with your purifier, please recycle the box and properly dispose of all other packaging materials. 2. Select a Location for Your pureAir 3000 There are several things to consider when selecting a location.
INITIAL SETTINGS Before using your pureAir 3000 you will need to find the area (or square footage) of the environment. To do this accurately, take into account all connected rooms with open doorways (the purification does not flow through closed doors). The pureAir 3000 can purify up to 3,000 square feet of space. For example: Suppose you have a 2500 square foot house. The living room is attached to the kitchen, three bedrooms, the den and a laundry room.
CONTROLS Turning the Purifier On/Off Press the POWER BUTTON on the CONTROL PANEL or REMOTE to turn the purifier on. The purifier will initially be set to NORMAL MODE (PCO). Press the POWER BUTTON once more to turn the power off. Using NORMAL MODE (PCO) Press NORMAL/HIGH MODE TOGGLE until “PCO” is shown in the MODE SPECIFIC DISPLAY. • Square Footage not available in “NORMAL MODE (PCO)” • To control the fan speed: Use Fan Up/Down buttons.
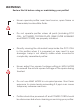
DISASSEMBLY Tools Required You will need a #2 Phillips screwdriver. Workspace Recommendations A counter top or flat surface is ideal for disassembling/assembling your purifier. You will need 2ft x 3ft of clean, accessible workspace. It is recommended to use a small bowl or cup to hold any screws so they are not lost during the /assembly process. Disassembly Instructions 1. Turn the purifier off. 2. Remove the POWER CORD PLUG from the wall and the DC POWER ADAPTER PLUG from the rear of the purifier. 3.
DISASSEMBLY Removing the PURIFICATION PLATE: Grasp the PURIFICATION PLATE on the ceramic and gently pull it out of the grooves on the sides. Clean (see “CLEANING” page 16) and set the PURIFICATION PLATE aside. Removing the PCO CELL: 1. Locate the PCO CELL CONNECTOR on the right of the rear of the purifier almost halfway up the purifier (beside the PURIFICATION PLATE slot). Squeeze the tabs on the top and bottom of the PCO CELL CONNECTOR and pull gently until free from the PCO CELL CONNECTOR Outlet. 2.
ASSEMBLY Refer to “TOOLS & WORKSPACE” from “DISASSEMBLY” on Page 12 Installing the FRONT GRILLE: 1. Gently set the bottom of the FRONT GRILLE in place on the lower front of the purifier and swing the top of the FRONT GRILLE into place, being careful not to damage the IONIZATION NEEDLE at the top center of the front of the purifier. 2. Insert the two FRONT GRILLE SCREWS one at a time until they are in place, but not tight. After both FRONT GRILLE SCREWS are in place, tighten them carefully.
ASSEMBLY Installing the FILTER ASSEMBLY: 1. Hold the FILTER ASSEMBLY with the larger flat side (where the honeycomb layer of the filter is visible) facing the interior of the purifier. 2. Insert the bottom of the FILTER ASSEMBLY into the tabs on the rear of the purifier and then seat the FILTER ASSEMBLY on the rear of the purifier. (NOTE: If the user fails to insert the FILTER ASSEMBLY into the tabs appropriately, disassembling the purifier in the future could be extremely difficult.) 3.
CLEANING Your purifier should be cleaned at least monthly to keep it running at peak performance, but more often if its operating environment is heavily contaminated. Cleaning the Purifier (Exterior): Wipe down the exterior with a damp cloth or use compressed air or a vacuum cleaner to remove dust. Cleaning the FILTER ASSEMBLY You may use clean water or compressed air to clean your FILTER ASSEMBLY once it has been disassembled (see “DISASSEMBLY” on page 12).
TROUBLESHOOTING The Purifier Fails to Turn On 1. Verify that the POWER PLUG is plugged into an operational wall outlet. 2. Ensure that the POWER CORD is fully inserted (leaving less than an 1/8”) into the DC POWER ADAPTER and the green light on the DC POWER ADAPTER is illuminated. 3. Ensure that the DC POWER ADAPTER PLUG is fully seated in the DC POWER ADAPTER INLET. 4. Verify the POWER BUTTON has been activated on the CONTROL PANEL. 5.
TROUBLESHOOTING The IONIZATION NEEDLE Creates an Electrical Arc: The IONIZATION NEEDLE needs to be cleaned. Using a cotton swab soaked with rubbing alcohol, gently clean around the IONIZATION NEEDLE. The Fan Does Not Operate Properly: 1. Try adjusting the fan speed using the CONTROL PANEL or REMOTE CONTROL. 2. Remove the FRONT GRILLE (see “DISASSEMBLY” on page 13) to ensure there are no obstructions to the movement of the fan. 3.
LIMITED WARRANTY INFORMATION Your pureAir 3000 Whole Home Air Purifier (Product) is warranted to be free from all defects in material and workmanship in normal household use for a period of 1 Year from date of purchase. The warranty is granted only to the original purchaser. The warranty is subject to the following provisions: Any damages or malfunctions caused by negligence, abuse, or use not in accordance with the Product Owner’s Manual are not covered by this warranty.
www.GreenTechEnv.