
User's Manual


G e t t i n g S t a r t e d
W i r e l e s s S m a r t P l u g
U s e r G u i d e | 5
Getting Started
Before you plug in and install your Smart Plug, verify your Wireless Gateway is operating and connected
to the Internet. For information on setting up your Wireless Gateway, refer to the instructions that came
with your Wireless Gateway.
Follow these steps to install your Smart Plug:
Step 1: Pair your Smart Plug with your Wireless Gateway
Step 2: Connect your device to your Smart Plug
Step 3: Add your connected device to your online account
Step 1: Pair your Smart Plug with your Wireless Gateway
You can select your appliance or electronic device to plug into your Smart Plug. The best choice is
devices, such as ovens, that power down instantly and do not require a staged power-down process. For
instance, computers use a staged process to power down and instantly powering off the power may
cause loss of work.
Perform the following steps:
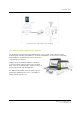
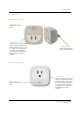
1. Plug your Smart Plug into an electrical outlet. The Power button turns green to indicate that
power is on.
As your Smart Plug automatically searches for your Wireless Gateway and home network, the
Power indicator begins to flash green. This pairing process continues until your Wireless Gateway
is found and the Power indicator turns a solid green.
2. If needed, move your Smart Plug to the location where you will plug in your device. When you
unplug your Smart Plug to move it, your Smart Plug remains paired to your Wireless Gateway.