MO60L06 MO60L516 EN LAWN MOWER OPERATOR MANUAL ES CORTACÉSPED MANUAL DEL OPERADOR LMC421 www.greenworkstools.
English 1 1.1 1.2 1.3 2 2.1 2.2 2.3 2.4 3 4 5 6 6.1 6.2 6.3 6.4 6.5 6.6 6.7 6.8 6.9 Description......................................... 4 Purpose.............................................................. 4 Overview........................................................... 4 Packing list........................................................ 4 7 7.1 7.2 7.3 7.4 7.5 7.6 Read all instructions......................... 4 Children and Bystanders....................................4 General Operation.
English EN 1 DESCRIPTION 1.1 PURPOSE 2 DANGER This machine was built to be operated according to the rules for safe operation included in this manual. As with any type of power equipment, carelessness or error on the part of the operator can result in serious injury. This machine is capable of amputating hands and feet and throwing objects. Failure to observe all safety instructions could result in serious injury or death. This machine is used for domestic lawn mowing.
English • • • handle immediately and the blade will stop rotating within three seconds. Thoroughly inspect the area where the equipment is to be used and remove all stones, sticks, wires, bones, and other foreign objects. Prevent unintentional starting. Ensure the switch is in the off-position before connecting to battery pack, picking up or carrying the appliance. Carrying the appliance with your finger on the switch or energizing appliance that have the switch on invites accidents.
English EN • • • • • • • 2.3 • • • • • • • • • • • Do not dispose of the battery in a fire. The cells could catch fire or explode. Check with local codes and waste management for proper disposal instructions. When battery pack is not in use, keep it away from other metal objects, like paper clips,coins, keys, nails, screws or other small metal objects, that can make a connection from one terminal to another. Shorting the battery terminals together may cause burns or a fire.
English 3 SYMBOLS ON THE PRODUCT EN Symbol Name Explanation V Volt Voltage A Amperes Current Hz Hertz Frequency (cycles per second) W Watt Power Minutes Time min /min no Per Minute 4 Type of current Direct Current Type or a characteristic of current No Load Speed Rotational speed, at no load Safety Alert Precautions that involve your safety. Eye Protection Always wear eye protection with side shields marked to comply with ANSI Z87.1 when operating this equipment.
English EN 5 PROPOSITION 65 6.2 WARNING PLACE THE MOWER UPRIGHT IN VERTICAL POSITION This product contains a chemical known to the state of California to cause cancer, birth defects or other reproductive harm. Some dust created by power sanding, sawing, grinding, drilling, and other construction activities contains chemicals known to cause cancer, birth defects or other reproductive harm.
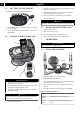
English 6.3 UNFOLD THE LOWER HANDLE 6.5 EN INSTALL THE MULCH PLUG 12 7 5 10 1. Remove the grass catcher. 15 2. Open the rear discharge door (7) and hold it. 3. Hold the mulch plug (10) by its handle and fit it in the discharge chute. 1. Pull up on the handle holes (12) to release the lower handles (5). 4. Close the rear discharge door. 2. Fold the lower handle up until the handle pins (15) lock into position. 6.
English EN 6.7 SET THE CUTTING HEIGHT 2. Align the ribs on the battery pack (22) with the grooves in the battery compartment. The machine can be set to different cutting height. 3. Push the battery pack (22) into the battery compartment until the battery pack locks into place. 4. When you hear a click, the battery pack is installed. 5. Close the battery door. NOTE The motor starts only when you put in the safety key (21). 8 6.9 1.
English 2 Green Lights The battery is at between 60% and 40% capacity 1 Green Light The battery is between 40% and 20% capacity 6. Close the rear discharge door. 7. Empty the grass catcher. 7.5 Lights go out The battery is less than 20% capacity and requires charging immediately 7.2 OPERATE ON SLOPES WARNING Do not mow on the slopes with incline more than 15°. If you are not comfortable, do not mow on a slope. STOP THE MACHINE • 1. Release the start handle to stop the machine.
English EN 8.1 • GENERAL MAINTENANCE optimized for efficiency, while high lift blades work better in extreme conditions. The high-lift blade has deeper curves on the ends, which increase suction to circulate and expel the clippings. The higher air flow also helps prevent clogging when mowing tall or wet grass. Before each use, examine the machine for damaged, missing, or loose parts such as screws, nuts, bolts and caps. Tighten correctly all the fasteners and caps. Clean the machine with a dry cloth.
English 2. Remove the battery and safety key. Problem 3. Pull through the handle holes to fold away the handles. 5. Stand the machine on end and make sure that the brackets touch the floor. Possible cause The handle is not in position. The bolts are not Adjust the height engaged correctly. of the handle and make sure that the bolts and nuts are aligned correctly. The machine does not start. The battery capacity is low. Solution Charge the battery pack.
English EN 11 LIMITED WARRANTY Greenworks hereby warranties this product, to the original purchaser with proof of purchase, for a period of four (4) years against defects in materials, parts or workmanship. Greenworks, at its own discretion will repair or replace any and all parts found to be defective, through normal use, free of charge to the customer.
English 12 EN EXPLODED VIEW 1 2 3 4 5 6 7 8 10 9 11 12 13 No. Part No. Qty.
English EN No. Part No. Qty.