60V BURSHLESS CULTIVATOR TL60L00 Owner’s Manual TOLL-FREE HELPLINE: 1(855)345-3934 www.greenworkstools.com Read all safety rules and instructions carefully before operating this tool.
CONTENTS Contents.........................................................................................................................................2 Product Specifications...................................................................................................................2 General Safety Rules.................................................................................................................3 Specific Safety Rules.............................................................
GENERAL SAFETY RULES WA R N I N G When using electric gardening appliances,basic safty precautions should always be followed to reduce the risk of fire, electric shock and personal injury including the following. WA R N I N G READ AND UNDERSTAND ALL INSTRUCTIONS. Failure to follow all instructions listed below may result in electric shock, fire, and/or serious personal injury.
GENERAL SAFETY RULES • Keep cultivator in good working condition. Check all nuts, bolts, and screws at frequent intervals for proper tightness to be sure the equipment is in safe working condition. • Keep the unit free of grass, leaves, or grease to reduce the chance of a fire hazard. • Do not use cultivator if switch does not turn it on or off. Any tool that cannot be controlled with the switch is dangerous and must be repaired. • Never spray water directly into the motor compartment of the cultivator.
SPECIFIC SAFETY RULES • Be aware that the equipment may unexpectedly bounce upward or jump forward if the tines should strike buried obstacles such as large stones, roots or stumps. • Wear hearing protection. • Ensure that people and pets are at least 50 ft. (15 m) away from cultivator while in use. • Replace worn or damaged parts only with identical replacement parts. • Ensure that work area is free of wet spots or excessive quantities of stone.
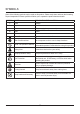
SYMBOLS Some of the following symbols may be used on this product. Please study them and learn their meaning. Proper interpretation of these symbols will allow you to operate the product better and safer. SYMBOL NAME DESIGNATION/EXPLANATION V Volts Voltage A Amperes Current Hz Hertz Frequency (cycles per second) W Watt Power Minutes Time Direct Current Type or a characteristic of current Wet Conditions Alert Do not expose to rain or use in damp locations.
SYMBOLS The following signal words and meanings are intended to explain the levels of risk associated with this product. SYMBOL SIGNAL MEANING DANGER Indicates an imminently hazardous situation, which, if not avoided, will result in death or serious injury. WARNING Indicates a potentially hazardous situation, which, if not avoided, could result in death or serious injury. CAUTION Indicates a potentially hazardous situation, which, if not avoided, may result in minor or moderate injury.
KNOW YOUR CULTIVATOR Read this operator’s manual and safety rules before operating your cultivator. Compare the illutration in Fig.1 to your cultivator in order to familiarize yourself with the location of various controls and adjustments. Save this manual for future reference. SWITCH BAIL HANDLE SAFETY LOCK-OUT BUTTON WING NUT BATTERY POCKET TINE SHIELD DEPTH ADJUSTMENT WHEEL ASSEMBLY TINE A TINE B TINE D TINE C 8 RING PIN Fig.
ASSEMBLY INSTRUCTIONS UNPACKING • Carefully remove the product and any accessories from the box. Make sure that all items listed in the packing list are included. • Inspect the tool carefully to verify no breakage or damage occurred during shipping. • Do not discard the packing material until you have carefully inspected and satisfactorily operated the product. • If any parts are damaged or missing, please call 1(855)345-3934 for assistance.
ASSEMBLY INSTRUCTIONS INSTALLING THE TINES (See Figure 2) The cultivator comes with four tines—For correct operation of the unit, the tines must be installed in the correct order. The cultivator may be used with four tines or two tines. 1. Remove the battery from the unit. 2. Lean the unit back on its wheels so that it is resting securely with the handlebar on the ground. TINE (A) TINE (B) SMALL FELT GEAR BOX BIG FELT TINE (C) BIG FELT RING PIN TINE (D) SMALL FELT RING PIN TINE SHAFT Fig.
ASSEMBLY INSTRUCTIONS TINES INSTALLED CORRECTLY (See Figure 3) NOTE: when the tines are installed correctly, the flute on the tines should line-up, and the angled edge of the tine blades should point towards the ground. NOTE: The tiller will not operate properly if the tines are not installed correctly. If there is a problem with the cultivating operation of the tiller, check the tines for proper positioning. NOTE: The directional arrow that is displayed on each tine should point toward the front.
ASSEMBLY INSTRUCTIONS ASSEMBLING THE HANDLE (See Figure 5) 1. Align the holes on the upper handle assembly with holes on the lower handle found on the cultivator. Insert the bolts (1) through the handles and secure using the wing nut (2). UPPER HANDLE BOLT LOWER HANDLE 1 2 WING NUT Fig.
OPERATING INSTRUCTIONS ADJUSTING WHEEL POSITION (See Figure 6) The wheel position of the unit is adjustable. The wheels are used to control the depth of operation. To adjust the height of the cultivator: 1. Remove the battery from the unit. 2. Insert the wheel assembly (1) into the support rod (2). 3. Align wheel assembly hole to desired position. Slide bolt (3) through hole and attach fastening knob (4) to bolt (3). 4. Tighten the fastening knob (4).
OPERATING INSTRUCTIONS WA R N I N G Do not allow hands, feet, or any other part of the body or clothing near the rotating tines or any other moving part. The tines begin to rotate forward once the switch trigger is depressed. The tines continue to rotate until the switch trigger is released. Failure to avoid contact could cause serious personal injury. INSTALLING THE BATTERY (See Figure 7) 1. Align the battery(1) with the cavity on the cultivator. 2. Hold the unit. 3.
OPERATING INSTRUCTIONS WA R N I N G Do not allow familiarity with tools to make you careless. Remember that a careless fraction of a second is sufficient to inflict serious injury. WA R N I N G Always wear safety goggles or safety glasses with side shields when operating tools. Failure to do so could result in objects being thrown into your eyes, resulting in possible serious injury. WA R N I N G Do not use any attachments or accessories not recommended by the manufacturer of this tool.
OPERATING INSTRUCTIONS PREPARING THE SEED BED The cultivator can be used to break up garden soil and prepare a seed bed for planting. Plan ahead to leave enough room between the seed rows to allow for machine cultivating after the plants have grown. TILLING SOD: Tilling sod into the soil is not recommended. If sod must be removed to perform application, then it is suggested to do as follows: 1. Map out the area of sod required to be removed. 2. Cut into 16 in. x 36 in.
MAINTENANCE WA R N I N G When servicing, use only identical replacement parts. Use of any other parts may create a hazard or cause product damage. WA R N I N G Always wear safety goggles or safety glasses with side shields during product operation. If operation is dusty, also wear a dust mask. WA R N I N G Before inspecting, cleaning, or servicing the machine, disconnect the battery from unit and wait for all moving parts to stop.
TROUBLESHOOTING PROBLEM POSSIBLE CAUSE SOLUTION Motor fails to start when switch trigger is depressed. The battery is not inserted in or connection is loose. Insert the battery into unit. Motor runs but tines do not move. Gear train failure. Take unit to authorized service center.
LIMITED FOUR-YEAR WARRANTY YEARS TOOL WARRANTY GREENWORKS hereby warranties this product, to the original purchaser with proof of purchase, for a period of four (4) years against defects in materials, parts or workmanship. GREENWORKS , at its own discretion will repair or replace any and all parts found to be defective, through normal use, free of charge to the customer.
EXPLODED VIEW 1 2 3 4 5 24 6 7 8 23 22 21 20 19 18 9 10 11 12 24 25 13 14 15 16 17 20 26
PARTS LIST ITEM NO. 1 2 3 4 5 6 7 8 9 10 11 12 13 14 15 16 17 18 19 20 21 22 23 24 25 26 PART NO.
Greenworks Tools PO Box 1238 Mooresville, NC 28115 TOLL-FREE HELPLINE: 1(855)345-3934 Rev: 00 (09-03-17) Printed in China on 100% Recycled Paper