
Manual


10
ASSEMBLY INSTRUCTIONS
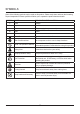
INSTALLING THE TINES (See Figure 2)
The cultivator comes with four tines—For correct operation of the unit, the tines must be installed in
the correct order. The cultivator may be used with four tines or two tines.
1. Remove the battery from the unit.
2. Lean the unit back on its wheels so that it is resting securely with the handlebar on the ground.
NOTE: This view of the gearbox is from the front of the cultivator.
3. Place the small felt inserts on each side of the tine shaft, and slide to rest against the inner tine.
4. Place tine (B) on the tine shaft to the left of the gear box. The stamped side of the tine should
face away from the gear box.
5. Place tine (C) on the tine shaft to the right of the gear box. The stamped side of the tine should
face away from the gear box.
6. Place the large felt inserts on each side of the tine shaft, and slide to rest against the inner tine.
7. Place the outer tine stamped (A) on the left side of the tine shaft. The stamped side should face
in toward tine (B).
8. Place the outer tine stamped (D) on the right side of the tine shaft.The stamped side should face
in toward tine (C).
NOTE: When installed correctly, the angled edge of the tine blades should face the ground. To secure the tines to
the tine shaft, insert the hitch pin into the holes located on either side of the tine shaft.
NOTE: The unit will not operate properly if the tines are installed incorrectly. If you notice a problem with the
cultivating operation of the unit, check for proper tine positioning.
RING PIN
TINE (A)
TINE (B) TINE (C) TINE (D)
TINE SHAFT
GEAR BOX
RING PIN
Fig.2
SMALL
FELT
BIG
FELT
BIG
FELT
SMALL
FELT