
Manual


11
ASSEMBLY INSTRUCTIONS
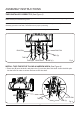
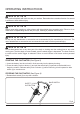
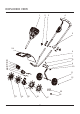
TINES INSTALLED CORRECTLY (See Figure 3)
NOTE: when the tines are installed correctly, the ute on the tines should line-up, and the angled edge of the tine
blades should point towards the ground.
NOTE: The tiller will not operate properly if the tines are not installed correctly. If there is a problem with the
cultivating operation of the tiller, check the tines for proper positioning.
NOTE: The directional arrow that is displayed on each tine should point toward the front.
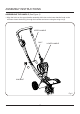
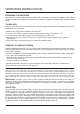
INSTALL TWO TINES FOR TILLING A NARROW AREA (See Figure 4)
1. Place tine (B) onto the shaft, and place tine (C) onto the other side shaft. Insert the hitch pins
into the holes in order to secure the tines to the tine shaft.
RING PIN
GEAR BOX
TINE (A)
HITCH PIN
Fig.3
Fig.4
TINE (B)
TINE (C)
TINE (D)
TINE (B)
TINE (C)
RING PIN