
Use and Care Manual


7 INSTALLATION
7.1 UNPACK THE MACHINE
WARNING
Make sure that you correctly assemble the machine before
use.
WARNING
• If the parts are damaged, do not use the machine.
• If you do not have all the parts, do not operate the
machine.
• If the parts are damaged or missing, speak to the service
center.
1. Open the package.
2. Read the documentation in the box.
3. Remove all the unassembled parts from the box.
4. Remove the machine from the box.
5. Discard the box and package in compliance with local
regulations.
7.2 ADD THE BAR AND CHAIN OIL
Examine the amount of oil in the machine. If the oil level is
low, add the bar and chain oil as follows.
IMPORTANT
Use bar and chain oil that is only for chains and chain
oilers.
NOTE
The machine comes from the factory without bar and chain
oil.
1. Loosen and remove the cap from the oil tank.
2. Put the oil into the oil tank.
3. Monitor the oil indicator to make sure that no dirt gets
into the oil tank while you add the oil.
4. Put the oil cap on.
5. Tighten the oil cap.
6. The whole oil tank will last for approximately 20- 40
minutes.
IMPORTANT
Do not use dirty, used or contaminated oil. Damage can
occur to the bar or chain.
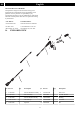
7.3 ASSEMBLE THE GUIDE BAR AND
THE CHAIN
Figure 10-14.
1. Remove the battery pack from the machine.
2. Remove the chain cover nuts with the wrench.
3. Remove the chain cover.
4. Put the chain drive links into the bar groove.
5. Put the chain cutters in the direction of the chain
operation.
6. Put the chain in position and make sure that the loop is
behind the guide bar.
7. Hold the chain and bar.
8. Put the chain loop around the sprocket.
9. Make sure the chain tension pin hole on the guide bar fits
correctly with the bolt.
10. Install the chain cover.
11. Tighten the chain. Refer to Adjust the chain tension.
12. Tighten the nuts when the chain is well tensioned.
NOTE
If you start the chain saw with a new chain, have a test for
2-3 minutes. After that, examine the tension again and
tighten the chain if necessary.
7.4 FIT THE POLE SAW
Figure 2-3
1. Mount the pole saw head on pole saw handle to achieve
the standard length.
2. Slide the collar upwards.
3. Turn the collar clockwise to tight it.
7.5 EXTENSION OF THE POLE SAW
Figure 2-3
1. Fit the extension pole between the pole saw handle and
the pole saw head to achieve the maximum length.
2. Slide the collars upwards.
3. Turn the collars clockwise to tight them.
WARNING
Periodically check the tightness of the connection of the
collars.
7.6 CUTTING PREPARATION
Figure 4
Before you start to cut, make sure that
• Wear heavy gloves for maximum grip and protection.
• Maintain a proper grip on the machine during operation.
• Use your right hand grip on the rear handle while
your left hand grip on the pole shaft.
• Keep your body to the left of the chain line.
8
English
EN