
Use and Care Manual


1. Loosen the chain cover by turning the chain cover knob
counterclockwise.
NOTE
It is not necessary to remove the chain cover to adjust the
chain tension.
2. Turn the chain tension screw behind the bar and chain
clockwise to increase the chain tension.
3. Turn the chain tension screw counterclockwise to
decrease the chain tension.
4. When the chain is at the wanted tension, tighten the chain
cover.
9.2 SHARPEN THE CUTTERS
Sharpen the cutters if it is not easy for the chain to go into the
wood.
NOTE
We recommend that a service center, which has an electric
sharpener, perform important sharpening work.
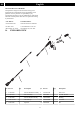
Figure 15-18.
1. Tensioning chain.
2. Sharpen the cutters corner with a 5/32 in. (4 mm)
diameter round file .
3. Sharpen the top plate, side plate and depth gauge with a
flat file.
4. File all the cutters to the specified angles and the same
length.
NOTE
During the process,
• Keep the file flat with the surface to be sharpened.
• Use the midpoint of the file bar.
• Use light but firm pressure when sharpening the
surface.
• Lift the file away on each return stroke.
• Sharpen the cutters on one side and then move to the
other side.
Replace the chain if:
• The length of the cutting edges is less than 5 mm.
• There is too much space between the drive links and the
rivets.
• The cut speed is slow
• Sharpening the chain many times but it does not increase
the cutting speed. The chain is worn.
9.3 GUIDE BAR MAINTENANCE
Figure 19-20.
NOTE
Make sure that it is turned over periodically to keep
symmetrical wear on the bar.
1. Lubricate the bearings on the nose sprocket (if present)
with the syringe (not included).
2. Clean the bar groove with the scraping hook (not
included).
3. Clean the lubrication holes.
4. Remove burr from the edges and level the cutters with a
flat file.
Replace the bar if:
• the groove is not fit with the height of the drive links
(which must never touch the bottom).
• the inside of the guide bar is worn and make the chain
lean to one side.
10 TRANSPORTATION AND
STORAGE
Before you move the machine, always
• Remove the battery pack from the machine.
• Keep hands clear of the lock-out button.
• Put the scabbard on the guide bar and the chain.
Before you put the machine into storage, always
• Remove the battery pack from the machine.
• Clean all unwanted material from the machine.
• Make sure that the storage area is
• Not available to children.
• Away from agents which can cause corrosion, such as
garden chemicals and de-icing salts.
11 TROUBLESHOOTING
Problem Possible cause Solution
The machine does
not start.
The poles are not
assembled cor-
rectly.
Assemble the
poles according to
the instructions.
The lock-out but-
ton and trigger are
not depressed at
the same time.
1. Push and hold
the lock-out
button
2. While you
hold the lock-
out button,
pull the trig-
ger.
3. Release the
lock-out but-
ton to start the
machine.
10
English
EN