
Product Manual


12
BATTERY CHARGER
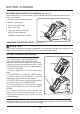
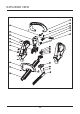
BECOME FAMILIAR WITH THE CHARGER
Before attempting to use this charger, become familiar with all of its operating features and
safety requirements.
1. Charging indicator reference chart
2. Battery compartment
3. Power source LED light
4. Power cord wrap
5. Two-stage indicator LED light
(RED indicates charging)
(GREEN indicates fully charged)
(See Figure 5.)
1
3
5
2
4
Fig. 5
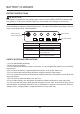
CHARGING THE BATTERY PACK
(See Figure 6)
W A R N I N G
If any part of the charger is missing or damaged, do not operate it until the part is repaired or re-
placed. Failure to heed this warning could result in possible serious injury.
BATTERY CHARGING PROCEDURE:
NOTE:
The battery is not shipped fully charged.
It is recommended to fully charge before rst
use to ensure that maximum run time can be
achieved. This lithium-ion battery will not develop
a memory and may be charged at any time. A fully
discharged battery pack will require approximately
4.5 hours to fully charge.
1. Plug the charger into an AC wall outlet/recep-
tacle.
2. The RED LED power indicator (1) will illuminate.
3. Insert the battery into the charger. Verify that
the battery is fully inserted into the charger.
4. The RED LED indicator (3) will illuminate indicat-
ing that the battery is in CHARGE MODE.
5. Once the battery has reached a full charge
level, the LED indicator (3) will switch from RED to
GREEN.
6. The battery may be removed or stored in the
charger once it is fully charged; however, it is rec-
ommended to disconnect the plug from the wall
outlet/receptacle.
2
1
3
NOTE:
Lithium-ion batteries while in use will continue to provide full power without power fade
unlike typical batteries; when the battery is fully discharged the battery circuitry will immediately
cut power to the tool and require immediate charging.
Fig. 6