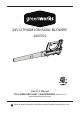
24V LITHIUM-ION AXIAL BLOWER 2400702 Owner’s Manual TOLL-FREE HELPLINE: 1-888-90WORKS (888.909.6757) www.GreenWorksTools.com Read all safety rules and instructions carefully before operating this tool.
CONTENTS Contents .............................................................................................................................. 2 Product specifications .......................................................................................................... 2 General safety rules .........................................................................................................3-5 Symbols ...............................................................................................
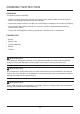
GENERAL SAFETY RULES WA R N I N G Read and understand all instructions before using this product. Failure to follow all instructions listed below may result in electric shock, fire, and/or serious personal injury. IMPORTANT SAFETY INSTRUCTIONS When using an electrical appliance, basic precautions should always be followed, including the following: READ ALL INSTRUCTIONS BEFORE USING (THIS APPLIANCE) • Use extra care when cleaning on stairs. • Do not use on outdoors or on wet surfaces.
GENERAL SAFETY RULES • Do not force the tool. Use the correct tool for your application. The correct tool will work more efficiently and safely when it is used at the rate that it was designed to work at. • Do not operate the equipment while barefoot or when wearing sandals or similar lightweight footwear. Wear protective footwear that will protect your feet and improve your footing on slippery surfaces. • Secure long hair so it is above shoulder level to prevent entanglement in any moving parts.
GENERAL SAFETY RULES • Do not expose a battery pack or appliance to fire or excessive temperature. Exposure to fire or temperature above 130°C may cause explosion. The temperature of 130°C can be replaced by the temperature of 265°F. • Have servicing performed by a qualified repair person using only identical replacement parts. This will ensure that the safety of the product is maintained.
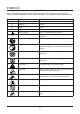
SYMBOLS Some of the following symbols may be used on this product. Please study them and learn their meaning. Proper interpretation of these symbols will allow you to operate the product better and safer. SYMBOL V NAME Volts DESIGNATION/EXPLANATION Voltage A Amperes Current W Watts Power Minutes Direct Current Per Minute Time Type or a characteristic of current Revolutions, strokes, surface speed, orbits etc.
SYMBOLS The following signal words and meanings are intended to explain the levels of risk associated with this product. SYMBOL SIGNAL MEANING DANGER Indicates an imminently hazardous situation, which, if not avoided, will result in death or serious injury. WARNING Indicates a potentially hazardous situation, which, if not avoided, could result in death or serious injury. CAUTION Indicates a potentially hazardous situation, which, if not avoided, may result in minor or moderate injury.
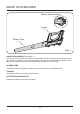
KNOW YOUR BLOWER Battery release button Trigger Blower Tube Fig. 1 KNOW YOUR BLOWER (See Figure 1.) The safe use of this product requires an understanding of the information on the product and in this operator’s manual as well as a knowledge of the project you are attempting. Before use of this product, familiarize yourself with all operating features and safety rules. BLOWER TUBE The blower tube can be easily installed on the blower without any additional tools.
ASSEMBLY INSTRUCTION UNPACKING This product requires assembly. • Carefully remove the product and any accessories from the box. Make sure that all items listed in the package contents section are included. • Inspect the product carefully to make sure no breakage or damage occurred during shipping. • Do not discard the packing material until you have carefully inspected and satisfactorily operated the product. • If any parts are damaged or missing, please call 1.888.909.6757 for assistance.
ASSEMBLY INSTRUCTION BATTERY IMPORTANT! The battery pack is not charged when it is purchased. Before using the blower for the first time, place the battery pack in the battery charger and charge. Make sure to read all safety precautions, and follow the instructions in the Battery Charger section. To remove (See Figure 2.) 1. Press and hold the latch button (1). 2. Grasp the handle firmly. Pull the battery pack out of the handle.
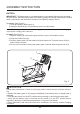
ASSEMBLY INSTRUCTION BLOWER TUBE ASSEMBLY WA R N I N G To prevent accidental start-up that could cause serious personal injury, always remove the battery pack from the tool when assembling parts. 1. Align either of the grooves in the tube with the tabs on the blower housing. Push the tube into the blower housing until the tab engages the grooves.(See Figure 3.) Tube Groove Tab Fig. 3 2. Turn the tube clockwise until both of the tabs slide into the lock positions.(See Figure 4.) Fig.
ASSEMBLY INSTRUCTION B A Tab Hole Fig. 5 3. To install Tube A on to tube B align the tab on Tube B with the hole on Tube A. Once aligned slide tube A on to B until secured in to place.(See Figure 5.
OPERATION WA R N I N G Do not allow familiarity with this product to make you careless. Remember that a careless fraction of a second is sufficient to inflict serious injury. WA R N I N G Always wear eye protection with side shields marked to comply with ANSI Z87.1, along with hearing protection. Failure to do so could result in objects being thrown into your eyes and other possible serious injuries.
OPERATION STARTING/STOPPING THE BLOWER (Fig.6) • • • Ensure that the battery is installed in the blower. Squeeze the trigger to start the blower. Release the trigger to stop. Trigger Fig.6 OPERATING THE BLOWER • • • • • • To keep from scattering debris, blow around the outer edges of a debris pile. Never blow directly into the center of a pile. To reduce sound levels, limit the number of pieces of equipment used at any one time. Use rakes and brooms to loosen debris before blowing.
MAINTENANCE WA R N I N G In order to avoid personal injury and the risk of fire and electric shock, remove the battery pack before adjusting, inspecting, or cleaning the blower. CLEANING Remove the battery pack. 1. Brush or blow dust and debris out of the air vents using compressed air or a vacuum. Keep the air vents free of obstructions, sawdust, and wood chips. Do not spray, wash, or immerse the air vents in water. 2. Wipe off the housing and the plastic components using a moist, soft cloth.
MAINTENANCE BATTERY CHARGER CHARGING PROCEDURE use to ensure that maximum run time can be achieved. This lithium-ion battery will not develop a memory and may be charged at any time. A fully discharged battery pack will require approximately 90 minutes to fully charge from a discharged state. 1. Plug the charger into an AC power outlet. 2. Insert the battery pack (1) into the charger (2). (3) communicate the current battery status.
MAINTENANCE CHECKING THE CHARGE If the battery pack does not charge properly: • Check the current at the power outlet with another tool. Make sure that the outlet is not turned off. • Check that the charger contacts have not been shorted by debris or foreign material. • If the surrounding air temperature is not normal room temperature, move the charger and battery pack to a lockation where the temperature is between 45°F and 104°F.
ENVIRONMENTALLY SAFE BATTERY DISPOSAL The batteries used in this blower's battery pack contain the following toxic and corrosive material: LITHIUM-ION. WA R N I N G All toxic materials must be disposed of in a specified manner to prevent contamination of the environment. Before disposing of damaged or worn out Lithium-Ion battery packs, contact your local waste disposal agency, or the local Environmental Protection Agency for information and specific instructions.
TROUBLESHOOTING PROBLEM POSSIBLE CAUSE SOLUTION Motor fails to start when switch trigger is depressed. Battery is not secure. To secure the battery pack, make sure the latches on the top of the battery pack snap into place. Battery is not charged. Charge the battery pack according to the instructions included with your model. Unit will not start. Defective power switch. Return to place of purchase or return the unit to a repair center. Unit will not blow. Blocked tube. Clear the blockage.
LIMITED FOUR-YEAR WARRANTY GREENWORKS™ hereby warranties this product, to the original purchaser with proof of purchase, for a period of four (4) years against defects in materials, parts or workmanship. GREENWORKS™, at its own discretion will repair or replace any and all parts found to be defective, through normal use, free of charge to the customer.
EXPLODED VIEW 1 2 3 6 5 7 4 21
PARTS LIST ITEM NO. 1 2 3 4 5 6 7 PART NO.
Greenworks Tools PO Box 1238 Mooresville, NC 28115 TOLL-FREE HELPLINE: 1-888-90WORKS (888.909.