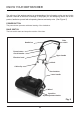
4" 10A ELECTRIC DETHATCHER 27022 Owner’s Manual TOLL-FREE HELPLINE: 1-888-90WORKS (888.909.6757) Read all safety rules and instructions carefully before operating this tool.
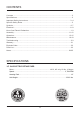
CONTENTS Contents............................................................................................................................... 2 Specifications....................................................................................................................... 2 Important Safety Instructions.............................................................................................3 - 4 Specific Safety Rules................................................................................
IMPORTANT SAFETY INSTRUCTIONS WA R N I N G TO AVOID MISTAKES THAT COULD CAUSE SERIOUS INJURY, DO NOT PLUG IN THE DETHATCHER UNTIL THE FOLLOWING STEPS HAVE BEEN READ THOROUGHLY. • Read and become familiar with this entire instruction manual. Learn the tool’s applications, limitations, and possible hazards. • Avoid dangerous conditions. Do not use in wet or damp areas or expose to rain. • Do not use in the presence of flammable liquids or gases. • Keep bystanders at a safe distance.
IMPORTANT SAFETY INSTRUCTIONS WA R N I N G ONLY USE IDENTICAL REPLACEMENT PARTS WHEN SERVICING. TOLL-FREE HELPLINE: at 1-888-909-6757 (1-888-90WORKS). WA R N I N G ALWAYS WEAR EYE PROTECTION. This tool can eject foreign objects into your eyes, posing the risk of permanent eye damage. Always wear safety goggles (not glasses). Ordinary eyeglasses have only impact-resistant lenses-they are not safety goggles.
SPECIFIC SAFETY RULES • Do not use the dethatcher in the rain or in moist, wet conditions. • Do not work close to the edge of swimming pools or garden ponds. • Please observe any local noise restrictions. • Always wear eye protection. • Wear a dust mask. Soil mixed with fertilizers may cause harmful chemicals to be inhaled.
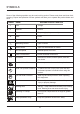
SYMBOLS Some of the following symbols may be used on this product. Please study them and learn their meaning. Proper inter-pretation of these symbols will allow you to operate the product better and safer.
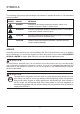
SYMBOLS The following signal words and meanings are intended to explain the levels of risk associated with this product. SYMBOL SIGNAL MEANING DANGER Indicates an imminently hazardous situation, which, if not avoided, will result in death or serious injury. WARNING Indicates a potentially hazardous situation, which, if not avoided, could result in death or serious injury.
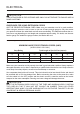
ELECTRICAL WA R N I N G THIS DETHATCHER IS FOR OUTDOOR USE ONLY. DO NOT EXPOSE TO RAIN OR USE IN DAMP LOCATIONS. GUIDELINES FOR USING EXTENSION CORDS USE THE PROPER EXTENSION CORD. Make sure your extension cord is in good condition. When using an extension cord, be sure to use one of heavy enough gauge to carry the current your product will draw. An undersized cord will cause overheating. The table below shows the correct size to use depending on cord length and nameplate ampere rating.
ELECTRICAL WA R N I N G CHECK EXTENSION CORDS BEFORE EACH USE. IF DAMAGED REPLACE IMMEDIATELY. NEVER USE TOOL WITH A DAMAGED CORD SINCE TOUCHING THE DAMAGED AREA COULD CAUSE ELECTRICAL SHOCK RESULTING IN SERIOUS INJURY. ELECTRICAL CONNECTION This tool is powered by a precision built electric motor. It should be connected to a power supply that is 120 volts, 60 Hz, AC only (normal household current). Do not operate this tool on direct current (DC).
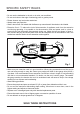
KNOW YOUR DETHATCHER The safe use of this product requires an understanding of the information on the tool and in this operator’s manual as well as a knowledge of the project you are attempting. Before use of this product, familiarize yourself with all operating features and safety rules. (See Figure 2) POWER BUTTON The power button prevents accidental starting of the dethatcher. BALE SWITCH The bale switch starts and stops the rotation of the tines.
ASSEMBLY UNPACKING • This product requires assembly. WA R N I N G This new product has been shipped in a partially assembled condition as described below. Carefully check the packing list below to ensure all items are included in the package; the packing list describes all loose items that are not assembled to the product as shipped. Do not operate the product if any packing list items are already assembled to your product when you unpack it. Call the customer service number below for assistance.
ASSEMBLY INSTALLING THE LOWER HANDLE (See Figure 3.1) • Insert the lower handle (2) into the housing hole. Place rubber pad (1) between the housing and lower handle. • Using the supplied screws (3), fasten the lower handle to the housing using a star-shaped screwdriver, not supplied. 2 1 Fig. 3.2 3 2 1 Fig. 3.1 Fig. 3 INSTALLING THE UPPER HANDLE (See Figure 3.2) • Position the upper handle so the holes line up with the lower handle holes.
OPERATION STARTING AND STOPPING THE DETHATCHER (See Figure 4) i M P O R TA N T Prior to dethatching the lawn, the lawn should be mowed to a height of approx. 2” (0.05 m). Doing this will lengthen the life span of the tines and prevent unnecessary motor overload on the dethatcher. STARTING THE DETHATCHER • Plug the dethatcher into an approved outdoor extension cord. • Press and hold the Power button (1). This makes the bale switch operational. • Pull the bale switch (2) upward to the handlebar to operate.
OPERATION USING THE CORD RETAINER (See Figure 5) This dethatcher is equipped with a cord retainer in order to prevent the extension cord from disconnecting from the power cord while the mower is in use. The cord retainer hangs from the cord guide bar. NOTE: Do not plug the extension cord into the outlet until it has been connected to the cord retainer and plugged into the mower. To use the cord retainer: • Fold the extension cord in order to forming a tight loop near the retainer.
OPERATION ADJUSTING THE DETHATCHER DEPTH (See Figure 6) C A U T I O N BEFORE YOU ADJUST THE DETHATCHER DEPTH, TURN OFF THE POWER, UNPLUG THE TOOL AND ENSURE THE MOTOR HAS STOPPED. • The dethatcher depth is adjusted by turning the hubcaps. You can choose from three different depth settings by pulling out and turning hubcaps. • When setting “I” is at the bottom, the high setting is locked in. The dethatcher depth is approx 1 mm above the ground. Select depth setting “I” when transporting the dethatcher.
MAINTENANCE The dethatcher cylinder can cause injuries! Prior to making adjustments, unplug unit and wait until the dethatcher cylinder has stopped. Wear heavy-duty work gloves when making adjustments. If the dethatcher cylinder is not yet worn but individual springs have broken, these must be replaced. Only identical replacement springs may be used. Toll-free helpline: 1-888- 909-6757. REPLACING THE TINES (See Figure 7 - 8.) • Disconnect dethatcher from power source. • Turn the dethatcher over.
MAINTENANCE REPLACING THE TINES (See Figure 9) • Remove the tine cartridge as demonstrated on page 16. • Secure tine cartridge on a workbench. • Push out the pin using a screwdriver (Not Supplied). This may require the use of a rubber mallet if more strength is required. • Remove and discard the worn/broken tines. • Replace the tine into position and slide the pin back into place pressing the pin against a solid surface to pressure it back into place. Spring Pin Fig.
MAINTENANCE DANGER! THE DETHATCHER CYLINDER CAN CAUSE INJURIES. Prior to maintenance, unplug from the power source and wait until the dethatcher cylinder has stopped. Wear heavy-duty gloves for performing maintenance. The lawn dethatcher should be cleaned after each use. WA R N I N G WHEN SERVICING, USE ONLY IDENTICAL REPLACEMENT PARTS. USE OF ANY OTHER PARTS MAY CREATE A HAZARD OR CAUSE PRODUCT DAMAGE. WA R N I N G ALWAYS WEAR SAFETY GOGGLES OR SAFETY GLASSES WITH SIDE SHIELDS DURING PRODUCT OPERATION.
MAINTENANCE Risk of injury and physical damage! Do not clean the lawn dethatcher under running water (particularly under high pressure). Do not use hard or pointed objects for cleaning the lawn dethatcher. To save space, the lawn dethatcher can be folded up for storage by releasing the wing nuts. Take care during this process that the power cable does not become trapped. Store the lawn dethatcher in a dry, closed room to which children cannot gain access.
TROUBLESHOOTING PROBLEM POSSIBLE CAUSE SOLUTION Abnormal noise. Foreign objects on the dethatcher cylinder are hitting 1. Switch off the dethatcher, remove the power cord from the outlet and wait until the cylinder has stopped rotating. Clattering in the unit. Foreign objects blocking the Whistling sound. dethatching cylinder. 1. Remove foreign objects. 2. Check the dethatcher immediately. Whistling sound. Cog belt slipping. 1. Contact an authorized service centre. Motor will not start.
LIMITED FOUR-YEAR WARRANTY GREENWORKS™ hereby warranties this product, to the original purchaser with proof of purchase, for a period of four (4) years against defects in materials, parts or workmanship. GREENWORKS™, at its own discretion will repair or replace any and all parts found to be defective, through normal use, free of charge to the customer.
EXPLODED VIEW 22
PARTS LIST ITEM NO. 1 2 3 4 5 5-1 5-2 5-3 5-4 5-5 6 7 8 9 10 11 12 13 14 15 16 17 18 19 20 21 22 23 24 25 26 PART NO. 60-3864-1 60-3864-2 60-3864-3 60-3864-4 60-3864-5 60-3864-5-1 60-3864-5-2 60-3864-5-3 60-3864-5-4 60-3864-5-5 60-3864-6 60-3864-7 60-3864-8 60-3864-9 60-3864-10 60-3864-11 60-3864-12 60-3864-13 60-3864-14 60-3864-15 60-3864-16 60-3864-17 60-3864-18 60-3864-19 60-3864-20 60-3864-21 60-3864-22 60-3864-23 60-3864-24 60-3864-25 60-3864-26 DESCRIPTION Housing Cover for motor Motor assy.
NOTES 24
NOTES 25
TOLL-FREE HELPLINE: 1-888-90WORKS (888.909.