
User manual


E44.X.00.6C-02 Connection and operating manual GIR 300 page 11 of 28
5 Configuration
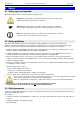
Please note: When you are configuring the device and don’t press any button for more than 60 sec.
the configuration of the device will be cancelled. The changes you made will not be
saved and will be lost!
Hint: The buttons 2 and 3 are featured with a ‘roll-function‘. When pressing the button once the value will be
raised (button 2) by one or lowered (button 3) by one.
When holding the button pressed for longer than 1 sec. the value starts counting up or down, the counting
speed will be raised after a short period of time.
The device also features a ‘overflow-function‘, when reaching the upper limit of the range, the device
switches to the lower limit, vice versa.
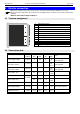
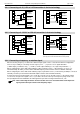
5.1 Selecting an input signal type
- Turn the device on and wait until it completed its built-in segment test.
- Press button 2 for >2 sec. (e.g. with a small screw driver)
The device displays “InP“ ('INPUT').
- Use button 2 or button 3 (middle or right button) to select the input
signal (see table below).
- Validate the selection with button 1 (the left button). The display will
show “InP“ again
Depending on the selected input signal, additional configurations will be needed.
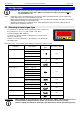
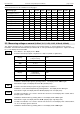
Input type
Input Signal
To select as
input
proceed in chapter
Voltage signal
0 – 10 V
U
5.2
0 – 2 V
0 – 1 V
0 – 50 mV
Current signal
4 – 20 mA
I
5.2
0 – 20 mA
RTD
Pt 100
T.RES
5.3
Pt 1000
Thermocouples
NiCr-Ni (type K)
T.TC
5.3
Pt10Rh-Pt (type S)
NiCrSi-NiSi (type N)
Fe-CuNi (type J)
Cu-CuNi (type T)
Frequency
TTL-signal
FREQ
5.4
Switch-contact NPN, PNP
Rotation
TTL-signal
RPN
5.5
Switch-contact NPN, PNP
Counter up
TTL-signal
[O.VP
5.6
Switch-contact NPN, PNP
Counter down
TTL-signal
[O.DN
5.6
Switch-contact NPN, PNP
Interface mode
Serial interface
SER,
5.7
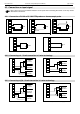
Please note: When changing the measuring mode “InP“, the input signal “SEnS“ and the display-unit “Unit“
all settings will be changed to factory default. You have to set all the other settings.
This also regards the settings for offset and slope-adjustment as well as the switching points!
button 1 button 2 button 3