
User manual


E44.X.00.6C-02 Connection and operating manual GIR 300 page 22 of 28
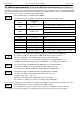
6.1 2-point-controller, 3-point-controller
This chapter describes how to configure the device as a 2-point-controller or 3-point-controller.
This instruction demands that you selected “2P“ or “3P“ as your desired output function like it is explained in chapter 5.8.
- Press button 1 (when not already done).
The device will be displaying “1.on“ (turn-on-point of output 1).
- Use button 2 and button 3 to set the desired value, the device’s output 1 should be turning on.
- Press button 1 to validate your selection. The display shows “1.on“ again.
- When pressing button 1 again, the device will be displaying “1.off“. (turn-off-point of output 1)
- Use button 2 and button 3 to set the desired value, the device’s output 1 should be turning off.
- Press button 1 to validate your selection. The display shows “1.off“again.
Example: You want to control the temperature of a heating coil, with a hysteresis of +2°C, to 120°C.
Therefore you will have to select the turn-on-point “1.on“ to 120°C and the turn-off-point to
“122°C“.
When your heating coil temperature falls below 120°C it will be turned on. When the tem-
perature rises above 122°C the heating coil will be turned off.
Note: Depending on the inertia of your heating coil an overshooting of the temperature may be possible.
When selected ‘2-point-controller‘ you finished configuring your device. Press button 1 to switch over to display the
measuring value.
When selected ‘3-point-controller‘ please follow the instructions given below:
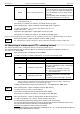
- Press button 1 (when not already done). The device will be displaying “2.on“ (turn-on-point of output 2).
- Use button 2 and button 3 to set the desired value, the device’s output 2 should be turning on.
- Press button 1 to validate your selection. The display shows “2.on“ again.
- When pressing button 1 again, the device will be displaying “2.off“. (turn-off-point of output 2)
- Use button 2 and button 3 to set the desired value, the device’s output 2 should be turning off.
- Press button 1 to validate your selection. The display shows “2.off“again.
Now you finished configuring your device. Press button 1 to switch over to display the measuring value.
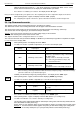
6.2 2-point-controller with alarm fuction
This chapter describes how to configure the device as a 2-point-controller with alarm function.
This instruction demands that you selected “2P.AL as your desired output function like it is explained in chapter 5.8.
- Press button 1 (when not already done).
The device will be displaying “1.on“ (turn-on-point of output 1).
- Use button 2 and button 3 to set the desired value, the device’s output 1 should be turning on.
- Press button 1 to validate your selection. The display shows “1.on“ again.
- When pressing button 1 again, the device will be displaying “1.off“. (turn-off-point of output 1)
- Use button 2 and button 3 to set the desired value, the device’s output 1 should be turning off.
- Press button 1 to validate your selection. The display shows “1.off“again.
Example: You want to control the temperature of a cooling chamber between –20°C and –22°C.
Therefore you will have to select –20°C for the turn-on-point 1 “1.on“ and –22°C for the
turn-off-point 1 “1.off“. When the temperature rises above –20°C the device turns its output
1 on, when falling below –22°C the device will turn its output 1 off.
Note: Depending on the inertia of your cooling circuit an overshooting of the temperature may be possible.
- When pressing button 1, the device will be displaying “AL.Hi“. (maximum alarm-value)
- Use button 2 and button 3 to set the desired value, the device should turn on its maximum-alarm.
- Press button 1 to validate your selection. The display shows “AL.Hi“ again.
- When pressing button 1 again, the device will be displaying “AL.Lo“. (minimum alarm-value)
- Use button 2 and button 3 to set the desired value, the device should turn on its minimum-alarm
- Press button 1 to validate your selection. The display shows “AL.Lo“ again.
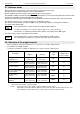
1.ON
1.OFF
2.ON
2.OFF
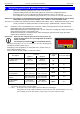
1.ON
1.OFF
AL.K,
AL.LO