
User Manual


5
the possible need of truss rod adjustments.
A guitar in need of an adjustment that is
ignored may develop permanent problems.
(See page 14.)
Please Note: Warpage of the
neck, caused by the neglect of necessary
adjustments will not be covered under the
Gretsch warranty.
Changing Strings
A fresh set of strings can breathe new life
into your instrument. That is why many
“tone-conscious” touring professionals
change their strings before every
performance. While there is no set rule on
how often to change strings, we have found
that most players do not change them nearly
as often as they should.
Body oils, acids from sweaty hands and
humidity all interact with the metals in guitar
strings and cause a corrosion and breakdown
of the materials.
Don’t wait until your strings break and fall
off from old age before you change them.
Worn, oxidized, pitted and dirty strings will
not hold pitch, and simply sound bad. If you
are an average player, playing several times a
week, we suggest that you change the strings
at least once a month.
When changing strings, we recommend that
you remove and replace each string one at a
time, instead of all at once. This will prevent
sudden and potentially damaging changes
in neck tension. Each new string should be
tuned up to correct pitch before the next one
is removed.
When tuning a brand new string, always
bring it up to pitch
slowly.
Otherwise, the
rapid stretching may cause the string to
break.
Re-Stringing Your Guitar
with a Fixed Tailpiece
The procedure for re-stringing acoustic
guitars, electric guitars and basses, is quite
similar in the way the strings are wound onto
the tuning machines. There are differences
though, in how the strings are attached to the
bridges of acoustic and electric guitars.
Gretsch
®
at-top acoustics have a pin style
bridge with holes and bridge pins to hold the
strings in place. The predominant setup for
Gretsch electric guitars is the oating bridge
paired with the Bigsby Vibrato Tailpiece.
There are also some acoustics and electrics
that have xed tailpieces through which the
strings are fed.
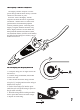
To string a at-top, remove the bridge pin
and the old string, drop the ball end of the
new string into the hole in the bridge, then
re-insert the bridge pin to keep the string
in place. Make sure that the bridge pin is
positioned with the groove over the string.
Do not hammer the bridge pin in. A rm push
with the thumb will secure it in place.
To string an electric with a surface mounted
bridge and xed tailpiece, simply feed the
string through the appropriate hole in the
bridge or slot in the tailpiece.
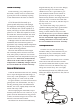
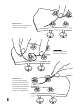
To attach a string to the machine head,
thread it through the hole or slot on the
machine head, running it halfway around the
post, then underneath the main length of the
string. Next, pull the string end back over the
main length.
See illustrations 1, 2 and 3.
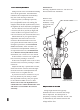
Make sure that each string is seated well,
stretched and snugged down on the tuning
machine post. This will prevent slipping and
save you some tuning frustrations down the
road.
Note: Never cut a string to length before
putting it on your guitar and tuning it to
pitch. Premature cutting may cause the
string to unwrap and become useless.
Crimp the string rst, then clip near the
machine head post.
IMPORTANT NOTE FOR RE-
STRINGING A GUITAR WITH A
FLOATING BRIDGE:
Change the strings
one at a time only. Do not remove all of the
strings at the same time, as the bridge is held
into its proper position by the downward
pressure of the strings.