
Installation & Assembly
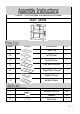
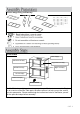
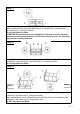
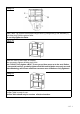
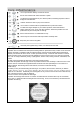
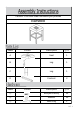
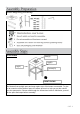
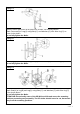
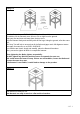
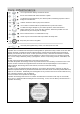
Table Of Contents

Step 3
Step 1
Open the carton and place all the parts onto a clean, non-marring surface.
Attach Left Back Pannel (D)to Right Back Pannel (E) using Bolts(①) and Washers(②)
with Allen Key(③) as the picture show.
DO not fully tigthen the Bolts.
ATTENTION: Occasionally some of the PE Wicker shifts and covers the mounting
positions preventing easy assembly. The PE wicker should never be cut, but moved
away from the mounting positions.
Step 2
Attach Right Pannel (C) to Right Back Pannel (D) and (B)Left Back Pannel (C)
Bolts(①) and Washers(
②
) with Allen Key(③) as the picture show.
DO not fully tigthen the Bolts.
Step3.1Attach Middle Panel (F) &Left Panel( B) and Right Panel(C) using Bolts(
①
Allen Key(
③
) as the picture show.
Step3.2Attach Bottom Panel (G)& using Bolts(
①
) and
②
Allen Key(
③
) as the picture show.
DO NOT fully tigthen the Bolts.
Step3.1
Step3.2
3 OF 4
D
E
C
D
E
Left Pannel
using
C
F
C
G
) with
②
Washers(
) and
with
Left Panel( B) and Right Panel
Washers( )
(C)