
User's Guide
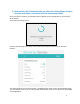
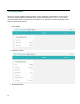
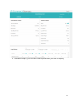

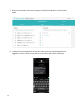

Table Of Contents
- Provisioning the Smart Power Cord to ConnectSense Cloud.
- 1.1 Overview of the ConnectSense Smart Power Cord
- 1.2 Setup Steps
- 1.3 Create an Account on the ConnectSense Cloud application
- 1.4 Connecting the Smart Power Cord to the Network
- 1. Select the “+” in the top left-hand pane to ADD a Smart Power Cord to the account
- 2. Press and hold the push button for 15 seconds on the Smart Power Cord
- 3. Click Next on the screen
- 4. Now, use your host computer to scan for available networks and then change the Wi-Fi connection to the network (SoftAP on the Smart Power Cord) named “CS-CORD-XXXXX” (where XXXXX is the unique serial number for each Smart Power Cord)
- 5. Now select a Wi-Fi network that you want the Smart Power Cord to use that will allow a connection to the Internet and AWS.
- 1.5 Display Modes
- 1. Appliance Mode
- 2. Advanced Mode
- 3. Available Graphs, you can select which parameters you wish to display
- 4. Power Signature shows the real-time data
- 5. Rules for shut down of the device (power on/off) and notification via text and/or email
- 6. Sample Text message which shows the name of the cord and parameter that trigged the event, note the relay and be turned off as part of the notification.
- 7. Settings - Change the name of the Cord, the reporting frequency, or removing a device
- 8. Power Signature shows in this example – Voltage and Current
- 9. Displaying the variables about your cord

8
4. Now, use your host computer to scan for available networks and
then change the Wi-Fi connection to the network (SoftAP on the
Smart Power Cord) named “CS-CORD-XXXXX” (where XXXXX is
the unique serial number for each Smart Power Cord)
When the Smart Power Cord gets a connection to the SoftAP, it will use its client station radio to
perform a Wi-Fi scan of the environment and the screen will change to show all of the Access
Points that it can see. The screen will change as shown: