
User's Guide
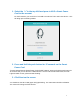
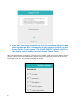
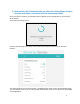
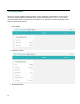
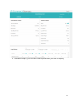
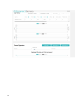

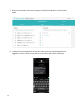

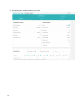
Table Of Contents
- Provisioning the Smart Power Cord to ConnectSense Cloud.
- 1.1 Overview of the ConnectSense Smart Power Cord
- 1.2 Setup Steps
- 1.3 Create an Account on the ConnectSense Cloud application
- 1.4 Connecting the Smart Power Cord to the Network
- 1. Select the “+” in the top left-hand pane to ADD a Smart Power Cord to the account
- 2. Press and hold the push button for 15 seconds on the Smart Power Cord
- 3. Click Next on the screen
- 4. Now, use your host computer to scan for available networks and then change the Wi-Fi connection to the network (SoftAP on the Smart Power Cord) named “CS-CORD-XXXXX” (where XXXXX is the unique serial number for each Smart Power Cord)
- 5. Now select a Wi-Fi network that you want the Smart Power Cord to use that will allow a connection to the Internet and AWS.
- 1.5 Display Modes
- 1. Appliance Mode
- 2. Advanced Mode
- 3. Available Graphs, you can select which parameters you wish to display
- 4. Power Signature shows the real-time data
- 5. Rules for shut down of the device (power on/off) and notification via text and/or email
- 6. Sample Text message which shows the name of the cord and parameter that trigged the event, note the relay and be turned off as part of the notification.
- 7. Settings - Change the name of the Cord, the reporting frequency, or removing a device
- 8. Power Signature shows in this example – Voltage and Current
- 9. Displaying the variables about your cord

10
1.5 Display Modes
There are currently 3 different display Modes – Pump, Appliance and Advanced. Each of these
modes will display different information about the device attached to the cord. You can select
more information about each device by selecting the cord. Below are the different display modes
and more information screens.
Pump Mode
1. Appliance Mode
2. Advanced Mode