
User's Guide

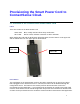
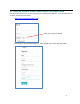

Table Of Contents
- Provisioning the Smart Power Cord to ConnectSense Cloud.
- 1.1 Overview of the ConnectSense Smart Power Cord
- 1.2 Setup Steps
- 1.3 Create an Account on the ConnectSense Cloud application
- 1.4 Connecting the Smart Power Cord to the Network
- 1. Select the “+” in the top left-hand pane to ADD a Smart Power Cord to the account
- 2. Press and hold the push button for 15 seconds on the Smart Power Cord
- 3. Click Next on the screen
- 4. Now, use your host computer to scan for available networks and then change the Wi-Fi connection to the network (SoftAP on the Smart Power Cord) named “CS-CORD-XXXXX” (where XXXXX is the unique serial number for each Smart Power Cord)
- 5. Now select a Wi-Fi network that you want the Smart Power Cord to use that will allow a connection to the Internet and AWS.
- 1.5 Display Modes
- 1. Appliance Mode
- 2. Advanced Mode
- 3. Available Graphs, you can select which parameters you wish to display
- 4. Power Signature shows the real-time data
- 5. Rules for shut down of the device (power on/off) and notification via text and/or email
- 6. Sample Text message which shows the name of the cord and parameter that trigged the event, note the relay and be turned off as part of the notification.
- 7. Settings - Change the name of the Cord, the reporting frequency, or removing a device
- 8. Power Signature shows in this example – Voltage and Current
- 9. Displaying the variables about your cord

2
SoftAP
The ConnectSense Smart Power Cord has an internal Wi-Fi radio. The Wi-Fi can be used in 2
different modes:
Client Station mode – to connect to network Access Points (APs)
SoftAP mode – allows host computers to connect to it for configuration
For provisioning the Smart Power Cord to the cloud, we use the “SoftAP” or soft access point.
The use of the SoftAP is temporary and is only enabled during the provisioning process. To
Provision the Smart Power Cord to the ConnectSense Cloud, you need to make a Wi-Fi
connection from a host computer to the SoftAP wireless connection in the Smart Power Cord.
Once the Smart Power Cord is connected to the cloud, the SoftAP is disabled for security.
1.2 Setup Steps
Follow this Quick Start guide to get your unit up and running quickly.
• To follow along with this document, you will need a ConnectSense Smart Power
Cord (SC) and a small load like a fan or light bulb. (See section 1.7)
The setup procedure consists of the following steps:
1. Connect the Smart Power Cord to the wall outlet to power the unit. In this example
you are connecting to the 120VAC power, the cord will handle up to 240VAC.
2. Plug a test device that you want to monitor/control into the other end of the Smart
Power Cord.
3. Using a host computer, sign into the ConnectSense Cloud application using a Web
Browser.
4. Hold down the push button for roughly 15 seconds to reset the Smart Power Cord
to default configuration and put the Wi-Fi interface into SoftAP mode so that it can
be provisioned onto the customers ConnectSense cloud application.
5. Connect a Host computer’s Wi-Fi interface to the SoftAP interface of the cord that
you want to provision.
6. The Smart Power cord will sense the SoftAP connection and then perform a scan
of the Wi-Fi environment to find an Access Point to connect it to the internet and
AWS.
7. Select the network and provide the passphrase key. The Smart Power Cord will
associate with the AP and make a secure network connection to AWS.
8. The Smart Power Cord is now connected.