
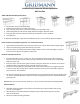
Instructions / Assembly

Stainless Steel Commercial Kitchen Equipment
NSF Certified
Table and Sink Assembly Instructions:
1. Lay the top on the ground, upside down.
2. Remove black leg caps from sockets and discard.
3. Insert each leg, one at a time, into place and tighten the allen/hex screws.
4. (Tables Only) Slide the shelf into the height desired and tighten allen/hex screws.
5. Snap gray plastic feet to the bottom of each leg. See below for caster installation.
6. Turn table over.
To adjust the shelf height, simply loosen the allen/hex screws, move position of shelf and retighten.
Caster Assembly and Installation (optional – for models with casters):
1. Tighten down the adjustment ring on the top of each caster until the black rubber expands slightly.
2. Loosen and remove the gray feet from the legs of the unit.
3. Insert the caster into the leg and tap with a rubber mallet to secure. Note: The higher the caster is
inserted into the leg pole, the tighter it will become.
Pan Rack Assembly Instructions:
1. Arrange frames with runners on their side. The rack shelves should be facing toward each other.
Insert the cross bar post into the square opening on the bottom of the panels (non-rounded edge).
Repeat for other side.
2. Insert the casters into the opening at the bottom of the posts. Attach the "U" washers on the panel
and tighten down using bolts by inserting through the post and caster.
3. Locate the cross bars with pre-drilled holes in the end and place it between the upright rack panels
at the top of the rack. Arrange the "U" washer around the frame and secure with bolts. Repeat for
second cross bar. See illustration.
For maximum lifespan of your commercial equipment it is recommended to clean and dry off after each
use. Do not use harsh chemicals or abrasives or allow standing liquids to pool on surface for extended
periods of time.
Tip! Bolt holes may not line up exactly. If this occurs, use a wrench to twist the bolt through the holes.
Shelf Installation:
1. Assemble mounting brackets to the bottom of the shelf by securing the brackets with the cap
nuts. Do not overtighten.
2. Hold shelf level on the wall at the desired height location. Mark wall through the mounting
holes on the brackets.
3. Mount to wall with mounting hardware.