
user manual
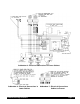

Drive Belt Adjustment
CAUTION: Unplug the machine before performing any adjustments.
Check the belt tension quarterly. Proper belt tension is ½" deflection
measured mid way between the drive and driven pulleys. If the deflection is
more than ½" adjust the motor height to achieve proper tension using the
following procedure:
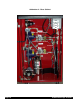
1) Unplug the unit and remove the side and rear panels.
2) Locate the motor flange bearings (W0380009) located at each end of
the drive motor. Two bearings support the motor, one on the shaft at
each end of the motor. The bearings are secured to the motor cradle
using two Allen bolts on each bearing.
3) Loosen all four bearing Allen bolts. NOTE: Do not loosen the setscrews
that hold the bearing collars to the motor shaft.
4) Lower or raise the motor as needed to achieve proper belt tension. The motor must be kept level from front
to back. NOTE: Excessive belt wear and belt noise can occur if the motor is not kept level.
5) Tighten all four Allen bolts down.
6) Align the driven motor pulley with the top driven pulley if needed. Use a straight edge along the top pulley. If the
pulleys are not in alignment, remove the setscrew from the pulley and move either in or out as needed.
NOTE: Use non-permanent Loc-Tite on the driven pulley setscrew and tighten down on the flat of the motor shaft.
Page 14 Crathco Beverage Freezers
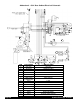
Lubricating Plunger O-Rings
1) Close syrup and alcohol manual control valves located in the back compartment of the lower cabinet.
2) Place freezer in "CLEAN" position.
3) Drain freeze cylinder while purging with carbonated water.
4) Turn freezer control switch to the "OFF" position.
5) Vent pressure and drain completely.
6) Remove dispensing valve plunger.
a) Remove valve handle retaining pin.
b) Push plunger up and remove handle.
c) Pull plunger down.
7) Remove "O" Rings and clean "O" Ring grooves.
8) Replace "O" Rings.
9) Lubricate the "O" Rings on the plunger and the area inside of the clear plastic valve body where the plunger
"O" Rings make contact with the valve body using silicone lubricant.
10) Replace Plunger assembly.
a) Place spring on top of plunger.
b) Place plunger in valve body making sure that the handle opening faces forward.
c) Push up on plunger and replace handle.
d) Insert handle retaining pin.
e) Sanitize unit following instructions in manual.
11) Refill unit following instructions in manual.
Note: Plunger o-rings, face plate quad ring, shaft seal set, motor belt, etc. should be replaced annually.
Changing Back Lit Sign Merchandiser Bulb
1) Remove the two screws, located on the top on either side of the sign.
2) Lower the metal enclosure that frames the merchandiser insert.
3) Pull merchandiser enclosure down and out.
4) Replace bulb inside.
5) Reassemble.
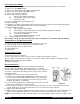
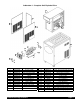
Cleaning Condenser Coil
1) Turn machine "OFF".
2) Remove both freezer side panels.
3) Place a wet towel on the inlet side of the condenser (right side facing front of freezer).
4) Use compressed air to blow out condenser coils from the exhaust side of condenser coil (fan motor side).
NOTE: Follow all health and safety standards.
5) Replace side panels.
Figure 18