
Instructions / Assembly


1. Measure the height of the opening where the door is
to be installed.
2.
3.
Place the door into the opening making sure it is leveled
and plumb.
6.
Install Lock: European slim line lock included.
(See instructions inside the lock box).
7.
9.
11.
8.
10.
12.
Note: It is suggested that the closer be mounted on the top
portion of the door frame. (Can be mounted in the
center of the door if preferred.)
NOTE:
4.
5.
(Use the installation screws provided.)
Installation Instructions:
If necessary to reverse door hinging, please follow
hinge side conversion instructions first.
Reversible sizes: (30" 32" 34" and 36" x 80"). No Z-bar cuts can be made prior to hinge
reversing process.
Note: In some homes the door frame mounting surface may NOT be plumb and square, and may require the
use of wood shims to build out, and equally an area may require the removal of surface material to properly
complete the installation.
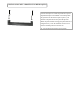
Cut off the bottom of the hinge side and the lock side of
the Z-bar 1/8" less than the door opening measurement.
With door in place, and beginning with the hinge side. Drill into the
doorway trim through the pre-drilled Z-bar holes with a 5/32" drill
bit. Insert the Phillips head screws provided and fasten firmly.
Open the door and remove the two pre-hang brackets. Close door,
and drill through the remaining holes in the Z-bar with a 5/32" drill
bit, and fasten with Phillips head screws provided while keeping a
consistent reveal between the door frame and supporting Z-bar.
IMPORTANT: Be sure
to measure from the top
before cutting.
Utilize the pre-drilled concealed screw
holes on the inside portion of the hinge
side Z-bar for added tamper resistance.
Place the closer bracket on the hinge side of the door jamb
between the upper and lower glass panels approximately 1/4"
away from the Z-bar. Using the holes in the closer bracket as
a guide, drill through the holes into the door jamb and secure
with Phillips head screws.
Attach the closer to the closer bracket with the securing pin.
To adjust the tension so that the closer will operate most
effectively,
pull the closer rod out 1/4" to 3/8" and lock with
the closer stop before attaching.
With the door closed and using the holes in the closer
bracket as a guide, drill holes into the door between the
glass panels. Secure the closer bracket with the Phillips
head screws provided. Return the closer stop to the
operative position. To adjust closer action, open and
close the door several times. To obtain desired tension,
tighten or loosen the screw at the cylinder end.
For placement of the storm chain jamb bracket on the overhead
door jamb, measure approximately 17" from the jamb on the
hinge side. Drill 5/32" holes into the jamb through the bracket
holes and attach the bracket with Phillips head screws.
Install the storm chain door bracket on the door approximately
17" from the jamb. Attach the chain to the door bracket with
the pin provided.
To hold the chain up while the door is closed, pull the chain
toward the h
inge side jamb; twist the spring provided onto the
chain so that the excess slack in the chain is removed. Attach the
spring to the upper portion of the jamb with the double-headed
nail.
Note: To install door closer and chain (steps 7 thru 12), follow
the instructions included in closer box.
Note: If the closer is mounted at the top of the door, attach the
chain to the holes provided on the closer bracket.
Cut
here
Bottom
Top
For 300 Series Doors