
Use and Care Manual


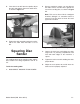

Table Of Contents

-18-
Model G0529 (Mfd. Since 04/17)
The table must be spaced evenly away from the
face of the sanding disc so that the sandpaper
does not rub against the table.
To align the table:
1. Loosen bolts securing table to the table sup-
port bracket.
2. Align the table so that there is a
1
⁄16'' gap
between the 12" disc and the table.
3. Tighten the bolts loosened in Step 1.
4. Spin the disc by hand to check if the sandpa-
per is touching the table.
Note: DO NOT turn the disc sander on at this
point.
5. Repeat Steps 1-3 if the sandpaper touches
table at any point in the rotation.
Aligning Table
Figure 13. Example of installing PSA sanding
disc.
Sanding Disc
Installation
The disc sander requires 12" PSA (pressure sen-
sitive adhesive) sanding discs.
To install a new sanding disc on the 12" disc
sanding surface:
1. DISCONNECT MACHINE FROM POWER!
2. Peel off the old sanding disc, clean the disc
surface with mineral spirit, then wipe it dry.
3. Remove protective layer of one-half of sand-
paper backing and fold it against the remain-
ing half.
4. Slip the half with the protective layer between
the disc and the table edge (see Figure 13
below).
5. Position the exposed adhesive on the upper
half of the disc that extends above the table.
Once it is positioned evenly on the disc,
press the adhesive onto the surface.
6. Rotate the disc so the lower half is above the
table. Peel off the remaining half of the pro-
tective paper and press sandpaper against
disc.