
Use and Care Manual
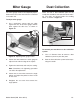


Table Of Contents

-22-
Model G0529 (Mfd. Since 04/17)
Disc Sanding
To perform disc sanding operations:
1. Set the angle of the table relative to the
sanding disc. Angle can be set with the angle
gauge on the disc sander or with a protractor
for greater accuracy.
Note: The disc table can be positioned from
0˚ to 45˚, relative to the plane of the sanding
surface.
2. Once the desired table angle has been set,
move the table towards the sanding disc to
decrease the gap between the table and the
disc. The gap should be
1
⁄16" maximum.
3. To sand straight edges, firmly hold the side
of workpiece against the miter gauge (set at
0˚), with the other surface against the face of
the disc (see Figure 18).
Note: For sanding curves or irregular shapes,
remove the miter gauge from the disc table.
Always keep the workpiece on the side of the
wheel that is rotating down toward the table.
This will keep the workpiece from flying out of
your hands from the rotational forces.
Miter Sanding
The most efficient way to get a perfect miter is to
cut the workpiece slightly long and sand it to the
desired dimension. Miter sanding can be done
easily with the miter gauge.
To perform miter sanding operations:
1. Loosen the knob on the miter gauge, adjust
the angle to the desired point, and tighten the
knob.
2. Slide the miter gauge into its slot and use it
to hold your workpiece in position (see
Figure 19).
Note: The miter gauge can be used in either
direction in the slot to achieve the proper
relation of the workpiece to the disc.
Figure 19. Disc sanding with miter.
Figure 18. Disc sanding with table tilted.