
Use and Care Manual


-44-
Model G0442/G0601 (Mfg Since 3/12)
Rinsing Filter
For a thorough cleaning, the filter can be removed
and rinsed off. However, make sure to clean the
filter with the brush system first. Allow the filter to
air dry. Do not use compressed air on the pleated
filter or leave it in the sun to dry—this could dam-
age it.
Removing/Replacing
Filter
The filter for the Model G0442/G0601 manufac-
tured since November, 2009, can be removed
from the assembly for replacement or rinsing.
Removing/installing the filter requires discon-
necting the canister filter assembly from the dust
collector and disassembling it. Follow the instruc-
tions below to perform this procedure.
Refer to the parts breakdown diagrams and list-
ings beginning on Page 52 to order the correct
filter from Grizzly at 800-523-4777.
Tools Needed Qty
Open-End Wrench 10mm .................................. 1
Wrench or Socket 12mm
................................... 2
To replace the canister filter:
1.
DISCONNECT MACHINE FROM POWER!
2. Use the brush handles to knock the built-up
dust from the filter pleats, then remove the
bag clamp and collection bag from the canis-
ter assembly.
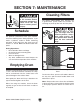
3. Pull the black handle all the way down and
secure the cable into the handle hook at the
bottom of the canister assembly, as shown in
Figure 73, to hold it in place during the fol-
lowing steps.
4.
Remove the canister assembly from the
dust collector and place it right-side up on a
stable, flat surface.
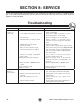
5.
Remove the six hex bolts, hex nuts, and flat
washers from the rim of the canister base, as
shown in Figure 74.
Figure 74. Removing the hex nuts and flat
washers from the rim of the canister base.
Canister
Base
Figure 73. Brush handles in correct position for
filter removal.
Black
Handle
Hook
Red
Handle