
Use and Care Manual


-30-
Model G0857/G0858 (Mfd. Since 02/19)
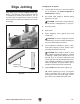
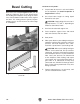
Bevel Cutting
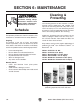
Figure 21. Example of fence set up for a bevel
cut of 45°.
Removed
Surface
To bevel cut on jointer:
1.
Inspect stock to ensure it is safe and suitable
for the operation (see
Stock Inspection &
Requirements section).
2.
Set infeed table height to cutting depth
desired for each pass.
CAUTION:
Cutting depth for bevel cuts is
typically between
1
⁄16" and
1
⁄8"
, depending on
hardness and width of stock.
3.
Set fence tilt to desired angle of cut.
4.
Place workpiece against fence and infeed
table with concave side face down.
5.
Start jointer.
6.
With a push block in your leading hand, press
workpiece against table and fence with firm
pressure, and feed workpiece over cutter-
head with a push block in your trailing hand.
CAUTION:
When your leading hand gets
within 4" of the cutterhead, lift it up and over
cutterhead, and place push block on portion
of the workpiece once it is 4" past cutterhead
.
Now, focus your pressure on outfeed end
of the workpiece while feeding, and repeat
same action with your trailing hand when it
gets within 4" of cutterhead. To help
keep
your hands safe, DO NOT let them get closer
than 4" from moving cutterhead at any time
during operation!
7.
Repeat cutting process, as necessary, until
you are satisfied with the results.
Bevel cuts (see example Figures below) can be
made by setting the fence at the desired angle
and feeding the workpiece firmly along the fence
face, with the bottom inside corner firmly against
the table. The cutting process typically requires
multiple passes or cuts to bevel the entire edge
of a workpiece.