
Use and Care Manual


Model G1183/G1276 (Mfg. Since 3/10)
-35-
— If the platen is not even with or is higher
than the upper roller crown, loosen the
platen cap screw shown in Figure 49,
adjust the platen even with the middle of
the top roller, then re-tighten the cap screw
to secure the platen in place.
5. Replace the sanding belt, put on gloves to
protect your hands, then rotate it several
times by hand—NOT by power.
— If the sanding belt tracks steadily in the
middle of the rollers without moving to one
side or the other, no other adjustments are
necessary. Continue to Step 11.
— If the sanding belt does track to one side or
the other, continue with next step.
3. If the sanding belt assembly is not already
horizontal, loosen the cap screw shown in
Figure 48 and lower the assembly to the
horizontal position.
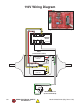
Figure 47. Removing the sanding belt.
Quick-Release
Tension Lever
To ensure proper belt tracking, the belt platen
must be even with the upper roller crown and the
upper and lower rollers must be parallel.
To adjust the roller and platen:
1. DISCONNECT SANDER FROM POWER!
1. Remove the side cover and table from the
belt assembly.
2. Pull the quick-release tension lever down,
then remove the sanding belt, as shown in
Figure 47.
4. Place the straightedge over the platen and
upper roller aligned with the middle of the
roller (the crown at the highest point), as
shown in Figure 49.
Figure 48. Location of the cap screw that
secures the rotation of the belt assembly.
Loosen this pivot
cap screw.
Figure 49. Comparing the platen height with the
upper roller crown.
Platen
Cap Screw
Upper
Roller
Tracking Roller &
Platen Adjustment