
Use and Care Manual

G9729 Combination Lathe/Mill
-23-
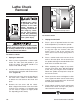
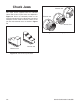
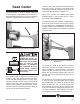
Figure 14. Arrow points to the lead of the scroll.
Replacing Jaws
Changing jaws on the 3-jaw chuck is straight for-
ward, but attention must be paid to the sequence
in which the jaws are loaded into the chuck.
Follow the instructions below.
To replace the jaws:
1. Unplug the lathe/mill!
2. Remove all of the jaws on the chuck by turn-
ing the chuck key counterclockwise. Each
jaw will move until it reaches the end of the
lead thread of the scroll inside the chuck
body. The jaws can then be pulled out of the
chuck by hand.
3. Examine the inside of each slot in the chuck
for debris and clean.
4. Examine each chuck jaw. Numbers can be
found in the slot, at the bottom of each jaw.
5. Locate the slot and the jaw with the #1 and
rotate the chuck key in the clockwise direc-
tion until you see the beginning of the lead
thread on the scroll come into view through
the slot, then back it off slightly until it disap-
pears again. In Figure 14, the lead thread is
still showing in the slot. The jaw cannot be
loaded until the lead thread for the scroll is
no longer seen in the slot.
6. Slide the #1 jaw into the slot and rotate the
key clockwise a couple of turns.
7. Repeat Step 5 for jaw #2 and #3 in
sequence.
It is important to follow these points when replac-
ing jaws in your 3-jaw chuck:
• The jaws must be loaded in sequence begin-
ning with the #1 jaw.
• The chuck, scroll, and jaws should be thor-
oughly cleaned before assembly. (A paint
brush works great for cleaning the scroll).
• Never use a combination of inside and out-
side jaws to hold a workpiece.
• DO NOT over-tighten the chuck jaws.
Damage will occur, resulting in loss of accu-
racy.
• DO NOT load the jaws into chuck incorrectly
to do eccentric work. Use a 4-jaw chuck for
this purpose.
• 3-jaw chucks will always have a little runout.
It is advisable to measure the runout of a
workpiece after it is mounted in the chuck.
If a higher degree of accuracy is desired,
replace the 3-jaw chuck with a 4-jaw chuck
and adjust the workpiece while using a dial
indicator until the desired concentricity is
achieved.
Always disconnect the power to the machine
before making adjustments, set-up changes
or cleaning. Failure to do so could result in
injury to yourself and others.
Lead Thread