Akku-Sense Débroussailleuse à batterie Accu-draadmaaier Cordless brush cutter Decespugliatore a batteria Akumuliatorinis dalgis Akumulátorová kosacka Guadaña a batería Kosa akumulatorowa Akumulátorová kosa DE FR NL GB IT LT CZ ES PL SK AS 4026 Lion AS 4026 Lion Set Originalbetriebsanleitung Traduction de la notice d’utilisation originale Vertaling van de originele gebruiksaanwijzing Translation of the original instructions for use Traduzione delle istruzioni per l’uso in originale Vertimas iš originalių
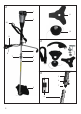
A B C D E F G H I J K L M N O P1 Q R S T U V W X Y Z 11 2 10 12 9 8 A B C D E F G H I K L M N O P Q R S 3U V W X Y Z G H I J Q R S T 4 7 5 A B C D E F K L M N O P U V W X Y Z 4 7 6 5 2 3
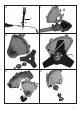
C D E F A GB HC I D J E F G H I J M N O P K Q L RM S N T O P Q R S T W X Y ZU E X Y Z F A GB HC I D J E F G H I J O P K Q L RM S N T O P Q R S T Y ZU W 3 W X Y Z GB HC I D J E F G H I J Q L RM S N T O P Q R S T V W V V X Y Z 3
DE Originalbetriebsanleitung.................................................................................... 5 FR Traduction de la notice d’utilisation originale................................................ 19 NL Vertaling van de originele gebruiksaanwijzing.............................................. 34 GB Translation of the original instructions for use............................................ 48 IT Traduzione delle istruzioni per l’uso in originale.................................
DE Inhalt Verwendungszweck.............................. 5 Allgemeine Beschreibung.................... 6 Lieferumfang........................................ 6 Übersicht.............................................. 6 Sicherheitshinweise 6 Allgemeine Sicherheitshinweise.......... 7 Zusätzliche Sicherheitsregeln.............. 9 Vorsichtsmaßnahmen gegen Rückschlag................................................. 10 Symbole in der Anleitung................... 10 Symbole auf dem Gerät.....................
DE Bitte lesen Sie vor der ersten Inbetriebnahme diese Bedienungsanleitung aufmerksam durch. Bewahren Sie die Anleitung gut auf und geben Sie sie an jeden nachfolgenden Benutzer weiter, damit die Informationen jederzeit zur Verfügung stehen. Allgemeine Beschreibung Die Abbildungen für die Bedienung des Gerätes finden Sie auf den Seiten 2-3 - Entsorgen Sie das Verpackungsmaterial ordnungsgemäß. Übersicht A Lieferumfang K Packen Sie das Gerät aus und kontrollieren Sie, ob es vollständig ist: U Art.
DE Der Hersteller kann nicht haftbar gemacht werden, wenn seine Maschinen unerlaubterweise verändert werden und wenn aus solchen Veränderungen Schäden an Personen oder Gegenständen entstehen. Warnung! Bei der Verwendung von Maschinen sind immer grundlegende Vorsichtsmaßnahmen zu ergreifen. Bitte beachten Sie auch alle Tipps und Hinweise in den zusätzlichen Sicherheitshinweisen. Allgemeine Sicherheitshinweise 1. Achten Sie auf die Umgebungsbedingungen, unter denen Sie arbeiten.
DE kann zu vibrationsbedingten Durchblutungsstörungen der Hände führen. Sie können die Benutzungsdauer jedoch durch geeignete Handschuhe oder regelmäßige Pausen verlängern. Achten Sie darauf, dass die persönliche Veranlagung zu schlechter Durchblutung, niedrige Außentemperaturen oder große Greifkräfte beim Arbeiten die Benutzungsdauer verringern. 14. Achten Sie auf beschädigte Teile. Prüfen Sie das Gerät vor Inbetriebnahme und nach starken Stößen auf Anzeichen von Beschädigungen und Verschleiß.
DE 2. Das Gerät immer mit beiden Händen am Multifunktions-Handgriff halten. Das Gerät stets in einem angemessenen Sicherheitsabstand vom Körper halten und eine stabile Körperposition einnehmen. Immer den Tragegurt benutzen. 3. Stets eine Schutzbrille tragen. 4. Das Gerät nur bei Tageslicht oder bei Möglichkeit einer guten künstlichen Beleuchtung verwenden. 5. Das Gerät nicht bei Regen oder feuchtem Gras verwenden. 6.
DE • Achten Sie darauf, dass keine Hindernisse auf dem Boden liegen und benutzen Sie die Metall-Schneidscheibe nicht in der Nähe von Zäunen, Metallpfosten oder ähnlichem. Verwenden Sie nur gut geschärfte Werkzeuge. Setzen Sie zum Schneiden von dicken Stängeln das Gerät in Position A an. Lesen Sie vor Benutzung des Gerätes die Betriebsanleitung aufmerksam durch. Tragen Sie Augenschutz. Tragen Sie Gehörschutz. Symbole in der Anleitung Elektrogeräte gehören nicht in den Hausmüll.
DE Umstehende Personen aus dem Gefahren-bereich fernhalten. Gerät nicht dem Regen aussetzen. Leerlaufdrehzahl Motorspindel Entnehmen Sie vor allen Wartungsarbeiten den Akku. Das Metallschneidblatt nicht mit dieser Schutzeinrichtung verwenden! Diese Schutzeinrichtung nur mit dem Metallschneidblatt verwenden. Angabe des garantierten Schallleistungspegels LWA in dB.Fadenspule Angabe des garantierten Schallleistungspegels LWA in dB. Metallschneidblatt Ladevorgang Bei Art.
DE Sicherheitsfunktionen • Sicherungshebel ( 9) verhindert eine zufällige Beschleunigung des Motors. Der Drehzahlhebel kann nur betätigt werden, wenn der Sicherungshebel gedrückt ist. • Schutzabdeckungen ( 6) schützen die Bedienperson vor unbeabsichtigter Berührung mit dem Schneidwerkzeug und weggeschleuderten Fremdkörpern. 2. Lockern Sie die Rohrbefestigungsschraube (7) am oberen Schaftrohr (3). 3.
DE 1. Schrauben Sie die Schutzabdeckung mit Hilfe der 3 beiliegenden Schrauben an den Schneidkopfträger an. E O Y F P Z F Metallschneidblatt G H I montieren: J 2. Setzen Sie das Metallschneidblatt (11) und die Flansche) in folgender ReihenP folgeQauf den RSchneidkopfträger S T (19): Unterer Flansch) - MetallschneidZ blatt (11) - Flache Scheibe - Oberer Flansch. 3. Schrauben Sie das Metallschneidblatt (11) gegen den Uhrzeigersinn mit der Befestigungsmutter fest. G Metallschneidblatt H I J demontieren: 4.
DE Sie sich, dass der Schneidkopf korrekt sitzt, und dass die beweglichen Teile frei sind. Warnung! Wenn Sie irgendwelche Zweifel haben, lassen Sie sich beim Betrieb dieses Geräts von einem Fachmann in einem autorisierten Service-Center helfen. Tragegurt anlegen Tragen Sie immer einen Tragegurt, wenn Sie mit dem Gerät arbeiten. Schalten Sie immer das Gerät aus, bevor Sie den Tragegurt lösen. Es besteht Unfallgefahr. 1. Legen Sie den Tragegurt ( 10) an. 2. Stellen Sie den Gurt so ein, dass er stramm sitzt.
DE schnell abnutzen. Verwenden Sie den Rand der Schutzabdeckung, um das Gerät auf richtige Distanz zu halten. Arbeiten mit dem Metallschneidblatt Tragen Sie beim Arbeiten immer den Tragegurt und geeignete Schutzkleidung. Tragen Sie Augen-, Gehörschutz und Kopfschutz. Achten Sie darauf, dass das Schneidblatt ordnungsgemäß installiert ist. Wechseln Sie schadhafte oder stumpfe Werkzeuge aus. Es besteht Verletzungsgefahr.
DE Wartung und Pflege Lassen Sie Arbeiten, die nicht in dieser Anleitung beschrieben sind, von unserem Grizzly Service-Center durchführen. Tragen Sie beim Umgang mit dem Metallschneidblatt und dem Fadenabschneider Handschuhe. Es besteht Verletzungsgefahr! Verwenden Sie niemals metallische Fäden oder Sägeblätter. Der Gebrauch solcher Nicht-Originalteile kann Personenschäden und irreparable Schäden am Gerät verursachen und führt unverzüglich zum Verfall der Garantie.
DE Entsorgung/Umweltschutz Nehmen Sie den Akku aus dem Gerät und führen Sie Gerät, Akku, Zubehör und Verpackung einer umweltgerechten Wiederverwertung zu. Elektrogeräte gehören nicht in den Hausmüll. • • Geben Sie das Gerät und das Ladegerät an einer Verwertungsstelle ab. Die Entsorgung Ihrer defekten eingesendeten Geräte führen wir kostenlos durch. Garantie Für dieses Gerät gewähren wir 24 Monate Garantie. Bei gewerblichem Einsatz erlischt die Garantie.
DE Technische Daten Motorspannung..............................40 V Leerlaufzeit*.................................... 25 min Schutzklasse.......................................... III Leerlaufdrehzahl (n0), Fadenspule ..................................................6500 min-1 Leerlaufdrehzahl (n0), Metallschneidblatt ..................................................7000 min-1 Gewicht (ohne Akku)...................ca.4,3 kg Metallschneidblatt Schnittkreis.................................
FR Sommaire Fins d‘utilisation...................................19 Description générale............................20 Volume de la livraison......................20 Vue d‘ensemble................................20 Consignes de sécurité.........................20 Consignes de sécurité générales.....21 Règles de sécurité complémentaires..............................23 Mesures de précaution contre le choc électrique:................................24 Symboles utilisés dans le mode d’emploi...................
FR Avant la première mise en service, veuillez lire attentivement ces instructions d’utilisation. Conservez soigneusement ces instructions et transmettez-les à tous les utilisateurs suivants afin que les informations se trouvent constamment à disposition.
FR se trouvant à proximité de machines. Tenez compte des consignes régionales et locales en vigueur dans votre zone d’habitation en matière de prévention des accidents. Il en va de même pour toutes les prescriptions relatives à la sécurité du travail et à la santé sur le lieu de travail. Le constructeur ne peut être tenu pour responsable lorsque ses machines sont modifiées de manière illicite et que ces modifications entraînent des préjudices corporels ou matériels.
FR 10. Fonctionnement de l’appareil. Ne travaillez jamais sans protection sur l’outil de coupe. Il y a danger de blessure par projection d’objets. 11. Otez les clés de contact et autres. Toutes les clés doivent être enlevées avant la mise en marche de l’appareil. 12. Restez toujours vigilant, concentrez-vous sur ce que vous faites. Faites usage de votre bon sens. N’utilisez pas d’instruments à moteur lorsque vous êtes fatigué.
FR résultant d’une modification ou d’une utilisation impropre de ses machines. Attention! Même si l’instrument est utilisé correctement, un certain risque ne peut être exclu. Le genre et la construction de l’appareil induit les dangers potentiels suivants: • contact avec une tête faucheuse non protégée (coupures). • partie du corps prise dans le mécanisme à deux temps (coupures). • troubles de l’ouïe, lorsque l’utilisateur ne porte pas de protection acoustique.
FR 13. N’utilisez pas de bobine métallique. Une fois l’interrupteur lâché, veillez à ce que l’appareil reste encore quelques secondes en marche. 14. Eteignez le moteur (interrupteur de marche / arrêt) lorsque vous: - n‘utilisez pas l‘appareil, - le laissez sans surveillance, - le nettoyez, - le transportez d’un endroit à un autre, - ôtez ou changez le dispositif de coupe et réglez la longueur du fil de coupe à la main.
FR Portez une protection pour les yeux, les oreilles et la tête. Portez une protection pour les yeux, les oreilles et la tête. Les machines n’ont pas leur place dans les ordures ménagères. Portez une protection pour les yeux, les oreilles et la tête. Portez des gants de protection. Tenez toute personne aux alentours en dehors de la zone de danger. e soumettez pas l’appareil N à l’humidité. N’utilisez pas l’appareil lorsqu’il pleut et ne coupez pas d’herbe mouillée.
FR Opération de chargement Dans cet appareil:Art.: 72035302 AS 4026 Lion, la batterie et le chargeur ne sont pas fournis. Si vous êtes en possession d‘un autre appareil de la série de batterie Grizzly 40 V pour lequel la batterie est fournie, vous pouvez utiliser la batterie de cet appareil.
FR B C Montage D E du tube F àGdeux H I L M Retirez N le capuchon O Pde protection Q Rdu 1. tube de transmission inférieur (5). A B C D 2. Desserrez la vis de fixation de tube (7) W du tube X de Y Z transmission supérieur (3). 3. Rentrez les deux K tubes L de transmisM N sion (3 + 5) l’un dans l’autre de telle sorte que le bouton de sécurité (4) U V s’enclenche à A dans B l’évidement C W DprévuX E cet effet dans le tube de transmission supérieur. L solidement M Nla visO 4.
FR Monter le carter de protection / la bobine de fil : 1. Vissez le carter de protection / le boîtier de bobine à l’aide des 4 vis ci-jointes sur le carter de protection / la lame de coupe en métal. Monter le boîtier de bobine: 2. Vissez à la main le boîtier de bobine dans le sens inverse des aiguilles d’une montre tel que montré sur l’illustration sur le support de tête de coupe. 3. Retirez le capuchon de protection du coupe-fil. Démonter le boîtier de bobine : 4.
FR • • Il faut éloigner tous objets durs comme les pierres, les pièces de métal e.a. Ils peuvent être projetés et provoquer des préjudices matériels et/ ou corporels. Pour la coupe de haies ou de buissons hauts, la hauteur de travail devrait être d’au moins 15 cm. Les animaux comme p. ex. les hérissons ne sont ainsi pas menacés.
FR Attention! Les restes de fil peuvent être projetés et provoquer des bessures. Travail avec la lame de coupe en métal Quand vous travaillez, portez toujours la sangle de soutien et des vêtements protecteurs appropriés. Portez une protection oculaire yeux, d’ouïe et de tête tallée conformément aux prescriptions. Remplacez les outils endommagés ou émoussés. Vous risquez sinon de vous blesser. Ne travaillez que sur des surfaces libres et planes avec la lame de coupe.
FR 3. Enfoncez latéralement le cache de la bobine et tirez le cache vers le haut. 4. Retirez la bobine de fil du boîtier de bobine. 5. Pour monter la nouvelle bobine, enfilez les deux extrémités du fil par les anneaux dans le boîtier de bobine. Poussez la bobine dans le boîtier de bobine. Faites alors attention au positionnement correct du ressort. 6. Poussez de nouveau le cache de la bobine sur le support de la bobine. Le cache s‘encliquète.
FR • • En outre, les droits de garantie sont valables à condition que les intervalles d’entretien indiqués dans le mode d’emploi et les consignes de nettoyage et d’entretien aient été respectés. Les dommages dus à un défaut de matériel ou à un vice de fabrication seront éliminés gratuitement soit par un remplacement, soit par une réparation. La condition préalable est de rapporter au détaillant l’appareil dans son intégrité avec le justificatif d’achat et de garantie.
FR Intervalles d’entretien Elément de la machine Action Vis, écrous, boulons Contrôler, serrer Contrôler, au besoin nettoyer Contrôler le fonctionnement Contrôler le montage Machine intégrale Poignée de service Tête de coupe Heures de Avant service chaque 10 20 utilisation Pièces de rechange / Accessoires Vous obtiendrez des pièces de rechange et des accessoires à l’adresse www.grizzly-service.eu. Pour toute autre question, adressez-vous au « Service-Center » (voir « Service-Center »).
NL Inhoud Gebruiksdoel........................................34 Algemene beschrijving........................35 Omvang van de levering.....................35 Overzicht.............................................35 Veiligheidsinstructies..........................35 Algemene veiligheidsinstructies..........36 Aanvullende veiligheidsvoorschriften.....38 Veiligheidsmaatregelen tegen terugslag:............................................39 Symbolen in de handleiding................39 Symbolen op het apparaat.
NL Lees voor de inbedrijfstelling deze bedieningshandleiding aandachtig door. Bewaar de handleiding goed en geef deze door aan de volgende gebruiker van deze soldeerbout, zodat iedere gebruiker te allen tijde kan beschikken over de informatie. - Beschermende afdekking/spoelbehuizing (incl. bevestigingstoebehoren) - Spoelbehuizing met draadspoel - Metalen snoeiblad - Beschermende afdekking/metalen snoeiblad (incl.
NL Kinderen, zieke of zwakke personen mogen de trimmer niet gebruiken. Let goed op als kinderen binnen de gevarenzone van de machine komen. Neem ook de plaatselijke ongevallenpreventievoorschriften in acht. Hetzelfde geldt voor alle bepalingen met betrekking tot de wettelijke maatregelen ter bescherming van de werknemer en een gezonde werkomgeving. De fabrikant kan niet aansprakelijk worden gesteld voor schade of letsel als gevolg van ongeoorloofde wijzigingen aan de machine.
NL het apparaat als u onder invloed bent van alcohol, drugs of medicijnen die het reactievermogen nadelig kunnen beïnvloeden. 13. Gebruiksduur en pauzes. Langer gebruik van het apparaat kan door de vibraties doorbloedingsproblemen tot gevolg hebben. U kunt de gebruiksduur echter verlengen door het gebruik van geschikte handschoenen of door regelmatig pauzes in te lassen.
NL Aanvullende veiligheidsvoorschriften 1. Let op! Houd handen en voeten telkens buiten bereik van het maaigebied, ook tijdens het starten van het apparaat. Houd de hand op de extra handgreep steeds vrij. 2. Het apparaat met beide handen aan de multifunctionele handgreep vasthouden. Het apparaat steeds op een passende veiligheidsafstand tot het lichaam vasthouden en een stabiele lichaamshouding aannemen. Altijd de draagriem gebruiken 3. Draag altijd een veiligheidsbril. 4.
NL Veiligheidsmaatregelen tegen terugslag: Bij een terugslag krijgt de gebruiker een krachtige stoot van de motorzeis. Het gevolg hiervan kan zijn dat de gebruiker de controle over het apparaat verliest en zwaar gewond raakt. U voorkomt een terugslag door voorzichtig en met de juiste techniek te werken. Bij gebruik van het metalen maaimes kunt u een terugslag krijgen als het maaimes op een obstakel stuit (steen, hout). • • Houd het apparaat altijd met twee handen vast.
NL Let op dat de maaikop bij het starten en tijdens het werken met de trimmer niet in aanraking komt met externe elementen. Neem een gevarenzone van minimaal 15 m aan. pgepast! Terugslag – let op O voor terugslag van de machine Gevaar door weggeslingerde onderdelen! Houd andere personen op een veilige afstand. Omringende personen op een veilige afstand uit de gevarenzone houden. Stel het apparaat niet bloot aan vocht. Werk niet met het apparaat als het regent of maai geen nat gras.
NL Indicator laadtoestand Montage max. 40-V-Lithium-Ion Druk op de rechter knop van de laadtoestandsindicatie om de status van de accu te controleren. Het aantal lichtgevende LED-lampen duidt de laadtoestand A vanB de accu aan. Veiligheidsfuncties K L U V • Veiligheidshendel ( 9) verhindert een onopzettelijke versnelling van de motor. De toerentalhandel kan alleen worden bediend, wanneer de veiligheidshendel ingedrukt wordt.
NL A Metalen B Csnoeiblad D Emonteren/ F G demonteren K L U V M bij de Nomgang O metPhet meQ Draag talen snoeiblad beschermende handschoenen. W X Y Z De demontage van de spoelbehuizing is in de paragraaf “Spoelbehuizing monteren/demonteren” beschreven. D N X E O Y F P Z Beschermende afdekking/metalen F G H I J snoeiblad monteren: 1. Schroef de beschermende afdekking O met P S T behulpQ van deR 3 bijgevoegde schroeven vast tegen de snoeikopY houder. Z E F Metalen G snoeiblad H I monteren: J 2.
NL Let vooral op de volgende punten: • Controleer het maaigereedschap op beschadigingen en slijtage. • De maaikop moet juist zijn gemonteerd • Alle schakelaars moeten licht gaan • Zorg dat de handgrepen altijd schoon zijn, zodat het apparaat veilig kan worden gehanteerd. • Alle veiligheidsinrichtingen moeten volgens de voorschriften zijn ingebouwd en geplaatst voordat het apparaat kan worden gestart. De maaikop moet vrij kunnen lopen.
NL • • • halve cirkelvormige bewegingen. De beste resultaten kunnen worden behaald met een maximum graslengte van 15 cm. Als het gras hoger is, adviseren wij in meerdere cyclussen te maaien. Gras rondom bomen, afscheidingspalen of andere hindernissen maait u langzaam met de uiterste uiteinden van het maaikoord. Voorkom contact met vaste voorwerpen of hindernissen (stenen, muren, latten enz.). Het koord zal anders zeer snel afslijten.
NL Als het apparaat vibreert Reinig het apparaat, verwijder eventuele grasresten van de maaikop en de beschermkap. Verzorging en onderhoud Laat werkzaamheden die niet zijn omschreven in deze gebruiksaanwijzing uitvoeren door ons Grizzly-servicecenter. Draag altijd handschoenen bij werkzaamheden met of aan het metalen maaimes en het koordmes. Dit kan letsel veroorzaken! Gebruik nooit staaldraad.
NL Verwerking en milieubescherming Neem de accu uit het toestel en breng het toestel, de accu, de accessoires en de verpakking naar een milieuvriendelijke recycling. Machines horen niet bij huishoudelijk afval thuis. • • Lever uw apparaat in bij een recyclepunt. De gebruikte kunststof en metalen delen kunnen per soort worden gescheiden en zo geschikt worden gemaakt voor hergebruik. Voor vragen hieromtrent kunt u terecht bij ons servicecenter.
NL • Ongefrankeerd – als oningepakt vrachtgoed, als expresgoed of met een andere speciale vracht – ingezonden apparaten worden niet aangenomen. Een afvalverwijdering van uw apparaat voeren wij gratis door. Technische gegevens Accu-draadmaaier.............AS 4026 Lion Motorsp anning.............................................40 V Onbelaste looptijd*......................... 25 min Beschermniveau..................................... III Motortoerental bij onbelaste werking (n0), Draadspoel................
GB Content Intended Use.........................................48 General description..............................49 Extent of the delivery..........................49 Summary.............................................49 Safety Information................................49 General Safety Information.................50 Additional Safety Regulations.............51 Precautions to Prevent Recoil.............52 Symbols in the Instructions.................52 Symbols on the Equipment.................
GB Before initial start-up, please read through these operating instructions carefully prior to using the machine. Keep the instructions safe and pass them on to any subsequent user so that the information is always available. General description The illustration how to handle the appliance can be found on pages 2-3 - Reel capsule with thread reel - Metal cutting blade - Protective cover / metal cutting blade (inc.
GB same applies for all regulations concerning occupational safety and health in the workplace. The manufacturer cannot be held liable if the machines produced by the same are modified without permission and if damage to people or property occurs as a result of such modifications. Warning! Always take basic precautions when using machinery. Please also observe all tips and information in the additional safety information. General Safety Information 1.
GB low external temperatures and high gripping forces will reduce the usage duration when working. 14. Be aware of damaged parts. Before initial operation and after severe impacts, check the equipment for signs of damage and wear. Are individual parts damaged? In case of slight damage ask seriously whether the tool will nonetheless work properly and safely. Ensure correct alignment and adjustment of moving parts.
GB 8. Ensure that the engine ventilation slots, protective cover and cutting device are always free of dirt or residues. 9. During the work processes, always ensure that there are neither people nor animals within a radius of at least 15 m. Switch off the equipment immediately if anyone and particularly a child comes into the range of the machine. When using the equipment, stones and other elements that can cause serious injuries can be thrown out. 10.
GB Symbols on the Equipment On the equipment, there are information symbols. These convey important information about the product or information about its use. • Caution: Special safety measures are required when handing the equipment! • The entire operating instructions must be read and understood before use. Non-observance of the operating instructions may be fatal! Ensure that the cutting head does not come into contact with foreign bodies when starting or during the work.
GB Specification of the guaranteed sound power level LWA in dB. Thread reel Specification of the guaranteed sound power level LWA in dB. Metal cutting blade Charge level indicator max. 40-V-Lithium-Ion Press the right-hand button of the charge level indicator to check the battery status. The number of illuminated LED lights shows the charge level of the battery. Cutting blade Thread reel Charging the battery Art.: 72035302 AS 4026 Lion: the rechargeable battery and its charger are not included.
GB Assembly Before initial operation of the equipment, the two-part shaft tube must be assembled, the handle fitted, the cutting device with protective cover installed, the carrying strap fitted and the equipment checked. B L V C Fitting D the E Two-Part F G Tube H 1. Remove the protective transport cap M fromN OA shaft PBtubeQ(5). the bottom C RD 2. Loosen the tube fixing screw (7) on the (3). Z W top shaft X tube YK L (3 +M5) intoN 3.
GB G H Q R Installing/Removing the I J Reel Capsule S T the metal cutting blade Dismantling is described in the section on “Installing/Removing the Metal Cutting Blade”. Installing the protective cover / thread reel: 1. Screw the protective cover / reel capsule onto the protective cover / metal cutting blade using the 4 screws enclosed. Installing the reel capsule: 2. Screw the reel capsule anticlockwise onto the cutting head holder by hand, as indicated in the diagram. 3.
GB • damage. When cutting in high bushes or hedges, the working height should be at least 15 cm. This prevents the risk to animals, e.g. hedgehogs. Work safely and considerately! • Always hold the equipment firmly and securely with both hands (see picture 8). • Cut only grass and weeds. Be aware of roots or tree stumps – risk of tripping. • Work considerately and endanger nobody when cutting. Work quietly and carefully. • Work only in adequate visibility and lighting conditions.
GB Use the cutting blade only to work on open, level areas. Inspect carefully the area to be cut and remove all foreign bodies. Avoid impacts on stones, metal or other obstacles. The metal cutting blade could be damaged and there is a risk of recoil. • B L V When working, hold the cutting head over the ground and swing the equipment slowly even H C D toEand froFin an G curve, like a strimmer. • Do not hold the cutting head at an angle.
GB Do not use the equipment without a thread cutter or with a defective thread cutter. If the thread cutter blade is damaged, contact our service centre. • Storage General Storage Instructions • • • • Clean the equipment and accessories carefully before storage. Keep the equipment in a dry and dustproof place out of reach of children. Do not store the equipment on the protective cover; ideally hang it from the top handle. Remove the rechargeable battery from the device before storing the device.
GB Technical Specifications Cordless brush cutter.......AS 4026 Lion Motor voltage................................. 40 V Idle time*......................................... 25 min Protection Class..................................... III Idling speed (n0), Thread reel ..................................................6500 min-1 Idling speed (n0), Metal cutting blade ..................................................7000 min-1 Weight (without battery)..............ca.
GB Spare parts/Accessories Spare parts and accessories can be obtained at www.grizzly-service.eu If you have any other questions, contact the ”Service-Center” (see ”Service-Center”). Battery................................................................................................................80001176 Quick charger ................................................................................................. .80001097 Alternatively, you can obtain a 2.
IT Contenuto Uso previsto..........................................62 Descrizione generale...........................63 Contenuto della confezione................63 Illustrazione.........................................63 Norme di sicurezza...............................63 Norme di sicurezza generali...............64 Ulteriori regole di sicurezza.................66 Misure cautelative per prevenire il contraccolpo.............................................67 Simboli nelle istruzioni.......................
IT Si prega di leggere con attenzione le presenti istruzioni per l’uso la prima volta che si usa l’apparecchio. Conservare con cura il presente manuale d’uso e consegnarlo al successivo utilizzatore prestando attenzione che sia sempre a disposizione di chi usa l’apparecchio.
IT manutenzione, devono conoscere le istruzioni per l’uso ed essere informate sui potenziali pericoli. L’uso dell’apparecchio va vietato a bambini nonché a persone malate e gracili. I bambini devono essere tenuti scrupolosamente sotto sorveglianza quando questi si trovano in zone in cui si trovano degli apparecchi. Osservare le prescrizioni di sicurezza regionali e locali vigenti nel proprio paese. Ciò vale anche per tutte le disposizioni di protezione e di tutela della salute sul posto di lavoro.
IT mento acustico individuale, per esempio tappi auricolari antirumore. 9. Protezione delle mani. Indossare guanti resistenti – i guanti in pelle offrono una buona protezione. 10. Funzionamento dell’apparecchio. Non lavorare mai senza il dispositivo di protezione collocato sull’utensile di taglio. Pericolo d’infortunio attraverso oggetti che vengono scaraventati! 11. Allontanare le chiavi a tubo, ecc. Tutte le chiavi o cose simili devono essere allontanate prima che l’apparecchio venga avviato. 12.
IT modifiche non autorizzate o dal suo uso inappropriato. Attenzione! Anche in caso di uso appropriato dell’utensile, rimane sempre un certo margine di pericolo che non può essere escluso. In base al tipo e alla costruzione dell’utensile possono derivare i seguenti potenziali pericoli: • Contatto con la testa falciante non protetta (ferite da taglio). • Stendere le mani dentro il trimmer a 2 cicli in fase di esercizio (ferite da taglio).
IT 14. Arrestare il motore (interruttore di accensione/spegnimento spento) quando: - l’apparecchio non viene usato, - l’apparecchio è incustodito, - l’apparecchio viene pulito, - l’apparecchio viene portato da un posto all’altro, - all’apparecchio viene tolto o sostituito il dispositivo falciante nonché quando con la mano viene regolata la lunghezza del filo falciante.
IT Le apparecchiature non si devono smaltire insieme ai rifiuti domestici. Regime minimo alberino motore Indossare dispositivi di prote- Rimuovere la batteria prima di eseguire lavori di manutenzione. zione per testa. Indossare guanti protettivi. Pericolo di ferite da taglio. Indossare scarpe di sicurezza con suola resistente. Accertarsi che, nel momento in cui l’apparecchio è acceso o mentre lo si sta impiegando, la testa falciante non venga in contatto con corpi estranei.
IT Gli apparecchi compatibili sono: Tagliasiepe a batteria AHS 4055 Lion Soffiatore a batteria ALS 4025 Lion Motosega a batteria AKS 4035 Lion Tosaerba a batteria ART 4032 Lion Decespugliatore a batteria AS 4026 Lion Tosaerba a batteria ARM 4041 Lion Tosaerba a batteria ARM 4046 A-Lion In caso contrario rivolgersi al Centro Assistenza (vedere Pezzi di ricambio/accessori). Qui è possibile acquistare la batteria e il rispettivo caricabatterie. Indicazione carica max.
IT 5. Smontaggio: Allentare la vite di fissaggio del tubo (7). Premere il pulsante di sicurezza (4) e separare i due tubi. C D Montaggio E F della G maniglia H I posito foro laterale nel supporto della testina di taglio e nella flangia inferiore. 5. Svitare il dado di fissaggio in senso orario con l’aiuto della chiave di manutenzione e rimuovere la flangia J superiore e la lama in metallo (11). 1.
IT Messa in funzione Avvertimento! Prima di mettere in funzione l’apparecchio bisogna controllare che questo sia in uno stato affidabile e a prova di guasto. In caso di dubbi, non avviare l’apparecchio! Prestare attenzione soprattutto ai seguenti punti: • Controllo degli utensili da taglio relativamente a danneggiamenti e logoramento. • Montaggio corretto della testa falciante. • Facile azionamento di tutti i pulsanti/ interruttori.
IT • • • • • • • • • Tagliare solo erba ed erbaccia! Prestare attenzione alle radici o ai ceppi, poiché sussiste il rischio di inciampare. Lavorare con cautela per non mettere in pericolo nessuno durante le operazioni di taglio.
IT gli occhi, l’udito ed il capo. Fare attenzione che la lama di metallo sia stata montata correttamente. Sostituire gli attrezzi danneggiati o non affilati. Rischio di infortunio! • A B K L U V Lavorare con la lama di metallo solo su superfici libere e piane. Ispezionare con cura la superficie che si intende tagliare e rimuovere tutti i corpi estranei. Evitare di urtare contro pietre, metallo o altri ostacoli. La lama di metallo potrebbe subire danni e inoltre si potrebbero verificare contraccolpi.
IT 2. Fissare il dispositivo di taglio del filo in una morsa e affilare il coltello con una lima piatta. Affilare con cautela e sempre in una sola direzione. Non utilizzare, in nessun caso, l’apparecchio senza dispositivo di taglio o con dispositivo di taglio difettoso. Nel caso in cui sia danneggiata la lama del dispositivo di taglio, rivolgersi necessariamente al nostro servizio assistenza (Service-Center).
IT Servizio di riparazione • • • Le riparazioni che non siano coperte da garanzia potranno essere eseguite a pagamento dal nostro Centro di Assistenza tecnico. Il nostro Centro di Assistenza tecnico vi farà volentieri un preventivo. Potremo accettare solo quelle apparecchiature che siano state adeguatamente imballate e sufficientemente affrancate.
IT Intervalli di manutenzione Pezzo dell’apparecchio Viti, dadi, perni Apparecchio completo Manico di guida Testa falciante Operazione Apparecchio completo Controllare, se necessario pulire Controllare se funziona Controllare se montata correttamente rima di ogni uso Ore di utilizzo 10 20 Pezzi di ricambio / Accessori È possibile ordinare pezzi di ricambio e accessori all’indirizzo www.grizzly-service.eu Per ulteriori domande rivolgersi al „Service-Center“ (vedere „Service-Center“). Batteria.
LT Turinys Paskirtis................................................77 Bendrasis aprašymas..........................78 Pristatomas komplektas......................78 Apžvalga.............................................78 Saugos nurodymai...............................78 Bendrieji saugos nurodymai................79 Papildomos saugos taisyklės..............80 Saugos priemonės nuo atgalinio smūgio..................................81 Instrukcijoje naudojami simboliai...........................................
LT Prieš pradėdami eksploatuoti pirmą kartą atidžiai perskaitykite šią eksploatavimo instrukciją. Saugokite šią instrukciją ir prireikus perduokite kitam naudotojui, kad būtų galima bet kada pasinaudoti instrukcijoje esančia informacija.
LT reikia atidžiai prižiūrėti. Atkreipkite dėmesį į regione ir vietoje galiojančius nelaimingų atsitikimų prevencijos nurodymus. Darbo vietoje būtina paisyti ir visų darbo ir sveikatos apsaugos reikalavimų. Gamintojas neprisiima atsakomybės, jei be leidimo pakeičiama įrenginio konstrukcija ir dėl šio pakeitimo padaroma žalos asmenims arba daiktams. Įspėjimas! Naudojant įrenginius visada būtina imtis reikiamų saugos priemonių.
LT apsaugines pirštines arba reguliariai darydami pertraukėles. Atkreipkite dėmesį, kad dirbant naudojimo trukmę trumpina asmeninis polinkis į kraujotakos sutrikimus, žema lauko temperatūra arba didelės sugriebimo jėgos. 14. Atkreipkite dėmesį, ar dalys nepažeistos.
LT 2. Prietaisą visada abiem rankomis laikykite už daugiafunkcės rankenos. Prietaisą laikykite tinkamu saugiu atstumu nuo kūno ir visada išlaikykite stabilią kūno padėtį. Visada naudokite nešiojimo diržą. 3. Visada užsidėkite apsauginius akinius. 4. Prietaisą naudokite tik dienos šviesoje arba, jei įmanoma, įjunkite tinkamą dirbtinį apšvietimą. 5. Prietaiso nenaudokite lyjant lietui arba drėgmėje. 6. Prieš pradėdami naudoti arba po smūgio patikrinkite, ar prietaisas nepažeistas, prireikus jį suremontuokite.
LT Naudokite tik tinkamai pagaląstus įrankius. Jei norite pjauti storus stiebelius, nustatykite prietaisą į A padėtį. Prieš pradėdami naudoti prietaisą, atidžiai perskaitykite eksploatavimo instrukciją. Dėvėkite akių apsaugą. Instrukcijoje naudojami simboliai Dėvėkite klausos organų apsaugą. Pavojaus ženklas su duomenimis, kaip išvengti žalos žmonėms ir materialiniam turtui. Elektros prietaisų negalima išmesti kartu su buitinėmis atliekomis.
LT Aplink veikiantį prietaisą negali būti asmenų. Prietaiso negalima naudoti drėgmėje. Nedirbkite lyjant lietui ir nepjaukite drėgnos žolės. Variklio suklio sūkių skaičius tuščiąja eiga Prieš pradėdami techninės priežiūros darbus išimkite akumuliatorių. Nenaudokite metalinio pjovimo peilio su šiuo apsauginiu įtaisu! Šį apsauginį įtaisą naudokite tik su metaliniu pjovimo peiliu. Numatyto garso galios lygio Lwa nurodymas dB. Valo ritė Numatyto garso galios lygio Lwa nurodymas dB.
LT skaičius rodo akumuliatoriaus įkrovos A būseną. Saugos funkcijos K B L • Svirtinis saugiklis ( 9) U V apsaugo nuo atsitiktinio variklio pagreitėjimo. Sūkių skaičiaus reguliavimo svirtį galima nuspausti tik tada, kai nuspaustas svirtinis saugiklis. • Apsauginiai gaubtai ( 6) Valdantįjį asmenį apsaugo, kad jis neprisiliestų prie pjovimo mechanizmo ir išsviedžiamų daiktų.
LT Ritės kapsulės išmontavimas aprašytas skyriuje „Ritės kapsulės montavimas / išmontavimas“. D E N X O Apsauginį P gaubtą Q R S 1. prie pjovimo galvutės laikiklio prisukite 3 varžtais (34). Y pridedamais Z E F Apsauginio F G gaubto H / metalinio I Jpjovimo disko montavimas T Y Metalinio pjovimo G H I diskoJ montavimas 2.
LT Pjovimo galvutė turi suktis laisvai. Prieš užvesdami prietaisą, įsitikinkite, kad pjovimo galvutė yra tinkamoje padėtyje ir niekas neblokuoja judančių dalių. Įspėjimas! Jei kyla nors menkiausių abejonių, dėl prietaiso eksploatavimo kreipkitės pagalbos į įgaliotame techninės priežiūros centre dirbantį specialistą. Nešiojimo diržo užsidėjimas Dirbdami su prietaisu visada naudokite nešiojimo diržą. Prieš atsisegdami diržą visada išjunkite prietaisą. Antraip gali įvykti nelaimingas atsitikimas. 1.
LT Dėmesio! Eksploatuodami pjovimo galvutės nepadėkite ant žemės! Pjovimo disku pjaukite tik tuščius, lygius plotus. Atidžiai patikrinkite plotą, kurį pjausite, ir surinkite visus pašalinius daiktus. Stenkitės neatsitrenkti į akmenis, metalą ar kitas kliūtis. Galite pažeisti metalinį pjovimo diską ir kyla atgalinio smūgio pavojus. Pjovimo valo pailginimas Jūsų prietaise įmontuota dvigubo valo automatinė sistema, t. y. abu valai pailgėja pjovimo galvutę stuktelėjus į žemę. 1.
LT Niekada nenaudokite prietaiso, jei valo nupjovimo įtaiso nėra arba jis sugedęs. Jei valo nupjovimo įtaiso ašmenys pažeisti, būtinai kreipkitės į mūsų techninės priežiūros centrą. sugadinti prietaisą, dėl to iš karto neteksite teisės į garantiją. Prietaiso valymas • Po kiekvieno pjovimo nuo pjovimo įtaiso ir apsauginio daubto nuvalykite žoles ir žemes. Nepurkškite ant prietaiso vandens ir nebandykite jo panardinti į vandenį. Nenaudokite jokių valymo priemonių ar tirpiklių.
LT Garantija Remonto tarnyba • • • • • • Šiam prietaisui mes suteikiame 24 mėnesių garantiją. Šis prietaisas nepritaikytas naudoti komerciniais tikslais. Naudojant komerciniais tikslais netenkama teisės į garantiją. Garantija netaikoma natūralaus dėvėjimo požymiams ir žalai, atsiradusiai dėl per didelės apkrovos arba netinkamo valdymo. Tam tikros konstrukcinės dalys natūraliai dėvisi, todėl joms garantija nesuteikiama.
LT Techniniai duomenys Akumuliatorinis dalgis......AS 4026 Lion Variklio įtampa................................40 V Veikimo tuščiąja eiga trukmė*........ 25 min Apsaugos klasė...................................... III Variklio tuščiosios eigos sūkių skaičius (n0), Valo ritė ..................................................6500 min-1 Variklio tuščiosios eigos sūkių skaičius (n0), Metalinis pjovimo diskas........................................7000 min-1 Svoris (be akumuliatorius)..........ca.
LT Atsarginės dalys/Priedai Atsargines dalis ir priedus galite įsigyti interneto svetainėje www.grizzly-service.eu Dėl tolesnių klausimų kreipkitės į „Service-Center„ (žr. „Service-Center„). Akumuliatorius....................................................................................................80001176 Spartusis įkroviklis .......................................................................................... .
CZ Obsah Účel používání....................................... 5 Rozsah dodávky.................................. 6 Übersicht.............................................. 6 Bezpečnostní pokyny........................... 6 Všeobecné bezpečnostní pokyny........ 7 Dodatečná bezpečnostní pravidla........ 8 Bezpečnostní opatření proti zpětnému rázu..................................... 9 Symboly v návodu................................ 9 Symboly na přístroji........................... 10 Nabíjení...............
CZ - kovový řezný list - ochranný kryt/kovový řezný list (vč. montážního příslušenství) - imbusový klíč - údržbářský klíč - nosný popruh - Překlad originálního návodu k obsluze Před prvním uvedením do provozu si pro vaši bezpečnost a bezpečnost ostatních pozorně přečtěte tento provozní návod dříve, než začnete čerpadlo používat. Tento návod dobře uschovejte a předejte jej každému dalšími uživateli, aby byly tyto informace kdykoliv k dispozici.
CZ všechna ustanovení o bezpečnosti a ochraně zdraví při práci. Výrobce nemůže být činěn odpovědným, pokud se jeho stroje pozmění bez povolení a pokud takové změny způsobí zranění osob nebo věcné škody. Výstraha! Při používání strojů je nutné vždy přijat základní bezpečnostní opatření. Dodržujte také veškeré tipy a pokyny v uvedených bezpečnostních pokynech. Všeobecné bezpečnostní pokyny 1. Dbejte na podmínky okolí, za kterých pracujete: Během práce zajistěte dostatečné osvětlení.
CZ 14. Dávejte pozor na poškozené díly. Zkontrolujte přístroj před uvedením do provozu a po těžkém nárazu, jestli nenese známky poškození a opotřebení. Jsou jednotlivé díly poškozeny? V případě drobného poškození si sami vážně položte otázku, zda nástroj bude stále správně a bezpečně fungovat. Dbejte na správné vyrovnání a nastavení pohyblivých dílů.
CZ ochranná zařízení poškozená nebo nesprávně nainstalovaná. 8. Zajistěte, aby z ventilačních otvorů motoru, ochranného krytu a řezného zařízení byly vždy odstraněny nečistot nebo zbytky. 9. Během práce vždy zajistěte, aby se v okruhu minimálně 15 metrů nenacházely žádné osoby ani zvířata. Pokud se někdo, zejména děti, dostane do dosahu přístroje, okamžitě jej vypněte. Při použití přístroje může dojít k vyhození kamenů a jiných částí, které by mohly způsobit vážná zranění. 10.
CZ Symboly na přístroji Na Vašem přístroji se nachází symbolické pokyny. Poskytují důležité informace o produktu nebo pokyny k použití. • Pozor: Při manipulaci s přístrojem jsou nutná zvláštní bezpečnostní opatření! • Před použitím je nutné si přečíst celý návod k obsluze a musí se mu také rozumět. Nedodržení pokynů v návodu k obsluze může být nebezpečné životu! Pozor! Před používáním přístroje si pozorně přečtěte návod k obsluze. Noste ochranu očí. Noste ochranu sluchu.
CZ Údaj o zaručené hladině akustického výkonu LWA v dB. Kovový řezný list Indikátor stavu nabití max. 40-V-Lithium-Ion 3zubový nůž dvojitá cívka se strunou Nabíjení U výr.: 72035302 AS 4026 Lion nejsou akumulátor ani nabíječka součástí dodávky. Vlastníte-li jiný přístroj výrobní řady Grizzly Akku 40 V, u něhož je akumulátor součástí dodávky, můžete použít akumulátor tohoto přístroje.
CZ vat řezací zařízení s ochranným krytem, upevnit nosný popruh a zkontrolovat přístroj. B Demontáž pouzdra cívky je popsána v části Montáž/demontáž pouzdra cívky“. C Montáž D dvoudílné E A F B trubky GC HD I E Montáž J F ochranného G H krytu/kovovéI J 1. Sejměte přepravní ochranné víčko z M dolníNtrubkyOhřídele K P(5). L QM RN 2. Povolte šroub pro upevnění trubky (7) W na horní X trubce YUhřídele. ZV W X 3.
CZ Montáž pouzdra cívky: 2. Našroubujte pouzdro cívky ručně tak, jak je znázorněno na obrázku, proti směru hodinových ručiček na držák řezné hlavy. 3. Odstraňte ochranné víčko z odstřihávače struny. Demontáž pouzdra cívky: 4. Odšroubujte pouzdro cívky rukou ve směru hodinových ručiček . Pro usnadnění práce můžete zablokovat držák řezné hlavy a spodní přírubu pomocí přiloženého kovového čepu (viz také ). 5. Odmontujte ochranný kryt a převlečte ochranné víčko přes odstřihávač struny.
CZ Pracujte bezpečně a promyšleně! • Držte přístroj vždy pevně a bezpečně oběma rukama! • Sekejte pouze trávu a plevel! Dávejte pozor na kořeny nebo pařezy, hrozí nebezpečí zakopnutí. • Pracujte opatrně a neohrožujte nikoho přio řezání a stříhání.
CZ Řezný list používejte pouze pro práci na volných rovných plochách. Pečlivě zkontrolujte oblast zamýšlenou k sečení a odstraňte všechny cizí předměty. Vyhněte se kontaktu s kameny, kovem a dalšími překážkami. Kovový řezný list by se mohl poškodit a hrozí nebezpečí zpětného rázu. B L V • Při práci držte řeznou hlavu nad zemí a nástroj C D pomalu E otáčejte F sem G a tam H jako při práci s kosou v rovnoměrném oblouku. Nřeznou O hlavuPšikmoQ R • M Nedržte pod úhlem.
CZ Skladování Záruka Obecné skladovací pokyny Na tento přístroj poskytujeme 24 měsíční záruku. Při řemeslném použití záruka zaniká. Ze záruky jsou vyloučeny škody vzniklé přirozeným opotřebením, přetížením nebo používáním v rozporu s určením. Určité součásti podléhají běžnému opotřebení a jsou ze záruky vyloučeny. To jsou obzvláště tyto součásti: Řezná struna, kovový řezný list, pokud reklamace nejsou v důsledku vady materiálu.
CZ Technické údaje Akumulátorová kosacka..............................AS 4026 Lion Napětí motoru................................40 V Volnoběžná doba*...........................25 min Třída ochrany......................................... III Volnoběžné otáčky (n0), cívka se strunou ..................................................6500 min-1 Volnoběžné otáčky (n0), kovový řezný list ..................................................7000 min-1 Hmotnost (bez akumulátoru).....
CZ Intervaly údržby Strojní část Akce šrouby, matice, čepy kontrola, utažení zkontrolovat, v případě potřeby vyčistit kontrola funkce kontrola správné montáže kompletní stroj ovládací rukojeť řezná hlava Před každým použitím Provozní hodiny 10 20 Náhradní díly/příslušenství Náhradní díly a příslušenství dostanete v obchodě, ve kterém jste přístroj koupili nebo na internetových stránkách www.grizzly-shop.de nebo www.grizzly-service.
ES Contenido Uso previsto....................................... 106 Descripción general.......................... 107 Volumen de suministro..................... 107 Vista general.................................... 107 Indicaciones de seguridad............... 107 Indicaciones generales de seguridad.... 108 Reglas de seguridad adicionales......110 Medidas de protección frente al rebote.. 111 Símbolos en las instrucciones..........111 Símbolos en el aparato.....................111 Procedimiento de carga....
ES de hilos - Hoja metálica de corte - Cubierta de protección/hoja de corte metálica (incl. accesorio de sujeción) - Llave Allen - Llave de mantenimiento - Correa - Instrucciones de uso originales Antes de la primera puesta en marcha, lea detenidamente el manual de instrucciones para evitar un uso incorrecto. Conserve las instrucciones y entrégueselas al siguiente usuario para que pueda consultar esta información en cualquier momento.
ES así como a personas enfermas y debilitadas. Los niños que se encuentren en las inmediaciones de máquinas deberán estar vigilados. Observe la normativa local y regional en materia de prevención de accidentes que sea de aplicación en su región. Así como todas las disposiciones en materia de protección laboral y salud en el puesto de trabajo.
ES Han de retirarse todas las llaves mencionadas anteriormente, antes de encender el aparato. 12. No se despiste, mantenga siempre la atención. Esté atento a lo que está haciendo. Utilice el sentido común. No utilice herramientas motorizadas si está cansado. No está permitido trabajar bajo los efectos del alcohol, las drogas o medicamentos que mermen la capacidad de reacción. 13. Tiempo de utilización y pausas.
ES siguientes riesgos potenciales: • Contacto con el cabezal de corte descubierto (lesiones por cortes). • Introducir las manos mientras la guadaña está en funcionamiento (lesiones por cortes). • Daños auditivos si no se lleva la protección correcta. • Formación de polvo dañino para la salud cuando el aparato se utiliza en espacios cerrados (náuseas). Reglas de seguridad adicionales 1. ¡Atención! Mantener las manos y los pies siempre alejados de la zona de corte, sobre todo al arrancar el aparato.
ES - lo limpie; - lo transporte de un lugar a otro; - retire o cambie el dispositivo de corte, así como cuando ajuste la longitud del hilo de corte con la mano. Medidas de protección frente al rebote En caso de rebote, el usuario recibirá un fuerte golpe por parte del aparato. En consecuencia, es probable que el usuario pierda el control del aparato y sufra graves lesiones. Trabaje con cuidado y utilice la técnica adecuada para evitar los rebotes.
ES Póngase guantes de protección. Existe peligro de cortarse. Utilice este dispositivo de protección únicamente con la hoja de corte metálica. Póngase zapatos de seguridad con suela resistente. Indicación del nivel de potencia acústica Lwa en dB. Bobina de hilos Asegúrese de que el cabezal de corte no entra en contacto con cuerpos extraños mientras está en funcionamiento o durante el trabajo. Mantenga una distancia de seguridad de al menos 15 m con otras personas.
ES Para el resto de casos diríjase al centro de servicio (véase Piezas de repuesto/accesorios). Ahí podrá adquirir la batería y el cargador adecuados. Indicador del nivel de carga rotan alrededor de un eje que transcurre en vertical con el plano de corte. Para proteger al usuario, el aparato cuenta con un dispositivo de protección que cubre el dispositivo de corte. El funcionamiento de los elementos de mando se describe en las siguientes páginas. Montaje max.
ES esmontar elC mango H I la hoja J de corte metáD AMontar EB F GD HE I F J G D C 1. Coloque el mango sin la palanca de N Rdel O tubo NK O L (8) PM SP velocidad en elQ soporte superior (3). 2.X U Coloque mango W con Xla palanca Y de Z Y Vel Z velocidad (8) sobre el soporte. 3. Atornille los mangos al soporte con los cuatro tornillos Allen suministrados.
ES Desmontar la cápsula de la bobina: 4. Desenrosque la cápsula de la bobina en el sentido de las agujas del reloj con la mano. Para simplificar la tarea, puede bloquear el soporte del cabezal de corte y la brida inferior con el perno metálico suministrado (véase también ). 5. Desmonte la cubierta de protección y coloque la tapa de protección sobre el cortador de hilos. correctamente y las piezas movibles no tienen ningún obstáculo.
ES Trabaje de manera segura y consciente. • ¡Sujete el aparato fuerte con las dos manos y con seguridad! • ¡Corte únicamente hierba y hierbajos! Tenga cuidado con las raíces y los troncos de los árboles, ya que existe peligro de tropezar. • Trabaje con precaución y no ponga a nadie en peligro cuando esté cortando. Trabaje de manera tranquila y consciente. • Trabaje solo si las condiciones de visibilidad e iluminación son suficientes. • Preste atención al cabezal de corte.
ES Trabajar con la hoja de corte metálica Mantenimiento y cuidado Encargue los trabajos que no están descritos en este manual de instrucciones a nuestro centro de servicio Grizzly. Utilice guantes de protección cuando trabaje con la hoja de corte y el cortador de hilos. ¡Existe peligro de lesiones! No utilice nunca hilos metálicos u hojas de sierra.
ES Presione la bobina hacia la cápsula de la bobina. Compruebe que el resorte está correctamente ajustado. 6. Presione de nuevo la cubierta de la bobina de hilos sobre el soporte de la bobina. La cubierta quedará encajada. Afilar el cortador de hilos Eliminación / protección del medio ambiente Retire la batería del aparato y lleve el aparato, la batería, los accesorios y el embalaje a un punto verde para su reciclaje. Los aparatos eléctricos no han de tirarse junto con la basura doméstica.
ES Servicio de reparación Datos técnicos También puede encargar a nuestro centro de servicio reparaciones que no están cubiertas por la garantía (servicio no gratuito). Se le proporcionará un presupuesto. Solo podemos procesar equipos que hayan sido suficientemente empaquetados y franqueados. Los riesgos del transporte corren a cargo del remitente. No se aceptarán aparatos enviados a portes debidos, ya se trate de mercancías voluminosas, envíos exprés o con otras cargas especiales.
ES Piezas de repuesto/accesorios Encontrará piezas de repuesto y accesorios en el establecimiento donde compró el aparato o en www.grizzly-shop.de o www.grizzly-service.eu Si tiene más preguntas, póngase en contacto con el «Service-Center» (ver «ServiceCenter»). Batería................................................................................................................80001176 Cargador rápido ............................................................................................. .
PL Spis treści Przeznaczenie urządzenia................ 121 Opis ogólny........................................ 122 Zakres dostawy................................ 122 Zestawienie elementów urządzenia.122 Wskazówki bezpieczeństwa............. 122 Ogólne wskazówki bezpieczeństwa.....123 Dodatkowe zasady bezpieczeństwa... 125 Środki ostrożności zapobiegające powstawaniu efektu odrzutu podczas pracy z urządzeniem.......................... 126 Symbole zastosowane w instrukcji.. 126 Symbole na urządzeniu........
PL - Dolny trzonek prowadzący z uchwytem głowicy tnącej. - Osłona ochronna/osłona szpuli (w tym akcesoria do mocowania) - Osłona szpuli ze szpulą żyłki - Metalowa tarcza tnąca - Osłona ochronna/metalowa tarcza tnąca (w tym akcesoria do mocowania) - Klucz imbusowy - Klucz do prac konserwacyjnych - Pas do przenoszenia - Oryginalna instrukcja obsługi Przed pierwszym uruchomieniem urządzenia uważnie przeczytaj tę instrukcję obsługi.
PL muszą zapoznać się z instrukcją obsługi i znać potencjalne zagrożenia związane z obsługą urządzenia. Należy zabronić dostępu do urządzenia dzieciom i osobom ułomnym. Gdy w strefie pracy maszyny przebywają dzieci, należy nad nimi sprawować staranny nadzór. Należy postępować zgodnie z regionalnymi i lokalnymi przepisami związanymi z zapobieganiem wypadkom, jaki obowiązują w danym miejscu. Ta sama zasada dotyczy wszelkich przepisów BHP dotyczących danego stanowiska pracy.
PL 9. Środki ochrony dłoni. Nosić solidne rękawice - dobrą ochronę zapewniają rękawice skórzane. 10. Eksploatacja urządzenia. Nigdy nie należy wykonywać prac bez zainstalowanych na narzędziach tnących osłon. Niebezpieczeństwo obrażeń ciała przez wyrzucane przedmioty. 11. Usuwać klucze nasadowe itp. Przed włączeniem urządzenia należy usunąć wszelkie klucze itp. 12. Przez cały czas należy zachowywać koncentrację. Zwracać uwagę na wykonywane czynności. Podczas pracy zachowywać zdrowy rozsądek.
PL bach powstałe w wyniku tego typu niewłaściwego zastosowania odpowiada użytkownik, a nie producent. Producent nie ponosi odpowiedzialności za niedozwolone modyfikacje jego maszyn, a także za ich niezgodne z przeznaczeniem użytkowanie oraz za szkody powstałe w wyniku tego typu modyfikacji i użytkowania. Uwaga! Nawet w przypadku użytkowania narzędzi zgodnie z przeznaczeniem pozostaje określone ryzyko resztkowe, którego nie można wykluczyć.
PL Maszynę należy uruchamiać jedynie zgodnie z instrukcją. Podczas uruchamiania nie obracać urządzenia. Musi się ono znajdować w pozycji roboczej. Nie przechodzić z pracującym urządzeniem przez żwirowe ulice lub drogi. 12. W ramach przedłużania żyłki tnącej należy zachowywać najwyższą ostrożność. Niebezpieczeństwo ran ciętych. Po przeprowadzeniu tych czynności należy przed uruchomieniem urządzenia ponownie przyjąć prawidłową pozycję roboczą. 13. Nie stosować metalowych żyłek lub brzeszczotów.
PL • Przed rozpoczęciem użytkowania urządzenia należy przeczytać ze zrozumieniem całą instrukcję obsługi. Nieprzestrzeganie wskazówek w zakresie obsługi urządzenia może być śmiertelnie niebezpieczne! Należy się upewnić, że podczas rozruchu i w trakcie pracy głowica tnąca nie ma kontaktu z ciałami obcymi. Zachowuj bezpieczny odstęp min. 15 m od innych osób.
PL Informacje o poziomie mocy akustycznej w dB. Szpula z żyłką Informacje o poziomie mocy akustycznej podano w dB. Metalowa tarcza tnąca Nóż 3-zębny Podwójna szpula z żyłkami Ładowanie W przypadku artykułu: 72035302 AS 4026 Lion akumulator i ładowarka nie należą do zakresu dostawy tego urządzenia. W przypadku posiadania innego urządzenia z serii Grizzly Akku 40 V zawierającego akumulator, można użyć akumulatora z tego urządzenia.
PL niający urządzenie tnące. Funkcje elementów obsługowych podano w poniższych opisach. Montaż Przed uruchomieniem urządzenia należy złożyć dwuczęściowy członek, zamontować uchwyt, narzędzie tnące z osłoną ochronną, założyć pas do przenoszenia oraz przeprowadzić kontrolę urządzenia. B L V górnym trzonku (3). 3. Połączyć dwa trzonki (3 + 5) ze sobą, K L M N O tak by guzik zabezpieczający (4) wskoczyły w odpowiednie wycięcie w górnymUtrzonku. V W X Y 4. Dokręć mocno śrubę mocującą (7).
PL G H Montaż/demontaż I J Q R osłony szpuli S T Sposób demontażu metalowej tarczy tnącej opisano w rozdziale „Montaż/demontaż metalowej tarczy tnącej”. Montaż osłony ochronnej/szpuli z żyłką: 1. Skręcić osłonę ochronną/osłonę szpuli za pomocą czterech dołączonych śrub z osłoną ochronną/metalową tarczą tnącą. Montaż osłony szpuli: 2. Wkręcić ręcznie osłonę szpuli w kierunku przeciwnym do kierunku wskazówek zegara w uchwyt głowicy tnącej (patrz rysunek). 3.
PL aby karabińczyk znajdował się około 10 cm poniżej bioder. 4. Zamocować karabińczyk do zaczepu na trzonku urządzenia. • • Obsługa • Wskazówki dotyczące wykonywania pracy • • • • Podczas koszenia należy postępować zgodnie z krajowymi wzgl. komunalnymi przepisami. Nie kosić podczas ogólnie przyjętych czasów przerw. Usuwać stałe przedmioty, takie jak kamienie, elementy metalowe itp. Istnieje ryzyko odrzucenia, a co za tym idzie szkód na osobach i szkód materialnych.
PL 1. Przytrzymać pracujące urządzenie nad trawiastą powierzchnią i lekko uderzyć kilka razy głowicą tnącą o ziemię. W ten sposób żyłka wydłuża się. 2. Zintegrowany w osłonie ochronnej obcinacz żyłki przytnie żyłkę na odpowiednią długość. Jeśli nie można przedłużyć końcówek żyłek: • Wyłączyć urządzenie. • Wcisnąć wkład szpuli do oporu i mocno pociągnąć za koniec żyłki. Gdy nie widać końców żyłki: • Wymienić szpulę z żyłką (patrz rozdział „Wymiana szpuli”).
PL Oczyścić urządzenie • • • H R Po każdym koszeniu należy oczyszczać narzędzie tnące i osłonę ochronną z trawy i ziemi. Nie wolno chlapać wodą na urządzenie, ani wkładać urządzenia do wody. Nie stosować środków czyszczących ani rozpuszczalników. Mogłoby to spowodować nieodwracalne uszkodzenie urządzenia. szpuli I Wymiana J 1. Wyłączyć silnik. T urządzenie na ziemi i upewnić 2.S Ułożyć się, czy urządzenie jest bezpiecznie posadowione. 3. Wcisnąć z boku osłonę szpuli z żyłką, podciągając osłonę w górę. 4.
PL • • Utylizację przesłanych nam uszkodzonych urządzeń przeprowadzamy bezpłatnie. Przekaż wycięty materiał do kompostowania, nie wyrzucaj go do kontenera na śmieci. Gwarancja Na to urządzenie udzielamy 24-miesięcznej gwarancji. Korzystanie z urządzenia do celów komercyjnych powoduje utratę gwarancji. Uszkodzenia spowodowane naturalnym zużyciem, przeciążeniem lub niewłaściwą obsługą nie są objęte gwarancją. Określone elementy urządzenia podlegają normalnemu zużyciu i są wyłączone z gwarancji.
PL W ramach doskonalenia produktu możliwe są niezapowiedziane zmiany techniczne oraz zmiany wyglądu urządzenia. Dlatego też nie gwarantujemy prawidłowości wszystkich wymiarów, wskazówek oraz danych zawartych w tej instrukcji. W związku z tym nie możemy uznawać roszczeń prawnych, zgłaszanych z powodu instrukcji obsługi. Części zamienne/akcesoria Części zamienne i akcesoria można nabyć w sklepie, w którym zostało zakupione urządzenie lub pod adresem www.grizzly-shop.de lub www.grizzly-service.
SK Obsah Účel použitia Všeobecný opis Rozsah dodávky Prehľad Bezpečnostné pokyny Všeobecné bezpečnostné pokyny Doplňujúce bezpečnostné predpisy Preventívne bezpečnostné opatrenia proti spätnému rázu Symboly v návode Symboly na prístroji Nabíjanie Zobrazenie stavu nabitia Bezpečnostné funkcie Opis funkcie Montáž Montáž dvojdielnej rúry Montáž držadla Montáž/demontáž kovového rezacieho listu Montáž/ demontáž puzdra cievky Uvedenie do prevádzky Založenie nosného popruhu 136 137 137 137 137 138 139 140 140 14
SK Pred prvým uvedením do prevádzky si pozorne prečítajte tento návod na obsluhu, aby ste zabránili nesprávnemu zaobchádzaniu. Návod dobre uschovajte a postúpte ho nasledujúcemu používateľovi, aby boli informácie kedykoľvek k dispozícii. Všeobecný opis Obrázky pre obsluhu prístroja nájdete na stranách 2 -3 Rozsah dodávky Vybaľte prístroj a skontrolujte, či je kompletný: Výr.
SK Výrobca nemôže ručiť za to, keď sa jeho stroje zmenia nedovoleným spôsobom a keď z takýchto zmien vzniknú škody na osobách alebo predmetoch. Výstraha! Pri používaní strojov je potrebné vždy vykonať základné bezpečnostné preventívne opatrenia. Zohľadnite, prosím, tiež všetky tipy a upozornenia v prídavných bezpečnostných pokynoch. Všeobecné bezpečnostné pokyny 1. Dávajte pozor na podmienky okolia, pod ktorými pracujete. Pri prácach sa postarajte o dostatočné osvetlenie.
SK dobu používania. 14. Dávajte pozor na poškodené diely. Prístroj skontrolujte pred uvedením do prevádzky a po silných nárazoch vzhľadom na príznaky poškodenia a opotrebenia. Sú jednotlivé diely poškodené? V prípade ľahkým poškodení sa vážne opýtajte, či bude nástroj napriek tomu fungovať bezchybne a bezpečne. Dávajte pozor na správne vyrovnanie a nastavenie pohyblivých dielov.
SK 6. Prístroj pred použitím alebo v dôsledku nárazu skontrolujte vzhľadom na prípadné poškodenia a v prípade potreby ho opravte. 7. Prístroj nepoužívajte, keď sú ochranné zariadenia poškodené alebo nie sú správne umiestnené. 8. Uistite sa, že vetracia štrbina motora, ochranný kryt a rezacie zariadenia sú stále bez špiny a zvyškov. 9. Počas pracovných procesov sa vždy uistite, že sa v okruhu minimálne 15 m nenachádzajú ani osoby ani zvieratá.
SK Príkazová značka (namiesto výkričníka je príkaz vysvetlený) s údajmi na zabránenie vzniku škôd. Noste ochranné rukavice. Nebezpečenstvo v dôsledku rezných poranení. Upozorňovacia značka s informáciami pre lepšiu manipuláciu s prístrojom. Noste bezpečnostnú obuv s pevnou podrážkou. Symboly na prístroji Na vašom prístroji nájdete symbolické pokyny. Sprostredkujú dôležité informácie o výrobku alebo pokyny na používanie.
SK Toto ochranné zariadenie používajte iba s kovovým rezacím listom. Údaj garantovanej hladiny akustického výkonu LWA v cievke so strunou Údaj garantovanej hladiny akustického výkonu LWA v dB. Kovový rezací list 3-zubový nôž Dvojitá cievka so strunou Nabíjanie Pri výr. č.: 72035302 AS 4026 Lion akumulátor a nabíjačka nie sú súčasťou dodávky. Ak by ste mali vlastniť iný prístroj zo série Grizzly akumulátorový 40 V, pri ktorom je súčasťou dodávky akumulátor, môžete použiť akumulátor tohto prístroja.
SK Montáž/demontáž kovového rezacieho listu Funkcia jednotlivých prvkov obsluhy je uvedená v nasledujúcich popisoch. Montáž Pri manipulácii s kovovým rezacím listom noste rukavice. Skôr ako prístroj uvediete do prevádzky, musíte ešte zložiť dvojdielnu rúru násady, namontovať rukoväť, namontovať rezacie zariadenie s ochranným krytom, upevniť nosný popruh a skontrolovať prístroj. Demontáž puzdra cievky je opísaná v odseku „Montáž/demontáž puzdra cievky“.
SK Montáž ochranného krytu/cievky so strunou: 1. Naskrutkujte ochranný kryt/puzdro cievky pomocou priložených štyroch skrutiek na ochranný kryt/kovový rezací list. • Montáž cievky so strunou: Rezná hlava sa musí dať voľne pohybovať. Skôr ako spustíte prístroj, uistite sa, že rezná hlava sedí správne a že sú pohyblivé diely voľné. 2. Naskrutkujte puzdro cievky proti smeru hodinových ručičiek , ako je uvedené na obrázku rukou na nosič rezacej hlavy. 3. Odoberte ochranný kryt na odrezávači struny.
SK • • • Nekoste počas všeobecne obvyklých časov pokoja. Pevné predmety ako kamene, kovové časti a i. treba odstrániť. Tieto sa môžu vymrštiť a tým viesť k poškodeniam zdravia osôb a vecným škodám. Pri kosení vo vysokom kroví alebo živých plotoch by mala pracovná výška činiť minimálne 15 cm. Tým nebudú ohrozené zvieratá, ako napr. ježkovia.
SK Práce s kovovým rezacím listom Pri práci noste vždy nosný popruh a vhodný ochranný odev. Noste ochranu očí, sluchu a hlavy. Dávajte pozor na to, aby bol rezací list riadne inštalovaný. Vymeňte poškodené alebo tupé nástroje. Existuje nebezpečenstvo poranenia. S rezacím listom spracúvajte iba voľné, rovné plochy. Kosenú plochu starostlivo skontrolujte a odstráňte všetky cudzie telesá. Zabráňte nárazom na kamene, kovy alebo iné prekážky.
SK Ostrenie odrezávača struny Noste ochranné rukavice, aby ste zabránili rezným poraneniam. 1. Odskrutkujte odrezávač struny z ochranného krytu. 2. Upevnite odrezávač struny do zveráka a nôž nabrúste plochým pilníkom. Pilujte opatrne a vždy len v jednom smere. Prístroj v žiadnom prípade nepoužívajte bez odrezávača struny alebo s chybným odrezávačom struny. V prípade poškodenej čepele odrezávača struny sa vždy obráťte na naše servisné centrum.
SK Opravný servis Technické údaje Opravy, ktoré nepodliehajú záruke, môžete nechať vykonať v našom servisnom centre oproti vyúčtovaniu. Toto vám ochotne vypracuje predbežný návrh nákladov. Môžeme spracovať iba prístroje, ktoré boli zaslané dostatočne zabalené a ofrankované. Prepravné riziko nesie odosielateľ. Prístroje zaslané bez úhrady prepravného – ako veľkorozmerný náklad, expresom alebo s iným špeciálnym prepravným – nebudú prevzaté. Likvidáciu vašich zaslaných chybných zariadení vykonáme bezplatne.
SK Náhradné diely/príslušenstvo Náhradné diely a príslušenstvo dostanete v predajni, v ktorej ste prístroj zakúpili alebo na www.grizzly-shop.de alebo www.grizzly-service.eu Pri ďalších otázkach sa obráťte na „Service-Center“ (pozri „Service-Center“). Akumulátor.........................................................................................................80001176 Rýchlonabíjačka .............................................................................................. .
DE Original EG-Konformitätserklärung Hiermit bestätigen wir, dass der Akku-Sense Baureihe AS 4026 Lion Set Lot-Nummer B-46649 folgenden einschlägigen EU-Richtlinien in ihrer jeweils gültigen Fassung entspricht: 2006/42/EG • 2000/14/EG • 2011/65/EU* 2014/30/EU Um die Übereinstimmung zu gewährleisten, wurden folgende harmonisierte Normen sowie nationale Normen und Bestimmungen angewendet: EN 55014-1:2017 • EN 55014-2:2015 • EN ISO 11806-1:2011 EN 60335-1:2012/A13:2017 • EN 60745-1:2009/A11:2010 EN 50636-2-
FR Traduction de la déclaration de conformité CE Nous certifions par la présente que le modèle Débroussailleuse à batterie série AS 4026 Lion Set Numéro de lot B-46649 est conforme aux directives UE actuellement en vigueur: 2006/42/EC • 2000/14/EC • 2011/65/EU* 2014/30/EU En vue de garantir la conformité les normes harmonisées ainsi que les normes et décisions nationales suivantes ont été appliquées: EN 55014-1:2017 • EN 55014-2:2015 • EN ISO 11806-1:2011 EN 60335-1:2012/A13:2017 • EN 60745-1:2009/A11:20
Vertaling van de originele CE-conformiteitverklaring NL Hiermede bevestigen wij dat de Accu-draadmaaier bouwserie AS 4026 Lion Set Lot-nummer B-46649 aan de hierna volgende, van toepassing zijnde EU-richtlijnen 2006/42/EC • 2000/14/EC • 2011/65/EU* 2014/30/EU Om de overeenstemming te waarborgen, werden de hierna volgende, in overeenstemming gebrachte normen en nationale normen en bepalingen toegepast: EN 55014-1:2017 • EN 55014-2:2015 • EN ISO 11806-1:2011 EN 60335-1:2012/A13:2017 • EN 60745-1:2009/A11:20
Translation of the original CE declaration of conformity GB We confirm, that the Cordless brush cutter Design Series AS 4026 Lion Set Batch number B-46649 conforms with the following applicable relevant version of the EU guidelines: 2006/42/EC • 2000/14/EC • 2011/65/EU* 2014/30/EU In order to guarantee consistency, the following harmonised standards as well as national standards and stipulations have been applied: EN 55014-1:2017 • EN 55014-2:2015 • EN ISO 11806-1:2011 EN 60335-1:2012/A13:2017 • EN 60745-
IT Traduzione della dichiarazione di conformità CE originale Con la presente dichiariamo che Decespugliatore a batteria di costruzione AS 4026 Lion Set Numero lotto B-46649 corrisponde alle seguenti direttive UE in materia nella rispettiva versione valida: 2006/42/EC • 2000/14/EC • 2011/65/EU* 2014/30/EU Per garantire la conformità sono state applicate le seguenti norme armonizzate e anche le norme e disposizioni nazionali che seguono: EN 55014-1:2017 • EN 55014-2:2015 • EN ISO 11806-1:2011 EN 60335-1:201
LT Vertimas iš originalių eksploatavimo instrukcijoje Šiuo dokumentu mes patvirtiname, kad Akumuliatorinis dalgis serijos AS 4026 Lion Set Partijos numeris B-46649 atitinka toliau nurodytų numatytųjų ES direktyvų galiojantį leidimą: 2006/42/EC • 2000/14/EC • 2011/65/EU* 2014/30/EU Kad būtų galima užtikrinti atitiktį, taikyti šie darnieji standartai ir nacionaliniai standartai bei nuostatos: EN 55014-1:2017 • EN 55014-2:2015 • EN ISO 11806-1:2011 EN 60335-1:2012/A13:2017 • EN 60745-1:2009/A11:2010 EN 50636
Překlad originálního prohlášení o shodě CE CZ Potvrzujeme tímto, že konstrukce Akumulátorová kosacka konstrukční řady AS 4026 Lion Set Číslo šarže B-46649 odpovídá následujícím příslušným směrnicím EÚ v jejich právě platném znění: 2006/42/EC • 2000/14/EC • 2011/65/EU* 2014/30/EU In order to guarantee consistency, the following harmonised standards as well as national standards and stipulations have been applied: EN 55014-1:2017 • EN 55014-2:2015 • EN ISO 11806-1:2011 EN 60335-1:2012/A13:2017 • EN 60745-1:
ES Traducción de la Declaración de conformidad CE original Mediante la presente declaramos que el modo constructivo de Guadaña a batería Serie de construcción AS 4026 Lion Set Número de lote B-46649 a las siguientes Directivas de la UE corrientes en su respectiva versión vigente: 2006/42/EC • 2000/14/EC • 2011/65/EU* 2014/30/EU Para garantizar la conformidad, se aplicaron las siguientes normas armonizadas, así como las normas y regulaciones nacionales: EN 55014-1:2017 • EN 55014-2:2015 • EN ISO 11806-1:20
Tłumaczenie oryginalnej deklaracji zgodności WE PL Niniejszym oświadczamy, że Kosa akumulatorowa konstrukcja AS 4026 Lion Set Numer partii B-46649 spełnia wymogi odpowiednich Dyrektyw UE w ich aktualnie obowiązującym brzmie: 2006/42/EC • 2000/14/EC • 2011/65/EU* 2014/30/EU W celu zapewnienia zgodności z powyższymi dyrektywami zastosowano następujące normy harmonizujące oraz normy i przepisy krajowe: EN 55014-1:2017 • EN 55014-2:2015 • EN ISO 11806-1:2011 EN 60335-1:2012/A13:2017 • EN 60745-1:2009/A11:2010
Překlad originálního prohlášení o shodě CE SK Potvrzujeme tímto, že konstrukce Akumulátorová kosa konstrukční řady AS 4026 Lion Set Číslo šarže B-46649 odpovídá následujícím příslušným směrnicím EÚ v jejich právě platném znění: 2006/42/EC • 2000/14/EC • 2011/65/EU* 2014/30/EU Aby byl zaručen souhlas, byly použity následující harmonizovanénormy, národní normy a ustanovení: EN 55014-1:2017 • EN 55014-2:2015 • EN ISO 11806-1:2011 EN 60335-1:2012/A13:2017 • EN 60745-1:2009/A11:2010 EN 50636-2-91:2014 • EN 62
Explosionszeichnung • Exploded Drawing • Vue éclatée Vista esplosa • Explosietekening • Trimatis vaizdas Rysunek samorozwijający • Rozvinuté náčrtky Výkres náhradných dielov • Plano de explosión AS 4026 Lion informativ, informative, informatif, informativo informatief, pouczający, informační, informatyvus, informatívny 161
Service-Center DE Grizzly Tools GmbH & Co. KG Kunden-Service Stockstädter Straße 20 D-63762 Großostheim Tel.: 06026-9914-441 Fax: 06026-9914-499 e-mail: service-baumarkt@grizzly.biz Homepage : www.grizzly.biz NL I.T.S. Winschoten bv Bezoekadres: Papierbaan 55 9672 BG Winschoten Postadres: Antwoordnummer 300 9670 WB Winschoten Tel.: 0900 8724357 Tel.: 0597 413753 Fax: 0597 420632 e-mail: itsw@planet.nl IT Garden Italia SPA Via Zaccarini, 8 29010 San Nicolò a Trebbia (PC) Tel.