
Instructions


55
GB
Assembly
Before initial operation of the equipment,
the two-part shaft tube must be assem-
bled, the handle tted, the cutting device
with protective cover installed, the carrying
strap tted and the equipment checked.
K L M N O P Q R S T
U V W X Y Z
A B
C D E F G H I J
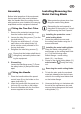
Fitting the Two-Part Tube
1. Remove the protective transport cap
from the bottom shaft tube (5).
2. Loosen the tube xing screw (7) on the
top shaft tube (3).
3. Plug the two shaft tubes (3 + 5) into
each other so the safety button (4)
clicks into the notch provided for it in
the top shaft tube.
4. Retighten the tube xing screws (7).
Ensure that the bottom shaft tube is
sitting rmly and safely before start-
ing the equipment.
5. Dismantling:
Loosen the tube xing screw (7). Press
the safety button (4) and pull the tubes
apart
K L M N O P Q R S T
U V W X Y Z
A B C
D E F G H I J
Fitting the Handle
1. Place the handle without the speed
control lever (8) on the holder on the
upper shaft tube (3).
2. Insert the handle with the speed con-
trol lever (8) over this on the holder.
3. Screw the handles with the four Allen
screws supplied to the holder.
Installing/Removing the
Metal Cutting Blade
Wear protective gloves when han-
dling the metal cutting blade.
Dismantling the reel capsule is
described in the section on “Install-
ing/Removing the Reel Capsule”.
K L M N O P Q R S T
U V W X Y Z
A B C D
E F G H I J
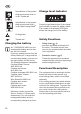
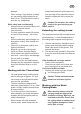
Installing the protective cover /
metal cutting blade:
1. Screw the protective cover onto
the cutting head holder using the 3
screws enclosed.
K L M N O P Q R S T
U V W X Y Z
A B C D E
F G H I J
Installing the metal cutting blade:
2. Place the metal cutting blade (11)
and anges on the cutting head hold-
er (11) in the following order:
Bottom ange – metal cutting
blade (11) – top ange.
3. Screw on the metal cutting blade (11)
anticlockwise using the xing
nut.
K L M N O P Q R S T
U V W X Y Z
A B C D E F
G H I J
Removing the metal cutting blade:
4. To lock the axle, push the enclosed
metal pin sideways into the hole pro-
vided on the cutting head holder and
on the bottom ange.
5. Unscrew the xing nut clockwise with
the aid of the maintenance key and
remove the top ange and the metal
cutting blade (11).