WWW.GRIZZLY.COM 14.4V 3⁄8" CORDLESS DRILL, DETAIL SANDER AND JIG SAW MODEL G8594 INSTRUCTION SHEET COPYRIGHT © 1999 BY GRIZZLY INDUSTRIAL, INC. 1821 VALENCIA ST., BELLINGHAM, WA 98227 WARNING: NO PORTION OF THIS MANUAL MAY BE REPRODUCED IN ANY SHAPE OR FORM WITHOUT THE WRITTEN APPROVAL OF GRIZZLY INDUSTRIAL, INC.
SAFETY For Your Own Safety Read Instruction Manual Before Operating This Equipment The purpose of safety symbols is to attract your attention to possible hazardous conditions. This manual uses a series of symbols and signal words which are intended to convey the level of importance of the safety messages. The progression of symbols is described below. Remember that safety messages by themselves do not eliminate danger and are not a substitute for proper accident prevention measures.
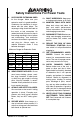
Safety Instructions For Power Tools 9. USE PROPER EXTENSION CORD for the charger. Make sure your extension cord is in good condition. Conductor size should be in accordance with the chart below. The amperage rating should be listed on the motor or tool nameplate. An undersized cord will cause a drop in line voltage resulting in loss of power and overheating. Your extension cord must also contain a ground wire and plug pin. Always repair or replace extension cords if they become damaged.
CHARGING SAFETY 1. READ ALL INSTRUCTIONS and warnings on the battery and charger before charging the battery. 2. CHARGE ONLY USING THE SUPPLIED CHARGER AND BATTERY. Do not use with other batteries, chargers or drills. 3. DO NOT EXPOSE BATTERY OR CHARGER TO WET OR RAINY CONDITIONS. Moisture greatly increases the risk of a shock hazard. 4. DO NOT TOUCH BATTERY POLES with any conductive materials.
BEFORE YOU START First review the contents of your cordless tool kit and familiarize yourself with the key components: Heavy-Duty Case Cordless Drill Cordless Detail Sander Cordless Jig Saw Saw Blade Battery Pack 1 Hour Charger 4. To begin charging, press the “SET” button. A steady red light over the word “ON” should come on indicating the battery is being charged. 5. When the battery is fully charged, the red light will go off and the unit will stop charging.
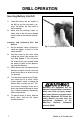
DRILL OPERATION Inserting Battery Into Drill 1. Insert the battery into the handle of the drill so that the long end is forward. The battery will only install in one orientation. 2. Make sure the securing clasps on either side of the drill base engage with the clips on the battery compartment. Inserting and Removing Bits and Drivers: 1. Set the direction switch, located just above the trigger, so that it is in the center position. 2.
DRILL OPERATION, CONT’D numbers from 1 to 5 on it, and a pointer indicator embossed on the drill case. Set on 1 for very light applications such as driving screws into drywall. Use the higher settings up to 5 for denser woods and materials. Use the drill bit symbol when boring holes. Using the proper torque setting will ensure that the fastener is not driven too deeply damaging the surface material, or in the worst case, stripped out of the hole due to overtorquing. Operating the drill 1. 2.
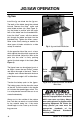
JIG SAW OPERATION Jig Saw Install the jig saw blade into the jig saw. The teeth of the blade should be pointed forward. Remove the Allen® screw and metal blade retainer tab. (See Figure 3). Lay the blade in position with the larger hole of the blade over the threaded hole. Insert the Allen® screw, with the retainer tab, through the blade and back into the threaded hole. Tighten the Allen® screw. Refer to the Grizzly catalog or website for other types of blades suitable for a wide variety of materials.
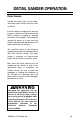
DETAIL SANDER OPERATION Detail Sander Transfer the battery pack to the sander. The battery snaps into the base the same as the drill. Install the desired sandpaper grit onto the triangular sanding pad. Please consult the Grizzly catalog or website for ordering information for sandpaper. The sandpaper attaches by means of a hook and loop material. Be certain the replacement sandpaper purchased is of this type.
OPERATING TIPS AND MAINTENANCE Operating Guides and Tips Maintenance Avoid overloading the drill, sander or jig saw. Do not apply excessive pressure to the tool while using. If the speed drops abnormally, decrease pressure immediately. When drilling, if the bit stops abruptly or becomes blocked, release the trigger at once. Reverse the direction to free the drill bit. Your cordless power tool will give you hundreds of hours of operation time before ever needing service.
WARRANTY AND RETURNS Grizzly Industrial, Inc. warrants every product it sells for a period of 1 year to the original purchaser from the date of purchase. This warranty does not apply to defects due directly or indirectly to misuse, abuse, negligence, accidents, repairs or alterations or lack of maintenance.
WARRANTY CARD Name __________________________________________________________ Street __________________________________________________________ City____________________State________Zip_________ Phone Number____________E-Mail___________________FAX____________ MODEL # G8594 14.4V Cordless Set Order #_______________________ The following information is given on a voluntary basis. It will be used for marketing purposes to help us develop better products and services.
Send a Grizzly Catalog to a friend: Name________________________________ Street________________________________ City______________State______Zip_______ FOLD ALONG DOTTED LINE GRIZZLY INDUSTRIAL, INC. P.O. BOX 2069 BELLINGHAM, WA 98227-2069 TAPE ALONG EDGES--PLEASE DO NOT STAPLE G8594 14.