8 GAUGE DEEP STAPLER KIT MODEL H7678 INSTRUCTION MANUAL COPYRIGHT © JULY, 2005 BY GRIZZLY INDUSTRIAL, INC., REVISED DECEMBER, 2007 (TS) WARNING: NO PORTION OF THIS MANUAL MAY BE REPRODUCED IN ANY SHAPE OR FORM WITHOUT THE WRITTEN APPROVAL OF GRIZZLY INDUSTRIAL, INC.
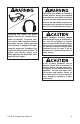
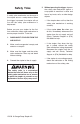
SAFETY For Your Own Safety Read Instruction Manual Before Operating This Equipment The purpose of safety symbols is to attract your attention to possible hazardous conditions. This manual uses a series of symbols and signal words which are intended to convey the level of importance of the safety messages. The progression of symbols is described below. Remember that safety messages by themselves do not eliminate danger and are not a substitute for proper accident prevention measures.
Safety Instructions For Pneumatic Tools 10. USE PROPER AIR HOSE for the tool. Make sure your air hose is in good condition and is long enough to reach your work without stretching. 11. WEAR PROPER APPAREL. Do not wear loose clothing, gloves, neckties, rings, bracelets, or other jewelry which may get caught in moving parts. Non-slip footwear is recommended. Wear a protective hair covering to contain long hair. 12. ALWAYS USE SAFETY GLASSES. Also use a face or dust mask if cutting operation is dusty.
Additional Safety Instructions for Staplers 1. HAND INJURIES. Do not place your hands near the staple point of entry. A staple can deflect and tear through the surface of the workpiece, puncturing your hand or fingers. 2. COMBUSTIBLE GASES. Never connect the stapler to pressurized oxygen or other combustible gases as a power source. Only use filtered, lubricated, and regulated compressed air. 3. 4. -2- SAFE HANDLING.
Never point this stapler at yourself or another person! Always pay attention to the direction this stapler is pointed. Use this tool with respect and caution to lessen the possibility of operator or bystander injury. Ignoring this warning may result in serious personal injury. Operating this stapler can propel objects into the air, causing immediate eye damage. To protect yourself, always wear American National Standards Institute (ANSI) approved safety glasses or goggles when operating this equipment.
INTRODUCTION Foreword Contact Info We are proud to offer the Grizzly Model H7678 18 Gauge Deep Stapler Kit. This model is part of a growing Grizzly family of fine pneumatic tools. When used according to the guidelines set forth in this manual, you can expect years of trouble-free, enjoyable operation and proof of Grizzly’s commitment to customer satisfaction.
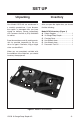
SET UP Unpacking Inventory Your Model H7678 left our warehouse in a carefully packed box. If you discover the stapler is damaged after you have signed for delivery, please immediately call Customer Service at (570) 546-9663 for advice. After you open the stapler box, you should find the following. Save the containers and all packing materials for possible inspection by the carrier or its agent. Otherwise, filing a freight claim can be difficult. Model H7678 Inventory (Figure 1) A. Safety Goggles ......
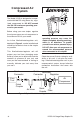
Compressed Air System The Model H7678 is designed to be operated at 60-100 PSI using clean, dry, regulated, compressed air. DO NOT exceed the 120 PSI maximum operating pressure for your model. Before using your new stapler, regulate the air pressure on your air compressor to the minimum PSI for your model. An in-line filter/lubricator/regulator unit, depicted in Figure 2, can be installed and should be located as close to the stapler as possible.
Safety Yoke A safety yoke mechanism on the nose of the stapler acts as a safety device. When the trigger is pressed, the stapler will not fire until the safety yoke mechanism is depressed. Before you use your stapler for the first time, check the safety yoke mechanism to ensure proper function. To do this: 1. DISCONNECT STAPLER FROM THE AIR SUPPLY! 2. Make sure the magazine is empty and contains no staples. 3. Make sure the trigger and the safety yoke mechanism move up and down without sticking. 4.
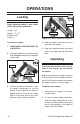
OPERATIONS Loading Pusher When replacing staples in your Model H7678, follow these guidelines: Gauge: 18 Length: 3⁄8"–11⁄2" Capacity: 100 Crown: 1⁄4 " Magazine Figure 4. Loading staples into magazine. To load your stapler: 4. Slide the staples all the way down to the nose of the stapler. 1. DISCONNECT STAPLER FROM THE AIR SUPPLY! 2. Grip the stapler firmly, unlock the catch lever (Figure 3) and pull the magazine pusher back.
3. Depress the safety yoke mechanism on your workpiece. 4. Before pulling the trigger, make sure your free hand and other body parts are positioned out of the way of a potential path of a staple in case of deflection. Deflection is caused when grain irregularities, knots or foreign objects inside the wood cause the staple to change its path, resulting in the staple puncturing the surface of the workpiece, as shown in Figure 5.
Clearing Jammed Staples 5. The jammed staple should now be visible; remove it from the discharge area with needle nose pliers. 6. Secure the quick release latch. A jammed staple must be cleared before using the stapler again. To clear a jammed staple from the discharge area: 1. DISCONNECT STAPLER FROM THE AIR SUPPLY! 2. Unlock the catch lever and slide the magazine pusher all the way back. 3. Remove the staple stick from the magazine. 7. Inspect the staple stick.
Replacing Pistons/ORings If you use your stapler day in and day out, repair pistons are cheap insurance against wasted down time and lost profits, in the event that a piston or piston shaft becomes worn out. A replacement piston and O-ring kit, part PH7678075, may be purchased for the Model H7678. 6. Open the nose cover as if to clear a jammed staple. 7. Watch the discharge area and push the top of the piston with your finger. You will see the piston shaft slide down the discharge area. 8.
CLEANING & LUBRICATION Cleaning Lubricating Disconnect the stapler from the air supply before cleaning. Use a good solvent to clean the nose assembly of the stapler. Always be sure that the stapler is dry before using it again. Pneumatic tool oil has been included with your new Grizzly stapler to help maintain its useful life. Place two to three drops of oil in the stapler air inlet (as shown in Figure 7) before every use, or after 2 hours of continuous use. Do not allow dust, chips, sand, etc.
H7678 PARTS BREAKDOWN � �� � �� � �� � �� � � � �� �� � �� � �� �� �� �� �� �� �� �� �� �� �� �� �� �� �� �� �� �� �� �� �� �� �� �� �� �� �� �� �� �� �� �� �� �� �� � �� �� �� �� �� �� �� �� �� �� �� �� �� ��� �� ���� �� �� �� �� �� �� �� �� �� �� �� �� �� �� H7678 18 Gauge Deep Stapler Kit -13-
H7678 PARTS LIST REF PART # DESCRIPTION REF PART # DESCRIPTION 1 2 3 4 5 6 7 8 9 10 11 12 13 14 15 16 17 18 19 20 21 22 23 24 25 26 27 28 29 30 31 32 33 34 35 36 37 38 SPECIAL CAP SCR M6-1 X 5 COMPRESSION SPRING AIR DEFLECTOR CAP SCREW M5-.8 X 20 FLAT WASHER 5MM CYLINDER COVER O-RING 14 X 2 SEALING WASHER COMPRESSION SPRING SWITCH VALVE PISTON O-RING 31 X 2 O-RING 26 X 3 SEALING GASKET COLLAR O-RING O-RING CYLINDER O-RING 21 X 2.
TROUBLESHOOTING Symptom Possible Cause Solution Air leaking at trigger valve area. 1. O-rings in trigger valve housing are damaged. 1. O-rings must be replaced & operation of safety yoke must be checked. Air leaking between housing and hose. 1. Loose screws in housing. 2. Damaged O-ring. 3. Loose air fitting. 1. Tighten screws. 2. Replace O-ring. 3. Tighten air fitting & use teflon tape. Air leaking between housing and cap assembly. 1. Damaged seal. 1. Replace damaged seals.
WARRANTY AND RETURNS Grizzly Industrial, Inc. warrants every product it sells for a period of 1 year to the original purchaser from the date of purchase. This warranty does not apply to defects due directly or indirectly to misuse, abuse, negligence, accidents, repairs or alterations or lack of maintenance.
WARRANTY CARD Name _________________________________________________________________ Street _________________________________________________________________ City _______________________ State _________________________ Zip _________ Phone # ____________________ Email ________________________ Invoice # _____ Model # ____________________ Order # _______________________ Serial # ______ The following information is given on a voluntary basis.
Send a Grizzly Catalog to a friend: Name________________________________ Street________________________________ City______________State______Zip_______ FOLD ALONG DOTTED LINE Place Stamp Here GRIZZLY INDUSTRIAL, INC. P.O.