Akku-Rasenmäher Cordless lawn mower Accu-grasmaaier Tondeuse à a ccumulateur Tosaerba a batteria Akumulatorowa kosiarka Aku travní sekačka Akumuliatorinės v ejapjovė DE GB NL FR IT PL CZ LT ARM 2432 Lion Set Originalbetriebsanleitung Translation of the original instructions for use Vertaling van de originele gebruiksaanwijzing Traduction de la notice d’utilisation originale Traduzione delle istruzioni per l’uso in originale Tłumaczenie oryginalnej instrukcji obsługi Překlad originálního návodu k obs
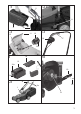
18 17 16 12 1 2 15 3 14 12 4 5 11 6 7 8 10 9 13 3 4c 10 4a 7 4b 1 14 15 2a 2b 3 2 4d
5 8 4 10 11 13 12 16 17 12a 18 12 12a 19 12b 14 1 20 2a 21 3
DE Originalbetriebsanleitung............................................5 GB Translation of the original instructions for use.......22 NL Vertaling van de originele gebruiksaanwijzing........37 FR Traduction de la notice d’utilisation originale.........53 IT Traduzione delle istruzioni per l’uso in originale....70 PL Tłumaczenie oryginalnej instrukcji obsługi.............87 CZ Překlad originálního návodu k obsluze..................105 LT Vertimas iš originalių eksploatavimo instrukcijoje..
DE Inhalt Lieferumfang.......................................... 5 Verwendungszweck.............................. 5 Sicherheitshinweise.............................. 6 Bildzeichen auf dem Gerät.................. 6 Symbole in der Anleitung.................... 7 Allgemeine Sicherheitshinweise......... 7 Allgemeine Beschreibung.................. 13 Funktionsbeschreibung..................... 13 Übersicht........................................... 13 Montage................................................
DE Sicherheitshinweise Setzen Sie das Gerät nicht der Feuchtigkeit aus. Dieser Abschnitt behandelt die grundlegenden Sicherheitsvorschriften bei der Arbeit mit dem Akku-Rasenmäher. Bildzeichen auf dem Gerät Hinweis Kontaktschlüssel Bildzeichen auf dem Akku Achtung! Lesen Sie die Bedienungsanleitung aufmerksam durch. Wasser. Verletzungsgefahr durch weggeschleuderte Teile. Tragen Sie Augen- und Gehörschutz Umstehende Personen von dem Mäher fern halten.
DE Schutzklasse II Elektrogeräte gehören nicht in den Hausmüll. Symbole in der Anleitung Gefahrenzeichen mit Angaben zur Verhütung von Personen- oder Sachschäden. Gebotszeichen (anstelle des Ausrufungszeichens ist das Gebot erläutert) mit Angaben zur Verhütung von Schäden. Hinweiszeichen mit Informationen zum besseren Umgang mit dem Gerät. Allgemeine Sicherheitshinweise Dieses Gerät kann bei unsachgemäßem Gebrauch ernsthafte Verletzungen verursachen.
DE • • • Schnüren oder Gürteln. Führen Sie vor jeder Benutzung eine Sichtprüfung des Gerätes durch. Benutzen Sie das Gerät nicht, wenn Schutzeinrichtungen (z.B. Prallschutz oder Grasfangkorb), Teile der Schneideinrichtung oder Bolzen fehlen, abgenutzt oder beschädigt sind. Zur Vermeidung einer Unwucht dürfen beschädigte Werkzeuge und Bolzen nur satzweise ausgetauscht werden.
DE • • sich beide Hände in Arbeitsstellung befinden, bevor das Gerät wieder auf den Boden zurückgestellt wird. Arbeiten Sie nie ohne Grasfangkorb oder Prallschutz. Halten Sie sich immer entfernt von der Auswurföffnung. Starten Sie den Motor nicht, wenn Sie vor dem Auswurfschacht stehen. Achtung Gefahr! Messer läuft nach. Es besteht Verletzungsgefahr. • • • • • Das Gerät darf nicht angehoben oder transportiert werden, solange der Motor läuft.
DE • • ab. - führen Sie die erforderlichen Reparaturen beschädigter Teile durch Bringen Sie Hände oder Füße niemals in die Nähe oder unter rotierende Teile. Bei Sichelmähern darf sich nie vor die Grasauswurföffnung gestellt werden. Ziehen Sie den Stromkreisunterbrecher/Kontaktschlüssel immer wenn: - Sie sich vom Gartengerät entfernen, - vor dem Beseitigen von Blockierungen, - wenn Sie das Gartengerät überprü-fen, reinigen oder an ihm arbeiten - nach der Kollision mit einem Fremdkörper.
DE • • zeugen. Unveränderte Stecker und passende Steckdosen verringern das Risiko eines elektrischen Schlages. Vermeiden Sie Körperkontakt mit geerdeten Oberflächen wie von Rohren, Heizungen, Herden und Kühlschränken. Es besteht ein erhöhtes Risiko durch elektrischen Schlag, wenn Ihr Körper geerdet ist. Halten Sie Elektrowerkzeuge von Regen oder Nässe fern. Das Eindringen von Wasser in ein Elektrowerkzeug erhöht das Risiko eines elektrischen Schlages.
DE • chanische Beschädigung des Akkus. Es besteht die Gefahr eines Kurzschlusses und es können Dämpfe austreten, die die Atemwege reizen. Sorgen Sie für Frischluft und nehmen Sie bei Beschwerden zusätzlich ärztliche Hilfe in Anspruch. Verwenden Sie keine nicht wiederaufladbaren Batterien. Das Gerät könnte beschädigt werden.
DE • muss sie durch den Hersteller oder seinen Kundendienst oder eine ähnlich qualifizierte Person ersetzt werden, um Gefährdungen zu vermeiden. Laden Sie in dem Ladegerät keine nichtaufladbaren Batterien auf. Das Gerät könnte beschädigt werden. Übersicht A Allgemeine Beschreibung Funktionsbeschreibung Der Akku-Rasenmäher besitzt ein parallel zur Schnittebene sich drehendes Schneidwerkzeug.
DE gehäuses (10) ein. 2. Befestigen Sie die unteren Holme (3) mit den beiliegenden Schrauben (7). Bügelgriff montieren 3. Befestigen Sie den Bügelgriff (1) mit den beiliegenden Schrauben (2b) und den Flügelmuttern (2a) an den unteren Holmen (3). Es sind zwei Positionen möglich. Kabelhalter montieren 4. Klipsen Sie die Kabelhalter (15) am unteren Holm (3) und Bügelgriff (1) ein und fixieren Sie damit das Gerätekabel (14).
DE F 1. Greifen Sie den Hebel (8) zur Schnitthöhenverstellung und führen Sie ihn an der Rasterung vorbei auf die gewünschte Einstellung der Schnitthöhe. Die richtige Schnitthöhe beträgt bei einem Zierrasen etwa 25 - 45 mm, bei einem Nutzrasen etwa 45 - 65 mm. Für den ersten Schnitt in der Saison sollte eine hohe Schnitthöhe gewählt werden. Beachten Sie den Lärmschutz und örtliche Vorschriften. Ein- und Ausschalten G H 1. Stellen Sie den Mäher auf eine ebene Fläche. 2.
DE Laden Sie nur mit beiliegendem Ladegerät auf. Achten Sie darauf, dass das Gerät nicht länger als 7-9 Stunden ununterbrochen aufgeladen wird. Der Akku und das Gerät könnten beschädigt werden und bei längerer Ladezeit verbrauchen Sie unnötig Energie. Bei Überladung erlischt der Garantieanspruch. • Laden Sie den Akku vor dem ersten Gebrauch auf. Den Akku nicht mehrmals hintereinander kurz aufladen.
DE Der erste Schnitt erfolgt ab etwa April bei einer Aufwuchshöhe von 70 - 80 mm. In der Hauptvegetationszeit wird der Rasen mindestens einmal pro Woche gemäht. • • • • Führen Sie das Gerät im Schritttempo in möglichst geraden Bahnen. Für ein lückenloses Mähen sollten sich die Bahnen immer um wenige Zentimeter überlappen. Stellen Sie die Schnitthöhe so ein, dass das Gerät nicht überlastet wird. Andernfalls kann der Motor beschädigt werden. Arbeiten Sie an Hängen immer quer zum Hang.
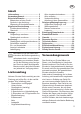
DE 1. Drehen Sie das Gerät um. 2. Benutzen Sie feste Handschuhe und halten Sie das Messer (19) fest. Drehen Sie die Messerschraube (20) gegen den Uhrzeigersinn mit Hilfe eines Schraubenschlüssels (SW13) von der Motorspindel (21). 3. Bauen Sie das neue Messer (19) in umgekehrter Reihenfolge wieder ein. Achten Sie darauf, dass das Messer (19) richtig positioniert und die Messerschraube (20) fest angezogen ist.
DE Ersatzteile/Zubehör Ersatzteile und Zubehör erhalten Sie unter www.grizzly-shop.de oder www. grizzly-service.eu Sollten Sie kein Internet haben, so wenden Sie sich bitte telefonisch an das Service-Center (siehe „Grizzly ServiceCenter“). Halten Sie die unten genannten Bestellnummern bereit. Reparatur-Service • • Akku ......................................... 91003390 Ladegerät.................................. 80001085 Ersatzmesser............................ 13700450 Grasfangkorb.....................
DE Technische Daten Akku-Rasenmäher... ARM 2432 Lion Set Motorspannung...................24 V 4,0 Ah Leerlaufdrehzahl........................3400 min-1 Messerbreite................................ 320 mm Schnitthöhe........ 25 / 35 / 45 / 55 / 65 mm Schutzklasse......................................... III Schutzart............................................IPX1 Gewicht (ohne Akku und Ladegerät)..............9,7 kg Volumen Grasfangkorb.........................30 l Schalldruckpegel (LpA)...................
DE Fehlersuche Problem Mögliche Ursache Fehlerbehebung Akku leer oder nicht eingesetzt Akku Ladezustand prüfen, ggf. Reparatur durch Elektrofachmann Entriegelungsknopf ( A 16) oder Starthebel ( A 17) defekt Gerät startet nicht Kohlebürsten abgenutzt Reparatur durch ServiceCenter Motor defekt Motor setzt aus Arbeitsergebnis nicht zufriedenstellend oder Motor arbeitet schwer Messer rotiert nicht Abnorme Geräusche, Klappern oder Vibrationen Gras zu lang Größere Schnitthöhe einstellen.
GB Contents Scope of Delivery................................ 22 Intended Use........................................ 22 Safety Information............................... 23 Symbols on the device...................... 23 Symbols used in the instructions...... 24 General Safety Information............... 24 General Description............................ 29 Function Description......................... 29 Summary........................................... 29 Assembling instructions.....................
GB Safety Information Note ignition key This section covers the basic safety regulations when working with the electric lawnmower. Symbols on the device Caution! Read the operating instructions carefully. Do not work in the rain and do notMAX.cut 60°C wet grass. Symbols on the battery MAX. 60°C Risk of injury from parts being thrown up. Wear ear and eye protection Keep nearby people away from the mower. Caution – sharp cutting blade! Keep feet and hands away.
GB Electrical appliances must not be disposed of with the domestic waste. • Symbols used in the instructions • Hazard symbols with information on prevention of personal injury and property damage. Precaution symbol (explanation of precaution instead of exclamation mark) with information on prevention of harm / damage. Notice symbol with information on how to handle the device properly. General Safety Information This unit can cause serious injury if not used correctly.
GB • • bolts are missing, worn or damaged. To avoid imbalance, damaged tools and bolts are to be replaced only in sets. Take care with equipment that has several cutting tools, as the movement of one blade may result in the rotation of the other blades. Use only spare parts and accessories supplied and recommended by the manufacturer. The use of non-original parts will immediately invalidate the guarantee.
GB • • • • • • 26 surfaces other than grass, and when the equipment is being transported to and from the surfaces to be mowed. Always keep the grass ejection hole clean and clear. Remove cut material only when the equipment is stopped. Do not leave the equipment unattended in the workplace. Do not work with equipment that is damaged, incomplete, or has been modified without the authorisation of the manufacturer.
GB • • • • • • • Check the mower for any damages. Do not attempt to repair the equipment yourself unless you have been trained to do so. Any work not specified in these instructions is to be carried out only by customer service centres that we have authorised. Keep the equipment in a dry location and out of reach of children. Handle the equipment with care. Keep tools sharp and clean, in order to facilitate better and safer work. Follow the maintenance instructions.
GB Special safety directions for battery-operated tools • • • • • • • Ensure that the device is switched off before inserting the battery. Inserting a battery into a power tool that is switched on may result in accidents. Recharge the batteries indoors only because the battery charger is designed for indoor use only. Risk of electric shock. To reduce the electric shock hazard, unplug the battery charger from the mains before cleaning the charger.
GB • • • may result in injuries and risk of fire Avoid mechanical damage to the charger. This can result in internal short circuits. Do not operate the charger on a combustible surface (e.g. paper, textiles). Risk of fire due to heating during charging. If the power cable for this equipment is damaged, it must be replaced by the manufacturer, a customer service agent of the same or a similarly qualified person in order to prevent hazards.
GB 2. Fix the bar (3) using the enclosed screws (7). 3. Fix the curved handle (1) using the enclosed screws (2b) and the wing nuts (2a) on the lower bar (3). There are two possible positions. 4. Clip the cable holder (15) into the bar (3) and thus fix the cable (14). Switch of the device, pull the ignition key (13) and wait for the blades to come to a stop. Mounting/removing the grass box E When both wing nuts are loosened, the curved handle can be folded down for storing the equipment.
GB Switching On and Off G H Charging process Do not expose the battery to extreme conditions such as heat or impact. Risk of injury from escaping electrolytic solution! After eye/skin contact, rinse the affected areas with water or a neutraliser and consult a doctor. 1. Place the mower on a level surface. 2. Lift the transparent cover (11) on the device housing and insert the charged battery (12) along the guide rail into the device. It locks into place audibly. 3.
GB Insert/remove battery Switch off the device, pull the ignition key (13) and wait for the blades to come to a stop. There is a risk of personal injury. G 1. To insert the battery (12) into the device, push the battery along the guide rail into the device. It locks into place audibly. 2. To remove the battery (12) from the device, press the release button (12a) on the battery and pull the battery out. Charge battery Allow a freshly charged battery (12) to cool down for approx.
GB Cleaning, Maintenance and Storage Have work that is not described in these instructions carried out by a customer service centre that we have authorised. Use only original parts. Wear gloves when handling the blade Switch off the device, pull the ignition key (13) and wait for the blades to come to a stop. There is a risk of personal injury. General Cleaning and Maintenance Work Do not hose down the lawnmower with water. Electric shock hazard • • • • Always keep the equipment clean.
GB Waste disposal and environmental protection Remove the battery from the device and take the device, battery, accessories and 400 mm packaging for environmentally friendly recycling. Machines do not belong with domestic waste. Do not dispose of the device with the battery installed in household waste, fire (risk of explosion) or water. Damaged batteries may damage the environment and your health if toxic fumes or liquids leak out. • • • • 34 Dispose of the equipment with the battery discharged.
GB Repair Service • • • Repairs, which are not covered by the guarantee, can be carried out for charge by our service center. Our service center will be glad to provide you with a cost estimate. We can only process devices which have been packaged sufficiently and which have been dispatched with correct stamping. Note: In case of complaint or service, please deliver your device cleaned, and with an indication of the defect, to our service address.
GB Trouble Shooting Problem Possible Cause Fault Fixing Battery is empty or not inserted Check charge level,have repairs carried out by a qualified electrician, if necessary Defective start lever ( A 17) or release button ( A 16) Equipment does not start Worn carbon brushes Repair by customer services Defective motor Motor stops Result unsatisfactory or motor labours Blade fails to turn Strange noises, rattling or vibrations 36 Grass too long Set a greater cut heigh.
NL Inhoud Omvang van de levering..................... 37 Gebruiksdoeleinde.............................. 37 Veiligheidsinstructies......................... 38 Symbolen in de gebruiksaanwijzing.... 39 Symbolen op het apparaat................ 39 Algemene veiligheidsinstructies........ 39 Algemene beschrijving....................... 44 Beschrijving van de werking............. 44 Overzicht........................................... 45 Montage................................................
NL Veiligheidsinstructies 34 cm Deze paragraaf behandelt de essentiële veiligheidsvoorschriften bij het werk met het apparaat. Stel het apparaat niet bloot aan vocht. Opmerking over de contactsleutel MAX. 60°C Symbolen op het apparaat Opgelet!! Neem de gebruiksaanwijzing aandachtig door. Symbolen op de accu MAX. 60°C Gevaar voor verwondingen door weggeslingerde onderdelen. Oog- en oorbescherming dragen. Omstanders op een veilige afstand tot de maaier houden.
NL Machines horen niet bij huishoudelijk afval thuis. Symbolen in de gebruiksaanwijzing Gevaarsymbool met informatie over de preventie van personen- of zaakschade. Gebodsteken (in plaats van het uitroepingsteken wordt het gebod toegelicht) met informatie over de preventie van schade. • • • Aanduidingsteken met informatie over hoe u het apparaat beter kunt gebruiken. Algemene veiligheidsinstructies Dit apparaat kan bij een onoordeelkundig gebruik ernstige verwondingen veroorzaken.
NL • • • broek. Gebruik het apparaat niet als u blootsvoets stapt of open sandalen draagt. Vermijd het dragen van loszittende kledij of kledij met hangende touwtjes of riemen. Voer telkens vóór gebruik een visuele controle van het apparaat door. Gebruik het apparaat niet als beschermingsinrichtingen (bijvoorbeeld stootbescherming of grasvangzak), onderdelen van de snoeiinrichting of bouten ontbreken, versleten of beschadigd zijn.
NL • • gemakkelijk opgetild worden. Controleer altijd dat beide handen zich in de werkstand bevinden voordat het apparaat weer op de grond neergezet wordt. Werk nooit zonder grasvangzak of stootbescherming. Houd u altijd op een veilige afstand tot de uitwerpopening. Start de motor niet wanneer u vóór de uitwerpschacht staat. Opgelet: gevaar! Mes loopt na. Er bestaat gevaar voor verwondingen. • • • • Het apparaat mag niet opgetild of getransporteerd worden zolang de motor draait.
NL • • raties van beschadigde onderdelen door. Breng handen en voeten nooit in de nabijheid van of onder roterende onderdelen. Bij cirkelmaaiers mag men nooit vóór de grasuitwerpopening gaan staan.
NL • • Vermijd lichamelijk contact met geaarde oppervlakken zoals van buizen, verwarmingsinstallaties, fornuizen en koelkasten. Er bestaat een verhoogd risico door een elektrische schok als uw lichaam geaard is. Houd het elektrische gereedschap op een veilige afstand van regen of nattigheid. Het binnendringen van water in elektrisch gereedschap verhoogt het risico op een elektrische schok. toevallig contact met water afspoelen. Als de vloeistof in de ogen komt, moet u bovendien een arts consulteren.
NL Juiste omgang met de acculader • • • • • 44 Dit apparaat kan door kinderen vanaf 8 jaar en ouder en tevens door personen met verminderde fysieke, zintuiglijke of mentale capaciteiten of met een gebrek aan ervaring en kennis gebruikt worden wanneer ze onder toezicht staan of met het oog op het gebruik van het apparaat geïnstrueerd werden en zich van de daaruit resulterende gevaren bewust zijn. Kinderen mogen niet met het apparaat spelen.
NL een stootbescherming en een grasvangzak uitgerust. Bovendien is het apparaat 5-voudig in de hoogte verstelbaar en heeft het gemakkelijk te bedienen wielen. Gelieve voor de werking van de bedieningsonderdelen de hierna volgende beschrijvingen te raadplegen. De afbeeldingen voor de bediening en het onderhoud vindt u op de zijde 2 - 3. Montage • • • Beugelhandgreep monteren 1. Breng de onderste hoofdligger (3) in de opname van de behuizing (10) van de grasmaaier. 2.
NL Met de grasmaaier mag er niet zonder stootbescherming of grasvangmand gewerkt worden. Er bestaat gevaar voor verwondingen. Bediening Instellingen aan de maaier mogen alleen worden uitgevoerd als de motor is uitgeschakeld en het mes niet meer beweegt. Er bestaat gevaar voor lichamelijke letsels. Schakel het apparaat uit, trek de contactsleutel (13) uit en wacht de stilstand van het mes af.
NL sluit. Er bestaat gevaar voor verwondingen door een elektrische schok. tijdig de starthefboom (17) ingedrukt. Laat de ontgrendelknop (16) los. 6. Om uit te schakelen, laat u de starthefboom (17) los. Laad uitsluitend met het ingesloten, originele laadtoestel op. Let erop dat het apparaat niet langer dan 9 uur ononderbroken opgeladen wordt. De accu en het apparaat zouden beschadigd kunnen worden en bij een langere laadtijd verbruikt u onnodig energie.
NL G 1. Om de accu (12) in het apparaat te plaatsen, schuift u de accu langs de geleiderail in het apparaat. Het klikt hoorbaar vast. 2. Om de accu (12) uit het apparaat te nemen, drukt u de ontgrendeltoetsen (12a) aan de accu in en trekt u de accu uit. Accu opladen Laat een zonet ontladen accu (12) ca. 15 minuten lang afkoelen voordat u deze in het laadtoestel (18) plaatst. . I 1. Neem eventueel de accu (12) uit het apparaat. 2. Schuif de accu (12) op het laadtoestel (18). De accu klikt hoorbaar vast.
NL Reiniging/onderhoud/ opslag Laat werkzaamheden, die niet in deze handleiding beschreven zijn, door een door ons gemachtigde klantenserviceafdeling doorvoeren. Gebruik uitsluitend originele onderdelen. Mes uitwisselen Als het mes stomp is, kan het door een gespecialiseerde werkplaats bijgeslepen worden. Als het mes beschadigd is of een onbalans vertoont, moet het gewisseld worden (zie hoofdstuk “Reserveonderdelen”). 1. Draai het apparaat om. 2. Gebruik vaste handschoenen en houd het mes vast (19).
NL Berging en milieu Neem de accu uit het toestel en breng het toestel, de accu, de accessoires en de verpakking naar een milieuvriendelijke recycling. Machines horen niet thuis in het huisafval. Werp het toestel met ingebouwde accu niet in het huisvuil, het vuur (explosiegevaar) of het water. Beschadigde accu’s kunnen schadelijk zijn voor het milieualsook uw gezondheidindien giftige dampen of vloeistoffen vrijkomen. • • • • Geef de acculader af op een recyclingpunt.
NL • • (olie loopt uit als de machine zijwaarts of op de kop gesteld wordt) of brandbeschadigingen die door het transport zijn ontstaan, worden ten laste van de afzender gelegd. Ongefrankeerde – oningepakt, express of andere speciale zendingen – toegezonden machines worden niet aangenomen. De afvalverwijdering van uw defecte ingezonden apparaten voeren wij gratis door. Technische informatie Accu-Grasmaaier..... ARM 2432 Lion Set Motorspanning....................24 V 4,0 Ah Onbelast toerental............
NL Foutmeldingen Probleem Mogelijke oorzaak Accu ontladen Accu niet aangebracht Starthefboom ( A 17) of ontgrendelknop ( A 16) defect Apparaat start nie Koolborstels versleten Oplossing Accu laden (zie „Laadprocédé“) Accu aanbrengen (zie „Bediening“) Reparatie door servicecenter Motor defect Motor wordt uitgeschakeld Gras te lang Grotere maaihoogte instellen. Met een druk op de grijpstang de voorwielen lichtjes optillen.
FR Table des matières Volume de la livraison......................... 53 Domaine d’emploi................................ 53 Consignes de sécurité........................ 54 Pictogrammes / Inscriptions sur l’appareil.................. 54 Symboles utilisés dans le mode d’emploi...................... 55 Consignes de sécurité générales...... 55 Description générale........................... 61 Description du fonctionnement......... 61 Vue d’ensemble................................ 61 Montage................
FR Le fabricant n‘est pas responsable des dommages qui seraient causés par un usage contraire aux prescriptions ou par une manipulation non conforme Consignes de sécurité L WA 400 mm dB 34 cm Attention! Lisez attentivement le mode d’emploi. Risque de blessure par les particules éjectées de la coupe Portez une protection pour les yeux et les oreilles Tenir les personnes à distance du faucheur. Attention - Lames de coupe acérées ! Tenir à distance les pieds et les mains.
FR Polarité Préparation: Le chargeur peut être utilisé uniquement à l‘intérieur • Classe de protection II Les appareils électriques ne doivent pas être jetés avec les déchets ménagers. Symboles utilisés dans le mode d’emploi Signes de danger avec conseils de prévention des accidents sur les personnes ou des dégâts matériels. Signes indicatifs (l’impératif est expliqué à la place des points d’exclamation) avec conseils de prévention des dégâts.
FR • • • • 56 ou sur leurs propriétés. Inspectez le terrain sur lequel l’appareil sera employé et retirez les pierres, les branches, les fils ou autres corps hétérogènes qui pourraient être happés puis éjectés par la lame. Portez des vêtements de travail appropriés, tels que de solides chaussures avec semelles antidérapantes et un pantalon long et épais. N’utilisez pas l’appareil, si vous êtes pieds nus ou portez des sandalettes.
FR • • • • faites faire demi-tour à l’appareil, en vous approchant de lui ou si vous vous déplacez en arrière. Mettez l’appareil en marche avec prudence, conformément aux instructions de ce guide d’utilisation. Faites attention à respecter une distance suffisante entre les pieds et les lames. Ne basculez pas l’appareil lors de la mise en marche à moins que cela ne ce soit nécessaire en étant arrêté dans de hautes herbes.
FR • • 58 tes les pièces mobiles sont à l‘arrêt : - toujours, quand vous quittez la machine, - avant que vous nettoyiez l’ouverture d’éjection ou éliminiez la cause des blocages, - si l’appareil n’est pas utilisé, - avant de contrôler, nettoyer l’appareil ou de travailler sur celui-ci, - Si l’appareil a rencontré un corps hétérogène pendant le travail ou si les vibrations inaccoutumées se produisent.
FR • • protection. Contrôlez régulièrement le dispositif de collecte de l’herbe afin de détecter usure et déformations. Pour des raisons de sécurité, remplacez les pièces usées ou endommagées. Soyez particulièrement prudent afin de ne pas coincer vos doigts entre les lames rotatives et les parties fixes de la machine. Vérifiez que vous n’utilisez que des lames de recharge autorisées par le fabricant. Sécurité électrique : . • Le connecteur du chargeur doit rentrer dans la prise de terre.
FR Consignes de sécurité spécifiques pour les appareils sans fil • • • • • • • 60 Assurez-vous que l‘appareil est bien mis à l‘arrêt avant d‘insérer la batterie. L‘insertion de la batterie dans un appareil en service peut entraîner des accidents. Chargez vos batteries uniquement à l‘intérieur, car le chargeur est prévu uniquement pour une utilisation à l‘intérieur. Risque d‘électrocution.
FR • • • • • • Gardez le chargeur toujours propre et protégez-le de l‘humidité et de la pluie. N‘utilisez le chargeur jamais à l‘extérieur. La pénétration de saletés ou d‘eau augmente le risque d‘une électrocution. Le chargeur doit être utilisé uniquement avec les batteries d‘origines correspondantes. Le chargement d‘autres batteries peut entraîner des blessures et un risque d‘incendie. Évitez tous endommagements mécaniques du chargeur. Ils peuvent entraîner des courtcircuits internes.
FR Montage • • • 3. Encliquetez le guidage du bac collecteur (4d) dans les rainures prévues à cet effet sur le bac à herbe inférieur (4b) Veuillez porter des gants de protection. Veuillez exécuter uniquement les travaux dont vous vous sentez capable. En cas d‘incertitude, faites appel à un spécialiste ou directement à notre service après-ventes. Attention : l’appareil ne doit pas être utilisé sans la protection anti-chocs correctement mis en place ou le panier collecteur d’herbe.
FR Régler la hauteur de coupe L’appareil possède 5 positions de réglage de la hauteur de coupe : 65 mm - hauteur de coupe haute 55 mm - hauteur de coupe moyenne 45 mm - hauteur de coupe moyenne 35 mm - hauteur de coupe basse 25 mm - hauteur de coupe basse F 1. Saisissez le levier de réglage de hauteur de coupe (8) et dirigez le sur l’indexage pour obtenir la hauteur de coupe souhaitée.
FR roits touchés avec de l‘eau ou un neutralisant et consultez un médecin. La batterie doit être chargée uniquement dans des endroits secs. La surface extérieure de la batterie doit être propre et sèche avant la connexion du chargeur. Il y a un risque de blessures par électrocution. Chargez la batterie uniquement avec le chargeur joint. Veillez à ce que l‘appareil ne soit pas chargé plus de 9 heures consécutives.
FR Batteries usées • • Si la durée de fonctionnement est considérablement réduite malgré un chargement régulier, ceci indique que la batterie est usée et qu‘il faut la remplacer. Utilisez uniquement une batterie de remplacement, que vous pouvez acheter auprès de notre service après-ventes. Veuillez respecter dans tous les cas les consignes de sécurité et règlementations en vigueur, ainsi que les consignes de protection de l‘environnement (voir « Élimination/Protection de l‘environnement »).
FR • • • • Conservez l’appareil toujours propre. Pour le nettoyage, utilisez une brosse ou un chiffon mais aucun produit de nettoyage ou de solvant. Une fois la tonte terminée, avec une spatule en bois ou en matière plastique, éliminez les restes de plantes qui adhèrent aux parois et aux roues, aux buses d’aération, dans l’ouverture d’éjection et autour de la lame. N’utilisez aucun objet dur ou acéré, vous pourriez endommager l’appareil.
FR si des liquides ou des vapeurs toxiques s’en échappent. • • • • Jetez l’appareil avec l’accumulateur déchargé. N’ouvrez pas l’appareil ni l’accumulateur. Jetez l’appareil d’après les instructions locales. Déposez l’appareil dans une déchèterie, où il pourra être recyclé écologiquement. Renseignez-vous auprès de votre déchetterie locale ou auprès de notre service après-vente. Jetez les déchets de coupe dans le composte et non pas dans les ordures ménagères.
FR Batterie ..................................... 91003390 Chargeur................................... 80001085 Lame de rechange.................... 13700450 Panier collecteur d’herbe........... 91095497 Données techniques Tondeuse à accumulateur......... ARM 2432 Lion Set Tension moteur...................24 V 4,0 Ah Régime de ralenti.......................3400 min-1 Diamètre de coupe...................... 320 mm Hauteur de coupe ....................................... ...........................
FR Recherche des pannes Problème L‘appareil ne démarre pas Cause possible Résolution des pannes Vérifier le niveau de charge de la batterie, prévoir, le cas Batterie vide ou pas insérée échéant, une réparation par un électricien Levier de démarrage ( A 17) ou bouton de déverrouillage Réparation par le service après( A 16) défectueux vente Balais de charbon usés Moteur défectueux Le moteur s‘arrête Herbe trop haute Régler sur une hauteur de coupe plus haute.
IT Indice Volume di fornitura.............................. 70 Destinazione d’uso.............................. 70 Norme di sicurezza.............................. 71 Simboli/scritte sull’apparecchio......... 71 Norme de sicurezza nelle istruzioni..... 72 Indicazioni di sicurezza generali....... 72 Descrizione generale.......................... 78 Descrizione del funzionamento......... 78 Vista d’insieme.................................. 78 Montaggio............................................
400 mm dell’apparecchio in presenza di pioggia o in ambienti umidi è vietato. Il produttore declina ogni responsabilità per danni causati da un uso improprio o un comando errato. 34 cm Non esporre l’apparecchio all’umidità. Non lavorare quando piove e non tagliare erba bagnata. Questa sezione tratta le indicazioni di sicurezza fondamentali durante il lavoro con il tagliaerba elettrico. Attenzione! Leggere attentamente le istruzioni d’uso.
IT Polarizzazione elettrica Preparazione: Il carica-batterie può essere utilizzato per la ricarica, all’interno di locali. • Classe di protezione II Le apparecchiature non si devono smaltire insieme ai rifiuti domestici. Norme de sicurezza nelle istruzioni Simboli di pericolo con indicazioni relative alla prevenzione di danni a cose e persone. Simboli di divieto (al posto del punto esclamativo il divieto viene delucidato) con indicazioni relative alla prevenzione di danni.
IT • • • • chiuse con suola antiscivolo e un pantalone lungo resistente. Non usare l’apparecchio scalzi o con i sandali. Evitare di indossare capi di abbigliamento aperti o con lacci o cinte pendenti. Prima di ogni uso, eseguire un controllo visivo dell’apparecchio. Non usare l’apparecchio in caso di dispositivi di sicurezza (p. es. protezione antiurto o cesto raccoglierba), componenti del dispositivo di taglio o bulloni mancanti, usurati o danneggiati.
IT • • • contenute nelle presenti istruzioni. Prestare attenzione ad una sufficiente distanza dei piedi dalle lame rotanti . Non ribaltare l’apparecchio durante l’avviamento, salvo nei casi in cui sia necessario per la partenza nell’erba alta. In questo caso, ribaltare l’apparecchio premendo l’impugnatura in modo tale che le ruote anteriori dell’apparecchio vengano leggermente sollevate.
IT • • - quando il cavo di rete è danneggiato o aggrovigliato, - quando l’apparecchio incontra un corpo estraneo durante il lavoro oppure subentrano vibrazioni insolite. In questo caso controllare l’apparecchio per verificare la presenta di eventuali danneggiamento, ed eventualmente farlo riparare. Non posizionare mai le mani o i piedi vicino o sotto le parti rotanti. In caso di tosatura con la falce, non posizionarsi mai davanti all’apertura di espulsione dell’erba .
IT • ciate tra le lame rotanti e le parti fisse della macchina. Assicurarsi che vengano usati solo utensili da taglio di ricambio autorizzati dal produttore. Sicurezza elettrica: . • Il connettore del caricabatterie deve entrare nella presa. La spina non deve essere modificata in alcun modo. Non usare un adattatore insieme a utensili elettrici collegati a massa. Spine non modificate riducono il rischio di scosse elettriche.
IT • medico. Non usare batterie non ricaricabili. L’apparecchio potrebbe venire danneggiato. Utilizzo corretto del caricabatterie • • • • • Questo apparecchio può essere usato da bambini a partire da 8 anni come anche da persone con capacità fisiche, sensoriali o mentali ridotte o senza esperienze e conoscenze, se sono sorvegliati o istruiti sull’uso sicuro dell’apparecchio e comprendono i pericoli che ne scaturiscono. I bambini non devono giocare con l’apparecchio.
IT Descrizione generale 19 Lama 20 Vite della lama 21 Alberino motore Descrizione del funzionamento Il tosaerba a batteria possiede un utensile da taglio che gira parallelamente al livello di taglio. E’ dotato di un motore elettrico potente, un alloggiamento di plastica resistente, un interruttore di sicurezza e una protezione antiurto come anche di un cesto raccoglierba. Inoltre, l’apparecchio è regolabile in 5 altezze ed è dotato di rotelle facili da manovrare.
IT 2. Far scattare il lato inferiore (4b) nelle apposite fessure in corrispondenza della parte superiore del cestello raccoglierba (4a). 3. Inserire la guida del cestello raccoglierba (4d) nelle apposite cavità della parte inferiore del cestello raccoglierba (4b). Attenzione: non azionare l’apparecchio senza la protezione antiurto o il cestino raccoglierba completamente montati.
IT H litica! In caso di contatto con gli occhi, sciacquare le parti interessate con acqua o un neutralizzatore e consultare un medico. dell‘accensione nell‘apposita apertura sotto la batteria ). 4. Prima di procedere all’accensione, prestare attenzione che l’apparecchio non tocchi oggetti 5. Per accendere l’apparecchio, premere il pulsante di sbloccaggio (16) sull’impugnatura e contemporaneamente tenere premuta la leva di avviamento (17). Rilasciare il pulsante di sbloccaggio (16). 6.
IT G 1. Per inserire la batteria (12) nell’apparecchio, spingerla al suo interno agendo lungo la barra di guida. Si innesta emettendo un suono. 2. Per rimuovere la batteria (12) dall’apparecchio, premere i tasti di sblocco (12a) della batteria ed estrarla. Caricamento della batteria Lasciare raffreddare la batteria (12) appena scaricata per ca. 15 minuti prima di inserirla nel caricabatterie (18). I 1. Eventualmente rimuovere la batteria (12) dall’apparecchio. 2.
IT Pulizia/manutenzione/ stoccaggio Fare effettuare i lavori non descritti nelle presenti istruzioni d’uso da un centro di assistenza clienti da noi autorizzato. Usare solo ricambi originali. Indossare guanti quando si maneggia la lama. Prima di qualsiasi intervento di manutenzione e/o pulizia, spegnere l‘apparecchio, estrarre la chiave dell‘accensione (13) e attendere che la lama si fermi. Pericolo di lesioni. Lavori di pulizia e manutenzione generali Non spruzzare il tosaerba con acqua.
IT Decliniamo ogni responsabilità per danni causati dai nostri apparecchi, qualora tali danni siano dovuti ad una riparazione non conforme o dall’impiego di ricambi non originali o da un uso improprio dell’apparecchio. Ricambi/Accessori Smaltimento/Tutela dell’ambiente Se non si dispone di una connessione Internet, contattare il centro di assistenza (vedere “Grizzly Service-Center”). Tenere a portata di mano i numeri d’ordine riportati in basso.
IT Assistenza unitamente alla prova d’acquisto e al tagliando di garanzia. Servizio di riparazione • • • Riparazioni non soggette a garanzia possono essere effettuate dal nostro centro di assistenza pagando in base al calcolo di quest’ultimo. Il nostro centro d’assistenza stilerà volentieri un preventivo per i nostri clienti. Possiamo trattare solo apparecchi che siano ben imballati e che siano inviati con un’affrancatura sufficiente. I rischi di trasporto sono a carico del mittente.
IT Avvertenza: Il valore di emissione delle oscillazioni può variare dal valore specificato durante l’uso effettivo dell’elettrodomestico, a seconda del tipo e del modo di utilizzo dell’elettrodomestico.
IT Ricerca guasti Problema L‘apparecchio non si accende Possibile causa Rimedio Batteria scarica o non inserita Controllare lo stato di carica della batteria e, se necessario, farla riparare da un elettricista Dadi ad alette ( A 17) o pulsante di sblocco ( A 16) difettoso Spazzola di carbone consumata Riparazione da parte del centro di assistenza clienti Motore difettoso Il motore si spegne Il risultato del lavoro non è soddisfacente oppure il motore è lento La lama non ruota Erba troppo alta
PL Spis treści Przeznaczenie...................................... 87 Wskazówki bezpieczeństwa............... 88 Symbole na urządzeniu.................... 88 Symbole w instrukcji obsługi............. 89 Ogólne wskazówki bezpieczeństwa................................ 89 Zakres dostawy................................... 95 Opis ogólny.......................................... 95 Opis działania................................... 95 Przegląd............................................ 96 Montaż................
400 mm PL Wskazówki bezpieczeństwa W niniejszym ustępie zajęto się podstawowymi przepisami bezpieczeństwa w trakcie pracy przy użyciu elektrycznej kosiarki do trawy. 34 cm Okrąg cięcia Nie wystawiaj urządzenia na działanie wilgoci i wody. Symbole na urządzeniu Uwaga! Proszę uważnie przeczytać niniejszą instrukcję obsługi. Niebezpieczeństwo urazów ze względu na wyrzucane części. Wskazówka dotycząca kluczyka startowego MAX. 60°C Symbole na baterii MAX.
PL Układ biegunów Przygotowanie: Ładowarka jest przeznaczona tylko do stosowania w pomieszczeniach. • Poziom ochrony II Urządzeń elektrycznych nie należy wyrzucać razem z odpadami domowymi Symbole w instrukcji obsługi Symbol niebezpieczeństwa z informacjami na temat ochrony osób i zapobiegania szkodom materialnym. • Znak nakazu (w miejscu wykrzyknika objaśnienie nakazu) z informacjami na temat zapobiegania szkodom. • Znak informacyjny ze wskazówkami ułatwiającymi posługiwanie się urządzeniem.
PL • • • • • 90 Proszę sprawdzić teren, w którym eksploatowane jest urządzenie, i usunąć kamienie, kije, druty oraz inne ciała obce, które mogą zostać uchwycone i wyrzucone. Proszę zawsze nosić odpowiednią odzień roboczą i stabilne obuwie z przeciwpoślizgową podeszwą oraz wytrzymałe, długie spodnie. Urządzenia nie należy używać, gdy chodzą Państwo boso lub noszą niezapinane sandały. Unikać noszenia luźnej odzieży, odzieży ze zwisającymi sznurami czy paskami.
PL • • • • • ność, gdy zmieniają Państwo na pochyłości kierunek jazdy. Pracy nie należy wykonywać na zbyt dużych pochyłościach. Urządzenie prowadzić wyłącznie w tempie kroku pieszego. Proszę zachować szczególną ostrożność, gdy odwracają Państwo urządzenie, przyciągają je do siebie, lub też, gdy poruszają się Państwo do tyłu. Proszę ostrożnie włączyć urządzenie zgodnie z instrukcjami z niniejszej instrukcji obsługi. Proszę zwrócić uwagę na odpowiednią odległość nóg do obracających się noży.
PL • • • 92 pobliżu palnych cieczy i gazów. W przypadku nieprzestrzegania tych zaleceń istnieje niebezpieczeństwo pożaru lub wybuchu. Wyłączyć urządzenie, wyciągnąć kluczyk bezpieczeństwa i wyjąć akumulator.
PL • • • Proszę nosić rękawice, gdy zmieniają Państwo urządzenie tnące. Należy regularnie sprawdzać urządzenie do zbierania trawy pod kątem zużycia i deformacji. Ze względów bezpieczeństwa zużyte i uszkodzone części należy wymieniać. Proszę w trakcie ustawiania noży zachować szczególną ostrożność, aby Państwa palce nie zostały zakleszczone pomiędzy obracającymi się nożami i nieruchomymi częściami maszyny. Proszę sprawdzać, czy są używane zapasowe narzędzia tnące, które są dopuszczone przez producenta.
PL Specjalne zasady bezpieczeństwa dotyczące urządzeń zasilanych akumulatorami • • • • • • 94 Upewnij się, że urządzenie jest wyłączone podczas instalowania akumulatora. Instalowanie akumulatora w urządzeniu elektrycznym podłączonym do sieci elektrycznej może spowodować wypadek. Ładuj akumulatory tylko wewnątrz pomieszczeń, ponieważ ładowarka jest przeznaczona tylko do takiego ładowania. Istnieje niebezpieczeństwo wybuchu.
PL • • • • • • ładowarce. Niebezpieczeństwo porażenia prądem. Przed rozłączeniem i połączeniem złączy między akumulatorem/narzędziem elektrycznym/ urządzeniem zawsze odłączaj ładowarkę od sieci. Utrzymuj urządzenie w czystości, nie wystawiaj go na działanie wilgoci i deszczu. Nigdy nie używaj ładowarki na dworze. Zabrudzenie ładowarki i dostanie się wody do jej wnętrza zwiększa ryzyko porażenia prądem. Ładowarkę wolno stosować wyłącznie z oryginalnymi akumulatorami.
PL Przegląd A 1 Uchwyt pałąkowy 2 Materiały do montażu mocowania rączki prowadzenia 2a Nakrętki motylkowe 2b Śruba 3 Dolny trzonek 4 Worek do zbierania skoszonej trawy 5 Osłona odbojowa 6 Uchwyt urządzenia 7 Śruba do mocowania trzonka 8 Dźwignia regulacji wysokości koszenia 9 Kółka 10 Obudowa kosiarki do trawy 11 Pokrywa wnęki akumulatora 12 Akululator 13 Kluczyk startowy 14 Kabel urządzenia 15 Uchwyt kabla 16 Przycisk odryglowujący 17 Dźwignia włączająca 18 Ładowarka 19 Nóż 20 Śruba mocująca nóż 21 Wałek
PL Obsługa Ustawienia na kosiarce można wykonywać tylko przy wyłączonym silniku i nieruchomym nożu. Niebezpieczeństwo dla osób. Wyłączyć urządzenie, wyciągnąć kluczyk zapłonu (11) i odczekać do zatrzymania się noża. Zawieszenie/zdjęcie worka do zbierania/trawy E Prawidłowa wysokość koszenia wynosi w przypadku trawnika ozdobnego około 25-45 mm, a trawnika użytkowego około 45-65 mm.
PL Wskaźnik stanu naładowania Wcisnąć prawy przycisk „Press“ wskaźnika stanu naładowania (patrz I . 12b), aby sprawdzić stan naładowania akumulatora. Liczba świecących się diod wskazuje stan naładowania akumulatora. 4 diody oznaczają pełne naładowanie akumulatora, 1 dioda sygnalizuje, że akumulator wymaga naładowania. Proces ładowania Nie wystawiaj akumulatora na ekstremalne warunki, takie jak wysokie temperatury i uderzenia.
PL Ładowanie akumulatora Przed umieszczeniem w ładowarce (18) świeżo rozładowany akumulator (12) musi ostygnąć przez ok. 15 minut. I 1. Jeżeli jest to konieczne, wyjmij akumulator (12) z urządzenia. 2. Wsuń akumulator (12) do gniazda ładowarki (18). Musi się on słyszalnie zablokować. 3. Podłącz ładowarkę (15) do gniazdka z zestykiem uziemiającym. 4. Po naładowaniu urządzenia odłącz ładowarkę (18) od sieci. 5. Naciśnij przycisk odblokowujący (12a) akumulatora (12) i wyciągnij akumulator z ładowarki (18).
PL W trakcie manipulowania nożem należy nosić rękawice. Przed czyszczeniem lub wykonaniem wszelkich prac konserwacyjnych wyłączyć urządzenie, wyciągnąć kluczyk zapłonu (13) i odczekać do zatrzymania się noża. Niebezpieczeństwo dla osób. Wymiana noża Jeżeli nóż jest tępy, to jego ostrzenie może wykonać warsztat specjalistyczny. Jeżeli nóż jest uszkodzony lub wykazuje niewyważenie, to należy go wymienić (patrz rozdział „Części zamienne“). 1. Proszę obrócić urządzenie. 2.
PL Utylizacja/ ochrona środowiska Części zamienne/ Akcesoria Wyjmij akumulator z urządzenia i przekaż urządzenie, jego akcesoria i opakowanie do zgodnej z przepisami o ochronie środowiska naturalnego utylizacji. Urządzeń elektrycznych nie należy wyrzucać razem z odpadami domowymi. Nie wyrzucaj urządzenia z zainstalowanym akumulatoremdo śmieci domowych,nie wrzucaj go do ognia (niebezpieczeństwo wybuchu) ani wody.
PL płatnie usunięte przez dostarczenie zastępczego urządzenia bądź przez naprawę. Warunkiem skorzystania ze świadczenia gwarancyjnego jest przekazanie nierozmontowanego urządzenia wraz z dowodem zakupu i gwarancji naszemu Centrum Serwisowemu. Serwis naprawczy • • • Naprawy nie objęte gwarancją można zlecać odpłatnie naszemu centrum serwisowemu. Nasze Centrum Serwisowe chętnie sporządzi kosztorys naprawy.
PL Podana wartość emisji drgań została zmierzona metodą znormalizowaną i może być wykorzystywana do porównań urządzenia elektrycznego z innymi urządzeniami. Podana wartość emisji drgań może też służyć do szacunkowej oceny stopnia ekspozycji użytkownika na drgania. Ostrzeżenie: Wartość emisji drgań może się różnić w czasie korzystania z urządzenia od podanej wartości, jest to zależne od sposobu używania urządzenia.
PL Wykrywanie błędów Problem Urządzenie nie uruchamia się Możliwa przyczyna Usuwanie błędów Akumulator jest rozładowany lub nie jest założony Sprawdzić stan naładowania akumulatora, w razie potrzeby zlecić naprawę w punkcie napraw urządzeń elektrycznych Dźwignia włączająca ( A 17) lub przycisk odryglowujący ( A 16) jest uszkodzony Szczotki węglowe są zużyte Naprawa w Centrum serwisowym Uszkodzony silnik Silnik wyłącza się Trawa jest za długa Ustawić wyższą wysokość koszenia. .
CZ Obsah Objem dodávky.................................. 105 Účel použití........................................ 105 Bezpečnostní pokyny....................... 106 Symboly na přístroji........................ 106 Symboly v návodu........................... 107 Obecné bezpečnostní pokyny......... 107 Obecný popis......................................112 Popis funkce....................................112 Přehled.............................................112 Návod k montáži................................
CZ Bezpečnostní pokyny Tato část pojednává o základních bezpečnostních předpisech při práci s benzínovou sekačkou. Symboly na přístroji Varování! Přečtěte si návod k obsluze. Přístroj nevystavujte vlhkosti. klíči Zabraňte přístupu okolo stojících osob k přístroji. Opatrně – ostré nože! Nohy a ruce musí být v dostatečné vzdálenosti od přístroje. Nebezpečí poranění! Před nastavováním nebo čištěním vypněte motor a zatáhněte za kontaktní klíč. Pozor! Doběh nože sekačky.
CZ Symboly v návodu Výstražné značky s údaji pro zabránění škodám na zdraví anebo věcným škodám. Příkazové značky (namísto výkřičníku je vysvětlován příkaz) s údaji pro prevenci škod. Informační značky s informacemi pro lepší zacházení s nástrojem. Obecné bezpečnostní pokyny Tento stroj může způsobit při neodborném užití vážná zranění. K zamezení poškození osob a věcí si bezpodmínečně pročtěte a respektujte následující bezpečnostní pokyny a se všemi obslužnými částmi se dobře seznamte.
CZ • • U přístrojů s několika řeznými nástroji buďte opatrní, protože pohyb jednoho nože může způsobit rotaci ostatních nožů. Používejte jen ty náhradní díly a příslušenství, které byly dodány a doporučeny výrobcem. Používání cizích dílů vede k okamžité ztrátě nároku na záruku. • • Práce s přístrojem: Nohy a ruce nesmíte mít v blízkosti nebo pod rotujícími díly. Hrozí nebezpečí poranění! Dodržujte ochranu proti hluku a místní předpisy.
CZ • • • • • Nepracujte s poškozeným, nekompletním přístrojem nebo s přístrojem přestavěným bez souhlasu výrobce. Přístroj nikdy nepoužívejte s poškozenými ochrannými zařízeními nebo kryty či s chybějícími bezpečnostními zařízeními, jako jsou usměrňovací zařízení a/nebo zařízení k zachytávání trávy. Přístroj nepřetěžujte. Pracujte jen v uvedeném výkonovém rozsahu a neměňte nastavení regulátoru na motoru. Pro těžké práce nepoužívejte stroje se slabým výkonem.
CZ • • • • chém místě a mimo dosah dětí. O váš přístroj se řádně starejte. K zajištění optimální a bezpečné práce musí být nástroje čisté a ostré. Řiďte se předpisy o údržbě. Měníte-li řezací zařízení, navlékněte si ochranné rukavice. Pravidelně kontrolujte sběrný koš na trávu, zda není opotřebován nebo zdeformován. Z bezpečnostních důvodů vyměňte opotřebované nebo poškozené části. Při nastavování nožů obzvlášť opatrní, abyste si nepřiskřípli prsty mezi rotující nože a pevné části sekačky.
CZ Zvláštní bezpečnostní pokyny pro akumulátorové přístroje • • • • • • • Před vložením akumulátoru se ujistěte, zda je přístroj vypnutý. Vložíte-li akumulátor do zapnutého elektrického nástroje, může dojít k nehodám. Baterie nabíjejte pouze ve vnitřních prostorách, protože nabíječka je určena k použití uvnitř. Nebezpečí úrazu elektrickým proudem. Abyste omezili riziko úrazu elektrickým proudem, vytáhněte před čištěním nabíječky zástrčku nabíječky ze zásuvky.
CZ • • • • • ko úrazu elektrickým proudem. Nabíječku lze provozovat pouze s příslušnými originálními akumulátory. Při nabíjení jiných akumulátorů může dojít ke zraněním a hrozí riziko požáru. Nabíječku chraňte před mechanickým poškozením. Poškození mohou vést k vnitřním zkratům. Nabíječku není dovoleno provozovat na hořlavém podkladu (například papír, textilie). Hrozí riziko požáru kvůli teplu uvolňovanému při nabíjení.
CZ 3. Upevněte rukojeť (1) pomocí přiložených šroubů (2b) a křídlatých matic (2a) na spodní části držadla (3). Jsou možné dvě polohy. 4. Kabelové držáky (15) sponami uchyťte ke držadlu (3) a zafixujte jimi přístrojový kabel (14). Zavěšení/sejmutí sběrného koše E Po uvolnění obou křídlových matic můžete držadlo zařízení sklapnout pro lepší skladování. Dbejte na to, aby nedošlo k přiskřípnutí napájecího kabelu. Montáž sběrného koše D 1.
CZ Zapnutí a vypnutí G H Nabíjecí proces Akumulátor nevystavujte extrémním podmínkám, například vysokým teplotám a nárazům. Hrozí riziko zranění kvůli unikající kapalině z akumulátoru. Při zasažení očí či pokožky opláchněte postižené místo vodou nebo neutralizátorem a vyhledejte pomoc lékaře. 1. Postavte sekačku na rovný podklad. 2. Zdvihněte průhledný kryt (11) na krytu zařízení a zasuňte nabitý akumulátor (12) po vodicí liště do zařízení. Slyšitelně zaklapne. 3.
CZ Vložení/vyjmutí akumulátoru Vypněte zařízení, vytáhněte kontaktní klíč (13) a vyčkejte, než se nůž zastaví. Hrozí nebezpečí zranění osob. G 1. Chcete-li akumulátor (12) vložit do zařízení, zasuňte akumulátor po vodicí liště do zařízení. Slyšitelně zaklapne. 2. Chcete-li akumulátor (12) vyjmout ze zařízení, stiskněte odblokovací tlačítko (12a) na akumulátoru a akumulátor vytáhněte. Nabíjení akumulátoru Čerstvě vybitý akumulátor (12) nechte cca 15 min. vychladnout, než jej vložíte do nabíječky (18).
CZ Při manipulaci s nožem noste rukavice. držte nůž (19). Šroubem nože (20) otáčejte proti směru hodinových ručiček za pomocí klíče směrem od vřetena motoru. 3. Při montáži nového nože postupujte zase v opačném pořadí. Dbejte, aby byl nůž ve správné poloze a šroub pevně utažený Před jakoukoliv údržbou a čištěním vypněte zařízení, vytáhněte kontaktní klíč (13) a vyčkejte, než se nůž zastaví. Hrozí nebezpečí zranění osob.
CZ akumulátory mohou škodit životnímuprostředí a Vašemu zdraví, když uniknou jedovaté páryanebo tekutiny. • • • • Přístroj likvidujte s vybitým akumulátorem. Přístroj ani akumulátor neotevírejte. Přístroj likvidujte podle místních předpisů. Přístroj odevzdejte ve sběrném středisku, které zajistí jeho ekologickou recyklaci. Zeptejte se ohledně tohoto svého místního likvidátora odpadů anebo v našem servisním středisku. Posekaný materiál uložte na kompost, neodhazujte jej do popelnice.
CZ Technické údaje Aku travní sekačka.... ARM 2432 Lion Set Napětí motoru......................24 V 4,0 Ah Otáčky naprázdno.....................3400 min-1 Průměr střihu............................... 320 mm Výška řezu.......... 25 / 35 / 40 / 55 / 65 mm Třída ochrany........................................ III Druh ochrany......................................IPX1 Hmotnost (bez akumulátor a nabíječka)...........9,7 kg Objem sběrného koše..........................30 l Hladina akustického tlaku (LpA)........
CZ Hledání chyb Problém Přístroj nelze zapnout Možná příčina Odstranění závady Zkontrolujte stav nabití akuAkumulátor je prázdný nebo mulátoru, příp. zajistěte opranení vložen vu kvalifikovaným odborníkem v oboru elektrických zařízení. Defektní startovací páčka ( A 17) nebo odblokovací tlačítko ( A 16) Oprava zákaznickým servisem Opotřebované uhlíkové kartáče Defektní motor Motor vypadává Výsledek práce není uspokojivý nebo motor těžce pracuje.
LT Turinys Pristatomas komplektas................... 120 Účel použití........................................ 120 Saugos nurodymai............................ 121 Paveikslėliai/užrašai ant prietaiso... 121 Instrukcijoje pateikiami saugos nurodymai....................................... 122 Bendrieji saugos nurodymai............ 122 Bendrasis aprašymas....................... 127 Veikimo aprašymas......................... 127 Apžvalga......................................... 127 Montavimas..................
LT Gamintojas neatsako už žalą, atsiradusią dėl naudojimo ne pagal paskirtį arba netinkamo valdymo. 34 cm Prietaiso negalima naudoti drėgmėje. Nedirbkite lyjant lietui ir nepjaukite drėgnos žolės. Saugos nurodymai Šiame skyriuje pateikiami pagrindiniai saugos potvarkiai, kurių reikia laikytis dirbant su elektrine vejapjove. Paveikslėliai / užrašai ant prietaiso Nurodymas dėl uždegimo raktelio Simboliai ant akumuliatoriaus Dėmesio! Atidžiai perskaitykite eksploatavimo instrukciją.
LT II apsaugos klasė Elektrinių prietaisų nemesti į buitines atliekas Instrukcijoje pateikiami saugos nurodymai Pavojaus ženklas su duomenimis, kaip išvengti žalos žmonėms ir materialiniam turtui. Privalomasis ženklas (vietoje ženklo su šauktuku pateiktas reikalavimas) su duomenimis, kaip išvengti žalos materialiniam turtui. Informacinis ženklas, kuriame pateikiama informacijos, kaip geriau naudoti prietaisą.
LT • • etaiso, jei nėra apsauginių įrenginių (pvz., apsaugos nuo smūgių arba žolės surinkimo maišo), pjovimo įtaiso dalių arba sraigtų, jei jie nusidėvėjo arba yra pažeisti. Kad būtų galima išvengti disbalanso, visada keiskite visą pažeistų įrankių ir sraigtų komplektą. Būkite atsargūs dirbdami prie prietaisų su keliais pjovimo įrankiais, nes pajudinus peilį gali pradėti suktis kiti peiliai. Naudokite tik gamintojo pristatytas ir rekomenduojamas atsargines dalis ir kitus priedus.
LT Dėmesio – pavojus! Peilis veikia iš inercijos. Kyla pavojus susižeisti. • • • • • • • Veikiant varikliui negalima pakelti ir transportuoti prietaiso. Išjunkite prietaisą, jei jį reikia pakreipti norint nugabenti į kitą vietą, jei važiuojate ne per veją ir prietaisas vežamas nuo vieno pjaunamo ploto iki kito. Žolės išmetimo anga visada turi būti švari ir neužkimšta. Nupjautą medžiagą išimkite tik sustojus prietaisui. Niekada nepalikite prietaiso darbo vietoje be priežiūros.
LT • • • • • • • • • Pasirūpinkite, kad visos veržlės, sraigtai ir varžtai būtų tvirtai priveržti ir prietaisas būtų saugios darbinės būklės. Patikrinkite, ar nesimato galimų vejapjovės pažeidimų. Prireikus sutaisykite pažeistas dalis. Nebandykite prietaiso remontuoti patys, nebent Jūs turite reikiamą išsilavinimą. Visus šioje instrukcijoje neaprašytus darbus gali atlikti tik mūsų įgalioti klientų aptarnavimo centrų darbuotojai. Prietaisą laikykite sausoje ir vaikams nepasiekiamoje vietoje.
LT • arba gaisrą. Netinkamai naudojant akumuliatorių, iš jo gali ištekėti skystis. Venkite kontakto su juo. Atsitiktinio kontakto atveju nuplaukite vandeniu. Jei skysčio pateko į akis, kreipkitės papildomai į gydytoją. Ištekantis akumuliatoriaus skystis gali sudirginti arba nudeginti odą Specialūs saugos nurodymai, skirti akumuliatoriniams prietaisams • • • • • • Prieš įstatydami akumuliatorių, įsitikinkite, kad prietaisas išjungtas.
LT • • • • • • atskirkite kroviklį nuo tinklo. Taip užtikrinsite, kad akumuliatorius ir kroviklis nebus sugadinti. Kroviklis turi būti švarus ir apsaugotas nuo drėgmės ir lietaus. Niekada nenaudokite kroviklio lauke. Dėl nešvarumų ir patekusio vandens padidėja elektros smūgio rizika. Kroviklį galima eksploatuoti tik su jam skirtais originaliais akumuliatoriais. Įkraunant kitokius akumuliatorius, iškyla sužalojimo ir gaisro pavojus. Venkite mechaninio akumuliatoriaus pažeidimo.
LT Montavimas • • • 3. Užfiksuokite surinkimo dėžės kreipiamąją (4d) tam skirtose apatinės žolės surinkimo dėžės (4b) angose. Mūvėkite apsaugines pirštines. Atlikite tik tuo darbus, kuriuos išmanote. Jei abejojate, kreipkitės į specialistą arba tiesiogiai į mūsų techninės priežiūros skyrių Dėmesio: niekada nenaudokite prietaiso iki galo nepritvirtinę apsaugos nuo smūgių arba žolės surinkimo dėžės. Galite susižeisti! Lenktos rankenos montavimas 1.
LT 65 mm - didelis pjovimo aukštis 55 mm - vidutinis pjovimo aukštis 45 mm - vidutinis pjovimo aukštis 35 mm - mažas pjovimo aukštis 25 mm - mažas pjovimo aukštis F 1. Suimkite pjovimo aukščio reguliavimo svirtį (8) ir traukite ją fiksavimo įtaise, kol nustatysite pageidaujamą pjovimo aukštį. Dekoratyvinei vejai pjauti nustatykite maždaug 25–45 mm pjovimo aukšti, o vaikščiojamajai vejai – maždaug 45–65 mm. Kai sezono pradžioje pjaunate pirmą kartą, nustatykite didesnį pjovimo aukštį.
LT Akumuliatorių įkraukite tik sausose patalpose. Prieš prijungdami kroviklį, įsitikinkite, kad akumuliatoriaus paviršius yra švarus ir sausas. Gresia elektros smūgio sužalojimo pavojus Įkraukite tik pridėtu krovikliu. Atkreipkite dėmesį, kad prietaisas būtų įkraunamas be pertraukų ne ilgiau kaip 9 valandas. Akumuliatorius ir prietaisas gali būti sugadinti, o ilgo įkrovimo metu išeikvosite per daug energijos be reikalo. Perkrovimo atveju nustoja galioti garantija.
LT lapeliai. Dėl to po kiekvieno pjovimo veja tampa tankesnė ir atsparesnė. Pirmą kartą reikia pjauti maždaug balandžio mėnesį, kai vejos aukštis yra apie 70–80 mm. Pagrindiniu vegetacijos laikotarpiu veją reikia pjauti mažiausiai vieną kartą per savaitę. Bendrieji valymo ir techninės priežiūros darbai • • • • • Prietaisą stumkite žingsnio greičiu ir kuo lygesnėmis linijomis. Kad nupjautumėte visą veją, juostos turėtų persidengti kelis centimetrus.
LT nustatytumėte tinkamoje padėtyje ir stipriai priveržtumėte varžtą. nuodingų garų arba skysčių. • Laikymas K • Prietaisą laikykite peilio apsaugoje, sausoje ir vaikams nepasiekiamoje vietoje. • Atlaisvinkite sparnuotąją veržlę (2a) ir sulenkite lenktą rankeną (1), kad prietaisas užimtų mažiau vietos. Tai atliekant negalima prispausti kabelio. • Palaukite, kol variklis atvės ir tik tada prietaisą statykite uždarose patalpose. • Ant prietaiso nedėkite nailoninių maišų, nes gali kauptis drėgmė.
LT Garantija Remonto tarnyba • • • • • Šiam prietaisui mes suteikiame 24 mėnesių garantiją. Šis prietaisas nepritaikytas naudoti komerciniais tikslais. Naudojant komerciniais tikslais netenkama teisės į garantiją Garantija netaikoma natūralaus dėvėjimo požymiams ir žalai, atsiradusiai dėl per didelės apkrovos arba netinkamo valdymo. Tam tikros konstrukcinės dalys natūraliai dėvisi, todėl joms garantija nesuteikiama. Labiausiai tai taikoma peiliams, akumuliatorius.
LT Techniniai duomenys Akumuliatorinės vejapjovė................... ARM 2432 Lion Set Variklio įtampa....................24 V 4,0 Ah Sūkių skaičius esant tuščiajai eiga..............................3400 min-1 Pjovimo lankas............................ 320 mm Pjovimo aukštis........ 25 / 35 / 45 / 55 / 65 mm Apsaugos klasė..................................... III Apsaugos rūšis...................................IPX1 (be akumuliatorius ir kroviklis)..........9,7 kg Žolės surinkimo dėžės talpa..............
LT Klaidų paieška Problema Galima priežastis Klaidos šalinimas Akumuliatorius išeikvotas arba neįstatytas Neužsiveda prietaisas Sugedo paleidimo svirtis ( A 17) arba atblokavimo mygtukas ( A 16.) Nusidėvėjo anglinis šepetėlis Patikrinkite akumuliatoriaus įkrovimo būseną, prireikus paveskite suremontuoti kvalifikuotam elektrikui Perduokite suremontuoti klientų aptarnavimo centrui. Sugedo variklis.
DE Original EG Konformitätserklärung Hiermit bestätigen wir, dass das Gerät Akku Rasenmäher Baureihe ARM 2432 Lion Set Seriennummer 201603000001 - 201603001139 folgenden einschlägigen EU-Richtlinien in ihrer jeweils gültigen Fassung entspricht: 2006/42/EG • 2014/30/EU • 2000/14/EG • 2011/65/EU* • 2005/88/EG Um die Übereinstimmung zu gewährleisten, wurden folgende harmonisierte Normen sowie nationale Normen und Bestimmungen angewendet: EN 55014-1/A1:2009/A2:2011 • EN 55014-2/A1:2001+A2:2008 EN 60335-1:2012
GB Translation of the original CE declaration of conformity We confirm, that the Cordless lawn mower Design Series ARM 2432 Lion Set Serial number 201603000001 - 201603001139 conforms with the following applicable relevant version of the EU guidelines: 2006/42/EC • 2014/30/EU • 2000/14/EC • 2011/65/EU* • 2005/88/EC In order to guarantee consistency, the following harmonised standards as well as national standards and stipulations have been applied: EN 55014-1/A1:2009/A2:2011 • EN 55014-2/A1:2001+A2:2008 E
Vertaling van de originele CE-conformiteitverklaring NL Hiermede bevestigen wij dat de Accu grasmaaier bouwserie ARM 2432 Lion Set Serienummer 201603000001 - 201603001139 aan de hierna volgende, van toepassing zijnde EU-richtlijnen 2006/42/EC • 2014/30/EU • 2000/14/EC • 2011/65/EU* • 2005/88/EC Om de overeenstemming te waarborgen, werden de hierna volgende, in overeenstemming gebrachte normen en nationale normen en bepalingen toegepast: EN 55014-1/A1:2009/A2:2011 • EN 55014-2/A1:2001+A2:2008 EN 60335-1:20
FR Traduction de la déclaration de conformité CE Nous certifions par la présente que le modèle Tondeuse à a ccumulateur série ARM 2432 Lion Set numéro de série 201603000001 - 201603001139 est conforme aux directives UE actuellement en vigueur: 2006/42/EC • 2014/30/EU • 2000/14/EC • 2011/65/EU* • 2005/88/EC En vue de garantir la conformité les normes harmonisées ainsi que les normes et décisions nationales suivantes ont été appliquées : EN 55014-1/A1:2009/A2:2011 • EN 55014-2/A1:2001+A2:2008 EN 60335-1:2
Traduzione della dichiarazione di conformità CE originale IT Con la presente dichiariamo che Tosaerba a batteria di costruzione ARM 2432 Lion Set Numero di serie 201603000001 - 201603001139 corrisponde alle seguenti direttive UE in materia nella rispettiva versione valida: 2006/42/EC • 2014/30/EU • 2000/14/EC • 2011/65/EU* • 2005/88/EC Per garantire la conformità sono state applicate le seguenti norme armonizzate e anche le norme e disposizioni nazionali che seguono: EN 55014-1/A1:2009/A2:2011 • EN 55014-
PL Tłumaczenie oryginalnej deklaracji zgodności WE Niniejszym oświadczamy, że konstrukcja Akumulatorowa kosiarka typu ARM 2432 Lion Set Numer seryjny 201603000001 - 201603001139 spełnia wymogi odpowiednich Dyrektyw UE w ich aktualnie obowiązującym brzmieniu: 2006/42/EC • 2014/30/EU • 2000/14/EC • 2011/65/EU* • 2005/88/EC W celu zapewnienia zgodności z powyższymi dyrektywami zastosowano następujące normy harmonizujące oraz normy i przepisy krajowe: EN 55014-1/A1:2009/A2:2011 • EN 55014-2/A1:2001+A2:2008 E
CZ Překlad originálního prohlášení o shodě CE Tímto potvrzujeme, že konstrukce Aku travní sekačka ARM 2432 Lion Set Pořadové číslo 201603000001 - 201603001139 odpovídá následujícím příslušným směrnicím EU v jejich toho času platném vydání: 2006/42/EC • 2014/30/EU • 2000/14/EC • 2011/65/EU* • 2005/88/EC Aby byl zaručen shodnost, bylo použito následujících harmonizovaných- norem jakož i národních norem a předpisů: EN 55014-1/A1:2009/A2:2011 • EN 55014-2/A1:2001+A2:2008 EN 60335-1:2012+A11:2014 • EN 61000-3-
LT Vertimas iš originalių eksploatavimo instrukcijoje Šiuo dokumentu mes patvirtiname, kad Akumuliatorinės vejapjovė serijos ARM 2432 Lion Set Serijos numeris: 201603000001 - 201603001139 atitinka toliau nurodytų numatytųjų ES direktyvų galiojantį leidimą: 2006/42/EC • 2014/30/EU • 2000/14/EC • 2011/65/EU* • 2005/88/EC Kad būtų galima užtikrinti atitiktį, taikyti šie darnieji standartai ir nacionaliniai standartai bei nuostatos: EN 55014-1/A1:2009/A2:2011 • EN 55014-2/A1:2001+A2:2008 EN 60335-1:2012+A11:
Explosionszeichnung • Exploded Drawing • Explosietekening Vue éclatée • Disegno esploso • Rysunek samorozwijający Výkres sestavení • Trimatis vaizdas ARM 2432 Lion Set informativ • informative • informatief • informatif • informativo • pouczający • informační • informatyvus 145
Grizzly Service-Center PL Krysiak Sp. z o.o. DE Grizzly Tools GmbH & Co. KG Kunden-Service Stockstädter Straße 20 D-63762 Großostheim Tel.: 06026-9914-441 Fax: 06026-9914-499 e-mail: service-baumarkt@grizzly.biz Homepage : www.grizzly.biz IT Garden Italia SPA Via Zaccarini, 8 29010 San Nicolò a Trebbia (PC) Tel.: 0523 764811 Fax: 0523 768689 e-mail: info@gardenitalia.it NL I.T.S. Winschoten bv Bezoekadres: Papierbaan 55 9672 BG Winschoten Postadres: Antwoordnummer 300 9670 WB Winschoten Tel.