ADJUSTABLE SPONGE SANDER MODEL G0565 INSTRUCTION MANUAL COPYRIGHT © AUGUST, 2004 BY GRIZZLY INDUSTRIAL, INC. WARNING: NO PORTION OF THIS MANUAL MAY BE REPRODUCED IN ANY SHAPE OR FORM WITHOUT THE WRITTEN APPROVAL OF GRIZZLY INDUSTRIAL, INC.
WARNING Some dust created by power sanding, sawing, grinding, drilling, and other construction activities contains chemicals known to the State of California to cause cancer, birth defects or other reproductive harm. Some examples of these chemicals are: • Lead from lead-based paints. • Crystalline silica from bricks, cement, and other masonry products. • Arsenic and chromium from chemically treated lumber. Your risk from these exposures varies, depending on how often you do this type of work.
Table of Contents INTRODUCTION ............................................................................................................................... 2 Foreword .................................................................................................................................... 2 Contact Info ................................................................................................................................ 2 Machine Data Sheet............................................
INTRODUCTION Foreword Contact Info We are proud to offer the Model G0565 Adjustable Sponge Sander. This machine is part of a growing Grizzly family of fine woodworking machinery. When used according to the guidelines set forth in this manual, you can expect years of trouble-free, enjoyable operation and proof of Grizzly’s commitment to customer satisfaction.
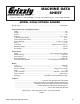
MACHINE DATA SHEET Customer Service #: (570) 546-9663 • To Order Call: (800) 523-4777 • Fax #: (800) 438-5901 MODEL G0565 SPONGE SANDER Design Type ................................................................................................. Floor Model Overall Dimensions and Specifications: Width ..................................................................................................................... 39" Height ...............................................................................
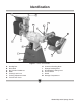
Identification B C G D F E H I A K A J L B M Figure 1. Features and controls. A. B. C. D. E. F. G. -4- Sanding Belt Dust Hood Belt Tension Handwheel Motor Tracking Lock Lever Tracking Adjustment Knob Tension Lock Lever H. I. J. K. L. M.
SECTION 1: SAFETY For Your Own Safety, Read Instruction Manual Before Operating this Machine The purpose of safety symbols is to attract your attention to possible hazardous conditions. This manual uses a series of symbols and signal words which are intended to convey the level of importance of the safety messages. The progression of symbols is described below. Remember that safety messages by themselves do not eliminate danger and are not a substitute for proper accident prevention measures.
Safety Instructions for Machinery 7. NEVER OPERATE MACHINERY WHEN TIRED, OR UNDER THE INFLUENCE OF DRUGS OR ALCOHOL. Be mentally alert at all times when running machinery. 16. MAINTAIN MACHINERY WITH CARE. Keep blades sharp and clean for best and safest performance. Follow instructions for lubricating and changing accessories. 8. ONLY ALLOW TRAINED AND PROPERLY SUPERVISED PERSONNEL TO OPERATE MACHINERY. Make sure operation instructions are safe and clearly understood. 17.
Additional Safety Instructions for Sanders 1. POWER DISCONNECT. Do all inspections, adjustments, and maintenance with the machine unplugged. Wait for all moving parts to come to a complete stop. 2. INSPECTIONS AND MAINTENANCE. Check the machine for worn or damaged parts before each use. Replace worn parts and clean your machine regularly. 3. SANDING BELTS. DO NOT operate the sander if the sanding belt is damaged or badly worn. Pieces of sandpaper could be ejected from the sander, causing injury. 4.
SECTION 2: CIRCUIT REQUIREMENTS 220V Single-Phase Serious personal injury could occur if you connect the machine to the power source before you have completed the set up process. DO NOT connect the machine to the power source until instructed to do so. Grounding In the event of an electrical short, grounding reduces the risk of electric shock.
SECTION 3: SET UP About this Section The purpose of this section is to guide you through the required steps to get your machine out of its crate and into operating condition. This machine presents serious injury hazards to untrained users. Read through this entire manual to become familiar with the controls and operations before starting the machine! Wear safety glasses during the entire set up process! The Model G0565 weighs 167 lbs. (Shipping weight).
Inventory The Model G0565 Sponge Sander comes almost entirely assembled. The remaining parts can be found in a bag inside the cabinet. After removing the parts from the bag, you should have the following items: Hardware Bag .................................................. 1 — Hex Nut 3 ⁄ 8-16" ....................................... 4 — Flat Washer 3 ⁄ 8" ...................................... 4 — Lock Washer 3 ⁄ 8" .................................... 4 — Rubber Feet......................................
Clean Up Dust Collection The unpainted surfaces are coated with thin layer of grease to protect them from corrosion during shipment. Wipe off this protective coating with a clean dry rag and apply a solvent cleaner or citrus-based degreaser such as Grizzly’s G7895 Degreaser to remove any residue. To clean thoroughly, some parts may need to be removed. For optimum performance from your machine, make sure you clean all moving parts that are coated.
Test Run 3. Plug the sander into the power source. 4. Push the START button shown in Figure 5. — If any problems, unusual noises, or vibrations occur, immediately press the STOP button. Turn to Troubleshooting on page 25 and correct the problem before operating the machine further. — If you cannot easily locate the source of the problem, unusual noise or vibration by yourself, please contact our service department at (570) 546-9663.
SECTION 4: OPERATIONS Operation Safety Damage to your eyes, lungs, and ears could result from using this machine without proper protective gear. Always wear safety glasses, a respirator, and hearing protection when operating this machine. Loose hair and clothing could get caught in machinery and cause serious personal injury. Keep loose clothing and long hair away from moving machinery.
3. Remove the belt and place a new belt on the sanding drums. 4. Center the sanding belt on the aluminium drum and the sponge drum. 5. Tension the belt by rotating the handwheel, then lock the belt in place. Note—The sponge drum will expand when at full RPM, so tension the belt just tight enough that the aluminum drum rotates when the belt is turned by hand. Belt Tracking Tracking is the process of adjusting the belts so they remain centered on the drums.
Belt Tilt Dust Hoods The sanding belt rotates 360˚ to best meet the needs of your sanding operation. The dust hoods easily tilt to funnel the maximum amount of dust into the dust collection system. To adjust the sanding belt tilt: Tools Needed: Qty Wrenches 19mm ............................................... 2 1. Disconnect the machine from the power source! 2. Loosen the belt tilt lock lever (see Figure 8.) To adjust the sanding belt tilt: 1. Disconnect the machine from the power source! 2.
Sanding Sanding Drums The extra wide spindles of this sponge sander are designed for sanding large objects and contoured shapes such as chair legs, guitar necks, or gun stocks. The sponge sanding drums will need to be replaced as they wear out, or you may wish to replace the original drums with a different diameter or hardness. To sand with the sponge sander: Tools Needed: Qty Open End Wrench 1"......................................... 1 Arbor Wrench 11⁄ 2" .............................................
SECTION 5: ACCESSORIES G7895—Citrus Degreaser This citrus based degreaser is perfect for cleaning cosmoline off of new equipment. It also works for cleaning auto parts, tools, concrete, and porcelain surfaces. Natural, safe for the environment, and contains no CFC’s.
PRO-STICK® Abrasive Surface Cleaners Extend the life of your sanding discs and sleeves! Choose the Pro-Stick® with a handle for greater control or without a handle for more usable area. Size Model 11⁄2" X 11⁄2" X 81⁄2" ..................................... G1511 2" X 2" X 12" ............................................G1512 11⁄2" X 11⁄2" X 9" with Handle.....................G2519 2" X 2" X 11" with Handle ........................
SECTION 6: MAINTENANCE Cleaning Disconnect power to the machine when performing any maintenance, assembly or adjustments. Failure to do this may result in serious personal injury. Cleaning the Model G0565 is relatively easy. Vacuum up excess sawdust, and wipe off the remaining dust with a dry cloth. Keep bare metal surfaces rust-free with products like, G96 ® Gun Treatment or Boeshield® T-9. Wear safety glasses during maintenance. Failure to comply may result in serious personal injury.
G0565 Parts Breakdown �� �� �� �� �� �� � �� �� �� ���� �� �� �� �� � � �� �� ����� �� �� ����� �������� �� �� �� � �� � ������� � � ������������ �������������� ���������������������� ������������� � ������������������� �������������� �������������������������������� ���������������������� ����������������������� � D a te ������������������������������������� ���������������������������� ����������������������� �������������������� S e r ia l N u m b e r ������������������������
��� ��� ��� ��� ��� ��� ��� ��� ��� ��� ��� ��� ��� ��� ��� ��� ��� ��� ��� ��� ��� ��� ��� ��� ��� ��� ��� ��� ��� ��� ��� ��� ��� ��� ��� ��� ��� ��� ��� ��� ��� ��� ��� G0565 Adjustable Sponge Sander ��� -21-
��� ��� ��� ��� ��� ��� ��� ��� ��� ��� ��� ��� ��� ��� ��� ��� ��� ��� ��� ��� ��� ��� ��� ��� ��� ��� ��� ��� ��� ��� ��� ��� ��� ��� ��� ��� ��� ��� ��� ��� ��� ��� ��� -22- G0565 Adjustable Sponge Sander
G0565 Parts List REF PART # DESCRIPTION REF PART # DESCRIPTION 1 2 3 4 5 6 7 8 9 10 11 12 12-1 13 14 15 17 18 19 20 21 22 23 24 25 26 27 28 STAND LATCH RUBBER FOOT 3/8-16 FLAT WASHER 3/8 LOCK WASHER 3/8 HEX NUT 3/8-16 MOTOR 1 HP 220V HEX BOLT M10-1.5 X 50 FLAT WASHER 10MM LOCK WASHER 10MM HEX NUT M10-1.5 ON/OFF SWITCH SWITCH COVER PLATE PHLP HD SCR M4-.
REF PART # DESCRIPTION REF PART # DESCRIPTION 129 130 131 132 133 134 135 136 137 138 139 140 141 142 143 201 202 203 204 205 206 207 209 210 211 212 213 214 215 BRACKET (L) LOCK WASHER 6MM HEX BOLT M6-1.0 X 12 LOCK WASHER 3/8 HEX BOLT 3/8-16 X 3 BRACKET (L) FLAT WASHER 3/8 LOCK WASHER 3/8 LOCK HANDLE 3/8 X 12 FLAT WASHER 3/8 SPRING 2.0 X 67MM FLAT WASHER 3/8 STAR KNOB 3/8-16 (FEMALE) LOCK WASHER 6MM HEX BOLT M6-1.0 X 12 ADJUSTMENT BLOCK (R) FLAT WASHER 8MM HEX BOLT M8-1.
Troubleshooting Symptom Possible Cause Motor will not start. 1. Check power line for proper voltage. 1. Low voltage. 2. Open circuit in motor or loose connec- 2. Inspect all lead connections on motor for loose or open connections. tions. Motor will not start; fuses or circuit break- 1. Short circuit in line cord or plug. ers blow. Possible Solution 1. Repair or replace cord or plug for damaged insulation and shorted wires. Motor fails to develop full power (output 1.
Warranty and Returns Grizzly Industrial, Inc. warrants every product it sells for a period of 1 year to the original purchaser from the date of purchase. This warranty does not apply to defects due directly or indirectly to misuse, abuse, negligence, accidents, repairs or alterations or lack of maintenance.
WARRANTY CARD Name _____________________________________________________________________________________ Street _____________________________________________________________________________________ City____________________________________________________State________Zip ______________ Phone Number______________________E-Mail_______________________FAX____________________ MODEL: G0565 Adjustable Sponge Sander Serial #______________________ Order ______________ The following information is given on a voluntary
FOLD ALONG DOTTED LINE Place Stamp Here GRIZZLY INDUSTRIAL, INC. P.O.
Buy Direct and Save with Grizzly® – Trusted, Proven and a Great Value! Visit Our Website Today And Discover Why Grizzly® Is The Industry Leader! • SECURE ORDERING • ORDERS SHIPPED WITHIN 24 HOURS • E-MAIL RESPONSE WITHIN ONE HOUR -OR- Call Today For A FREE Full Color Catalog