
- GRIZZLY 6" X 47" HEAVY-DUTY JOINTER INSTRUCTION MANUAL G1182HW, G1182ZHW, G1182Z, G1182ZX


G1182 6" Series Jointers -25-
Surface Planing Rabbet Cuts
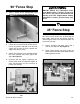
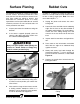
The purpose of planing on a jointer is to produce
one flat surface. The theory behind this is that
once you have one flat surface on a board, it can
then more readily be milled to precise, final
dimensions on a thickness planer. It is nearly
impossible to surface plane both sides of a board
effectively because the two surfaced sides will
not be parallel to each other.
1. Inspect your lumber for soundness and grain
direction.
2. If the stock is cupped (warped), place the
concave side down and slowly feed it over
the cutterhead. See Figure 27.
3. Inspect your results. Most likely, many pass-
es will be necessary before your lumber has
a flat surface.
4. If the stock has large or loose knots, consid-
er finding another workpiece. Knots in a
workpiece can be dangerous to the operator,
as well as destructive to equipment.
Figure 27. Correct method for surface planing.
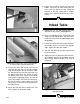
A rabbet is a groove cut along the edge of a
board. It is usually made to accept another board
to form a strong, simple joint. Note: The maxi-
mum rabbet depth is
1
⁄2".
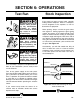
1. Unplug the jointer and remove the cutter-
head guard.
2. Loosen the fence and slide it to the rabbeting
edge. Set the fence to the desired width of
the rabbet and lock down. For small rabbets,
remove the fence sliding locking lever and
reinsert it in the rear fence hole on the fence
base.
3. Inspect stock for soundness and grain direc-
tion.
4. Place stock on the infeed table and rabbet
table with the edge to be rabbeted firmly
against the fence.
5. Slowly and evenly feed stock through the
cutterhead. Using the
1
⁄16" rule, it will take six
passes to achieve a common
3
⁄8" rabbet. See
Figure 28.
6. Replace the guard when finished with rab-
beting operations.
Figure 28. Correct operator position for rabbet
cutting.
Always use push paddles when planing the
surface of a board. Failure to comply may
result in serious personal injury.