2-IN-1 NAILER/STAPLER KIT MODEL H2912/H2913 INSTRUCTION MANUAL Model H2913 Model H2912 COPYRIGHT © JANUARY, 2002 BY GRIZZLY INDUSTRIAL, INC. 1821 VALENCIA ST., BELLINGHAM, WA 98227 WARNING: NO PORTION OF THIS MANUAL MAY BE REPRODUCED IN ANY SHAPE OR FORM WITHOUT THE WRITTEN APPROVAL OF GRIZZLY INDUSTRIAL, INC.
SAFETY For Your Own Safety Read Instruction Manual Before Operating This Equipment The purpose of safety symbols is to attract your attention to possible hazardous conditions. This manual uses a series of symbols and signal words which are intended to convey the level of importance of the safety messages. The progression of symbols is described below. Remember that safety messages by themselves do not eliminate danger and are not a substitute for proper accident prevention measures.
Safety Instructions For Power Tools 10. USE PROPER EXTENSION CORD for the tool. Make sure your extension cord is in good condition. Conductor size should be in accordance with the chart below. The amperage rating should be listed on the motor or tool nameplate. An undersized cord will cause a drop in line voltage resulting in loss of power and overheating. Your extension cord must also contain a ground wire and plug pin. Always repair or replace extension cords if they become damaged.
Nailer/Stapler Safety In addition to the rules stated in the previous section, and those in the warning boxes throughout this manual, please observe the following safety tips for your new nailer/stapler: 1. 2. 3. 4. 5. 6. 7. 8. -3- READ THIS ENTIRE MANUAL BEFORE OPERATING THE NAILER/STAPLER. ALWAYS DISCONNECT AIR FROM THE NAILER/STAPLER whenever servicing or installing nails or staples. During maintenance, a nailer/stapler connected to air may fire accidentally, causing serious personal injury.
INTRODUCTION Commentary We are proud to offer the Grizzly Model H2912/H2913 2-IN-1 Nailer/Stapler. This model is part of a growing Grizzly family of fine power tools. When used according to the guidelines set forth in this manual, you can expect years of trouble-free, enjoyable operation and proof of Grizzly’s commitment to customer satisfaction. The Model H2912/H2913 features 360˚ adjustable exhaust, a convenient bottomloading magazine, a safety trigger and a durable plastic carrying case.
Compressed Air System Safety Yoke Mechanism The Model H2912/H2913 is designed to be operated at 60-100 psi. Do not exceed the maximum operating pressure for your model. A safety yoke mechanism (bump fire) on the nose of the nailer/stapler acts as a secondary safety device. When the trigger is pressed, the nailer/stapler will not fire until the safety yoke mechanism is depressed. Before you use your new nailer/stapler, install the 3⁄8" quick connect fitting that comes with the nailer/stapler.
OPERATION Loading The Nailer/Stapler 5. To load your nailer/stapler: 1. 2. Disconnect the air supply from the nailer/stapler! Push the magazine latch in the direction shown in Figure 1. Push the magazine cover forward until the magazine latch locks in place. Depth Adjustment 1. Rotate the depth adjustment wheel (shown in Figure 3) clockwise to increase the nail/staple driving depth. 2. Rotate the finger wheel counter-clockwise to decrease the nail/staple driving depth. Figure 1.
To operate your nailer/stapler: 1. Connect the air supply to the quick connect fitting. Test the loaded nailer/stapler for proper penetration. Hold the nailer/stapler perpendicular to the surface of a piece of clean scrap wood that is thick enough for the length of staples/nails you have loaded. Depress the safety yoke mechanism on your workpiece. Before pressing the trigger, make sure your free hand is positioned out of the way of a potential path of a staple/nail in case of deflection.
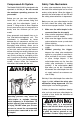
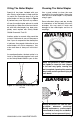
Oiling The Nailer/Stapler Cleaning The Nailer/Stapler Special oil has been included with your new Grizzly nailer/stapler to help maintain its useful life. Place one drop of oil in the nailer/stapler air inlet (as shown in Figure 5) before every use. Wipe off any excess oil near the nailer/stapler exhaust to avoid dust build-up. When the oil that was included with the nailer/stapler has been completely used, replace with Grizzly Model G2820 Pneumatic Tool Oil.
Replacing Pistons/O-Rings If you use your nailer/stapler day in and day out, Grizzly offers repair pistons as cheap insurance against wasted down time and lost profits in the event that a piston or piston shaft becomes worn out. To replace a piston: Figure 6. Removing the exhaust cap. 8. Always disconnect air from the nailer/stapler whenever servicing! During maintenance, a nailer/stapler connected to air may fire accidentally, causing serious personal injury! 1. 2. 3. 4. 5. 6. 7.
H2912 PART BREAKDOWN H2912/H2913 2-IN-1 NAILER/STAPLER -10-
REF PART # DESCRIPTION REF 01 02 03 04 05 06 07 08 09 10 11 12 13 14 15 16A 17 18 19 20 21 22 23 24 25 26 27 28 29 30 31 PH2912001 PH2912002 PH2912003 PH2912004 PH2912005 PH2912006 PH2912007 PH2912008 PH2912009 PH2912010 PH2912011 PH2912012 PH2912013 PH2912014 PH2912015 CAP SCREW CAP COVER SEAL CAP SCREW SETSCREW CAP PISTON STOPPER O-RING COLLAR O-RING SPRING PISTON HEAD VALVE O-RING O-RING O-RING PISTON ASSEMBLY CYLINDER O-RING BUMPER GASKET O-RING BODY CAP SCREW AIR PLUG JOINT GUIDE STEPPED PIN SPRI
H2913 PART BREAKDOWN H2912/H2913 2-IN-1 NAILER/STAPLER -12-
REF PART # DESCRIPTION 01 02 03 04 05 06 07 08 09 10 11 12 13 14 15 16A 17 18 19 20 21 22 23 24 25 26 27 28 29 30 31 32 35A 36 PH2913001 PH2913002 PH2913003 PH2913004 PH2913005 PH2913006 PH2913007 PH2913008 PH2913009 PH2913010 PH2913011 PH2913012 PH2913013 PH2913014 PH2913015 CAP SCREW CAP COVER SEAL CAP SCREW SETSCREW CAP PISTON STOPPER O-RING COLLAR O-RING SPRING PISTON HEAD VALVE O-RING O-RING O-RING PISTON ASSEMBLY CYLINDER O-RING BUMPER GASKET O-RING BODY CAP SCREW AIR PLUG JOINT GUIDE STEPPED PIN
TROUBLESHOOTING PROBLEM CAUSE ACTION Air leaking at trigger valve area. 1. O-rings in trigger valve housing are damaged. 1. O-rings must be replaced & operation of safety yoke must be checked. Air leaking between housing and hose. 1. Loose screws in housing. 2. Damaged O-ring. 3. Loose air fitting. 1. Tighten screws. 2. Replace O-ring. 3. Tighten air fitting. Air leaking between housing and cap assembly. 1. Damaged seal. 1. Replace damaged seals. Tool skips staples/nails while discharging. 1.
WARRANTY AND RETURNS Grizzly Industrial, Inc. warrants every product it sells for a period of 1 year to the original purchaser from the date of purchase. This warranty does not apply to defects due directly or indirectly to misuse, abuse, negligence, accidents, repairs or alterations or lack of maintenance.
WARRANTY CARD Name __________________________________________________________ Street __________________________________________________________ City____________________State________Zip_________ Phone Number____________E-Mail___________________FAX____________ Model #___________________________ Order #_______________________ The following information is given on a voluntary basis. It will be used for marketing purposes to help us develop better products and services.
Send a Grizzly Catalog to a friend: Name________________________________ Street________________________________ City______________State______Zip_______ FOLD ALONG DOTTED LINE Place Stamp Here GRIZZLY INDUSTRIAL, INC. P.O.