GRINDER/SANDER COMBO MODEL H3368 INSTRUCTION MANUAL COPYRIGHT © OCTOBER, 2002 BY GRIZZLY INDUSTRIAL, INC. WARNING: NO PORTION OF THIS MANUAL MAY BE REPRODUCED IN ANY SHAPE OR FORM WITHOUT THE WRITTEN APPROVAL OF GRIZZLY INDUSTRIAL, INC. PRINTED IN CHINA.
WARNING Some dust created by power sanding, sawing, grinding, drilling, and other construction activities contains chemicals known to the State of California to cause cancer, birth defects or other reproductive harm. Some examples of these chemicals are: • Lead from lead-based paints. • Crystalline silica from bricks, cement, and other masonry products. • Arsenic and chromium from chemically treated lumber. Your risk from these exposures varies, depending on how often you do this type of work.
Table Of Contents 1. 2. 3. 4. 5. 5. 6. 7. PAGE SAFETY ....................................................................................................................2 Safety Rules For Power Tools ..........................................................................2-3 Additional Safety Instructions For Grinders..........................................................4 INTRODUCTION........................................................................................................
SECTION 1: SAFETY For Your Own Safety Read Instruction Manual Before Operating This Equipment The purpose of safety symbols is to attract your attention to possible hazardous conditions. This manual uses a series of symbols and signal words which are intended to convey the level of importance of the safety messages. The progression of symbols is described below. Remember that safety messages by themselves do not eliminate danger and are not a substitute for proper accident prevention measures.
Safety Instructions For Power Tools 9. USE PROPER EXTENSION CORD. Make sure your extension cord is in good condition. Conductor size should be in accordance with the chart below. The amperage rating should be listed on the motor or tool nameplate. An undersized cord will cause a drop in line voltage resulting in loss of power and overheating. Your extension cord must also contain a ground wire and plug pin. Always repair or replace extension cords if they become damaged.
Additional Safety Instructions For Grinders 1. ALWAYS WEAR EYE PROTECTION! 2. MAKE SURE GRINDER IS SECURED FIRMLY TO A BENCH OR STAND BEFORE USE. Any “wobbles” must be corrected by shimming or blocking before operation. 3. BEFORE MOUNTING A NEW WHEEL, BE SURE WHEEL RPM IS RATED AT AN EQUAL OR HIGHER RPM THAN THE GRINDER. 4. DO NOT GRIND ON THE SIDES OF THE GRINDING WHEELS, unless they are special wheels designed specifically for this purpose. 5. ONLY USE FLANGES THAT ARE INCLUDED WITH THE GRINDER.
SECTION 2: INTRODUCTION Commentary Read the manual before assembly and operation. Become familiar with the machine and its operation before beginning any work. Serious personal injury may result if safety or operational information is not understood or followed. We are proud to offer the Grizzly Model H3368 Grinder/Sander Combo. The Model H3368 is part of a growing Grizzly family of fine woodworking and metalworking machinery.
SECTION 3: CIRCUIT REQUIREMENTS 110V Operation The Model H3368 is wired for 110V and will draw approximately 8 amps under load. If you operate this machine on any circuit that is already close to its capacity, it might blow a fuse or trip a circuit breaker. However, if an unusual load does not exist and a power failure still occurs, contact a qualified electrician or our service department. A 10 amp dedicated circuit should be used with this grinder.
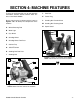
SECTION 4: MACHINE FEATURES To help you understand the set up and operation instructions, become familiar with the basic features of the Model H3368. J. Please match up the list below with the letters in Figures 2 & 3 to identify the components of the machine. L. A. Wheel Dressing Tool N. Spark Guard Dust Port K. Power Plug Sanding Belt Tension Knob M. Sanding Belt Tracking Knob B. Work Light L C. Eye Shield M D. Grinding Wheel E. Grinding Wheel Tool Rest N F. Coolant Tray G.
SECTION 5: SET UP Unpacking Some metal parts may have sharp edges on them after they are formed. Please examine the edges of all metal parts before handling them. Failure to do so could result in injury. Piece Inventory After all the parts have been removed from the carton, you should have the parts shown in Figure 4: A. B. C. D. E. F.
Mounting The Model H3368 weighs 27 lbs. Make sure the workbench on which you plan to mount the grinder is sturdy enough to hold the weight of the machine and any downward pressure that may be applied during operation. The workbench should have a level surface and be heavy, or attached to the floor, so that it will not move during operation. To mount the grinder: 1. 2. Mount the grinder to the workbench with bolts that are long enough to exceed the thickness of your workbench and the grinder base.
Tool Rests Eye Shield & Spark Guard The tool rest attaches to the inward side of the guard and provides a surface that can be used to support the workpiece during operation. Certain types of grinding/sanding may require jigs or accessories that will be used with the tool rests to assure the proper angle of the workpiece against the wheel. The spark guard should be positioned 1⁄8" from the grinding wheel to minimize sparks flying at the operator.
Belt Tracking “Tracking” the sanding belt means to center the belt on its rollers, so that it runs balanced and does not make contact with the sides of the belt cover. NOTICE The belt must be tracked before turning the machine ON. To track the sanding belt: Figure 10. Tracking control knob. 1. Unplug the machine! 2. Rotate the grinding wheel. 3. As you rotate the grinding wheel, watch how the sanding belt rides on the upper roller.
SECTION 6: OPERATIONS NOTICE Keep loose clothing rolled up and out of the way of machinery and keep hair pulled back. ! Disconnect power from the machine when performing any maintenance, assembly or adjustments. Failure to do this may result in serious personal injury. Wear safety glasses during the entire operation process. Failure to comply may result in serious personal injury. Using this machine produces dust which may cause allergic reactions and respiratory problems.
Before Grinding Operating Grinder The grinder is a safe tool when used properly. In addition to the safety instructions in this manual, the most important safety consideration is to use common sense at all times. What may be okay in one situation, may not be safe in another. The grinder is designed for use with ferrous metals only. Non-ferrous metals and wood products should be used on the sanding belt, as they will quickly load the grinding wheel surface and ruin its abrasive qualities.
Wheel Care Wheel Dressing Your safety when grinding depends, on a large part, on the condition of the wheel during grinding. A wheel in poor condition presents the possibility of breaking apart during rotation, injuring the operator and possibly causing property damage. Dressing restores the grinding wheel with a likenew abrasive quality. Whenever the front surface of the wheel loses its abrasive qualities (loading or polishing), then the wheel should be dressed.
Wheel Selection Wheel Inspection The Model H3368 only accepts Type-1 wheels with a 1⁄2" bore. Before mounting a new grinding wheel, it must be inspected. DO NOT assume that a wheel is in sound condition just because it is new—often, damage can occur during shipping, with age, or with exposure to moisture. Aluminum oxide and silicon carbide wheels are marked in a somewhat uniform manner by all the major manufacturers.
4. An undamaged wheel will emit a clear metallic ring or “ping” sound in each of these spots. A damaged wheel will respond with a dull thud that has no clear tone. 5. If you determine from the ring test that the wheel is damaged, DO NOT use it! 5. Mount the new wheel in the reverse order or as shown in Figure 13. Always make certain there is a paper or fiber disc between the wheel flanges and the wheel itself. Tighten the nut snugly but DO NOT over-tighten. Over-tightening can crack the wheel.
Sanding 4. Grasp the workpiece tightly and properly support it on the tool rest. 5. Press the workpiece evenly against the sanding belt with light pressure (see Figures 15 and 16). DO NOT press hard—let the the rotation of the belt do the work The 2" sanding belt on the Model H3368 works great for non-ferrous metals and wood products. A wide variety of belts are also available for many types of materials and stages of finishing.
Replacing Belts 5. Pull the sanding belt tension knob down with one hand and work the sanding belt off the rollers with the other hand as shown in Figure 19. Many belts are available with different grit sizes. To remove/replace a sanding belt: 1. Disconnect the machine from the power supply! 2. Remove the star knob from the right-hand sanding belt cover as shown in Figure 17. Figure 19. Removing sanding belt. 6. Install the new sanding belt in the reverse order of removal and replace the belt cover.
SECTION 7: MAINTENANCE Grinding Wheels ! Disconnect power to the machine when performing any maintenance, assembly or adjustments. Failure to do this may result in serious personal injury. General Always be aware of the condition of your machine.
Maintenance Log Date -20- Approximate Hours Of Use Maintenance Performed H3368 Grinder/Sander Combo
SECTION 8: CLOSURE The following pages contain general machine data, parts diagrams/lists, a troubleshooting guide and Warranty/Return information for your Model H3368. If you need parts or help in assembling your machine, or if you need operational information, we encourage you to call our Service Department. Our trained service technicians will be glad to help you.
TROUBLESHOOTING This section covers the most common problems encountered during operation and what to do about them. Do not make any adjustments until machine is unplugged and moving parts have come to a complete stop. SYMPTOM POSSIBLE CAUSE Motor will not start. 1. 2. Low voltage. 1. Open circuit in motor or loose 2. connections. Check power line for proper voltage. Inspect all lead connections on motor for loose or open connections. Motor will not start; fuses or 1. circuit breakers blow. 2.
MACHINE DATA SHEET Customer Service #: (570) 546-9663 • To Order Call: (800) 523-4777 • Fax #: (800) 438-5901 MODEL H3368 GRINDER/SANDER COMBO Design Type.......................................................................... Bench Model Overall Dimensions: Height (w/Work Light Extended) ..................................................193⁄4" Width ............................................................................................151⁄4" Depth ...................................................
-24- H3368 Grinder/Sander Combo 4 34 17 30 5 33 16 1 15 2 56 54 32 6 44 18 4 7 3 9 27 32 28 29 8 9 10 11 31 27 12 13 19 14 9 21 48 38 56 44 39 57 56 55 23 49 46 41 54 44 51 25 24 50 47 65 58 52 39 59 39 64 63 10 53 26 24 66 20 21 45 6 13 32 39 62 9 82 54 40 6 81 67 72 32 74 36 75 9 37 76 27 9 27 60 77 80 73 44 39 71 43 22 71 68 69 70 42 32 9 78 27 56 39 35 79 61 78
MODEL H3368 PARTS Ref# Part# 1 2 3 4 5 6 7 8 9 10 11 12 13 14 15 16 17 18 19 20 21 22 23 24 25 26 27 28 29 30 31 32 33 34 35 36 37 38 39 40 41 PS54M PH3368002 PN16M PH3368004 PH3368005 PS09M PH3368007 PH3368008 PW02M PS05M PH3368011 PH3368012 PW01M PB84M PCB07M PH3368016 PW03M PS53M PH3368019 PH3368020 PH3368021 PN03M PH3368023 P6202RS PH3368025 PH3368026 PN06M PTLW02M PH3368029 PH3368030 PH3368031 PLW01M PW05M PN04M PN09M PH3368036 PH3368037 PTLW01M PS07M PH3368040 PH3368041 Description PHLP HD SCR M5-
WARRANTY AND RETURNS Grizzly Industrial, Inc. warrants every product it sells for a period of 1 year to the original purchaser from the date of purchase. This warranty does not apply to defects due directly or indirectly to misuse, abuse, negligence, accidents, repairs or alterations or lack of maintenance.
WARRANTY CARD Name ____________________________________________________________________________________ Street ____________________________________________________________________________________ City ______________________________________________________________State________Zip_________ Phone Number_______________________E-Mail_______________________FAX________________________ MODEL # H3368 Grinder/Sander Combo Serial# ___________________ Order# ________________ The following information is given on a volu
FOLD ALONG DOTTED LINE Place Stamp Here GRIZZLY INDUSTRIAL, INC. P.O.
Buy Direct and Save with Grizzly® – Trusted, Proven and a Great Value! Visit Our Website Today And Discover Why Grizzly® Is The Industry Leader! • SECURE ORDERING • ORDERS SHIPPED WITHIN 24 HOURS • E-MAIL RESPONSE WITHIN ONE HOUR -OR- Call Today For A FREE Full Color Catalog