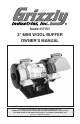
Model H7757 3" MINI WOOL BUFFER OWNER'S MANUAL COPYRIGHT © DECEMBER, 2005 BY GRIZZLY INDUSTRIAL, INC. WARNING: NO PORTION OF THIS MANUAL MAY BE REPRODUCED IN ANY SHAPE OR FORM WITHOUT THE WRITTEN APPROVAL OF GRIZZLY INDUSTRIAL, INC.
Table of Contents SECTION 1: SAFETY .......................................................................................................2 SECTION 2: INTRODUCTION .........................................................................................5 Foreword.....................................................................................................................5 Contact Information ....................................................................................................
SECTION 1: SAFETY For Your Own Safety Read Instruction Manual Before Operating This Equipment The purpose of safety symbols is to attract your attention to possible hazardous conditions. This manual uses a series of symbols and signal words which are intended to convey the level of importance of the safety messages. The progression of symbols is described below. Remember that safety messages by themselves do not eliminate danger and are not a substitute for proper accident prevention measures.
7. 8. ONLY ALLOW TRAINED AND PROPERLY SUPERVISED PERSONNEL TO OPERATE MACHINERY. Make sure operation instructions are safe and clearly understood. KEEP CHILDREN AND VISITORS AWAY. Keep all children and visitors a safe distance from the work area. 9. MAKE WORKSHOP CHILD PROOF. Use padlocks, master switches, and remove switch keys. 10. NEVER LEAVE WHEN MACHINE IS RUNNING. Turn power OFF and allow all moving parts to come to a complete stop before leaving machine unattended. 11.
Safety Instructions for the 3" Mini Wool Buffer 1. EYE PROTECTION. Grinding causes small particles to become airborne at a high rate of speed. ALWAYS wear safety glasses when using this machine. 2. MOUNTING TO BENCH/STAND. An unsecured grinder may become dangerously out of control during operation. Make sure grinder is FIRMLY secured to a bench/stand before use. 3. WHEEL SPEED RATING. Grinding wheels operated at a faster speed than rated for may break or fly apart.
SECTION 2: INTRODUCTION Foreword Contact Information We are proud to offer the Grizzly Model H7757 3" Mini Wool Buffer. This Model is part of a growing Grizzly family of fine power tools. When used according to the guidelines set forth in this manual, you can expect years of trouble-free, enjoyable operation and proof of Grizzly’s commitment to customer satisfaction.
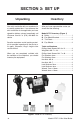
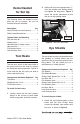
SECTION 3: SET UP Unpacking Inventory Your mini wool buffer left our warehouse in a carefully packed box. If you discover the mini wool buffer is damaged after you have signed for delivery, please immediately call Customer Service at (570) 546-9663 for advice. Save the containers and all packing materials for possible inspection by the carrier or its agent. Otherwise, filing a freight claim can be difficult.
Items Needed for Set Up 2. Adjust both tool rests approximately 1⁄8" from the grinding and buffing wheels and tighten the wing bolts. Figure 2 shows the correct adjustment for the tool rest at the grinding wheel. The following items are needed to complete the set up process, but are not included with your machine: Description Qty Safety Glasses (for each person)............. 1 Phillips Head Screwdriver ........................ 1 Optional Items for Mounting Drill with 4mm bit ..............................
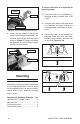
To secure the buffer to a benchtop or mounting board: Screw Flat Washer Hex Nut Lock Washer Figure 3. Eye Shield Bracket Installation. 2. Attach the eye shield to the bracket with the 4mm Phillips head screws, flat washers, lock washers and hex nuts as shown in Figure 4. The hex nut should be tightened to a point where the eye shields are stiff to move. Hex Nut 1. Place the buffer on a workbench or mounting board no smaller than 12"W x 10"D. 2.
SECTION 4: OPERATIONS Test Run Using this machine produces dust which may cause eye injuries or respiratory problems. Protect yourself by wearing safety glasses and a respirator during the entire operation process. To test run the buffer: 1. Plug the machine into the power source. 2. Stand to the side of the buffer and turn the machine ON. Keep loose clothing rolled up and out of the way of machinery and keep hair pulled back.
Grinding and Buffing Wheel Care The processes for grinding and buffing with the H7757 are very similar. Your safety largely depends on the condition of the wheels during grinding or buffing. A grinding wheel in poor condition presents the possibility of breaking apart during rotation and injuring the operator, while a buffing wheel in poor condition can tear apart and snag a workpiece, potentially causing serious entanglement injuries. To grind or buff: 1.
Grinding Wheel Dressing Dressing restores the grinding wheel with a like-new abrasive quality. Whenever the front surface of the wheel loses its abrasive qualities or balance due to particle loading or polishing of the wheel surface, then the wheel should be dressed. Use a commercially-available dressing tool, such as those available on Page 15. To dress the grinding wheel: 1. With the machine plugged into power, stand to the side of the grinding wheel turn the machine ON. 2.
Wheel Selection The Model H7757 only accepts Type 1 3" x 1⁄2" wheels with a 1⁄4" bore. Aluminum oxide and silicon carbide wheels are marked in a somewhat uniform manner by all major manufacturers. Understanding these markings will help you understand the capabilities of various wheels. Always refer to the manufacturer’s grinding recommendations when selecting a wheel for your project.
To perform a Ring Test: To remove/mount a wheel: 1. Make sure the wheel that you test is clean and dry; otherwise, you may get false results. 1. DISCONNECT THE MACHINE FROM THE POWER SUPPLY! 2. Hang the wheel in the air with a piece of cord or string looped through the hole in the center. 3. At the spots shown in Figure 7, gently tap the wheel with a light nonmetallic device such as the handle of a screwdriver or a wooden mallet. 2.
NEVER assemble a grinding wheel on the arbor without paper or fiber discs between the wheel and the flanges. Failure to include the paper or fiber discs can result in damage to the wheel and cause it to fail when at speed, causing serious injury! 6. Re-install the guards and shields. 7. Run a new wheel for at least one minute while standing clear of the line of rotation. If a wheel does have defects it will generally fail as soon as it gets up to full speed.
SECTION 5: ACCESSORIES G7984—Face Shield H1298—Dust Sealed Safety Glasses H1300—Clear Safety Glasses H2347—Uvex® Spitfire Safety Glasses H0736—Shop Fox® Safety Glasses Safety Glasses are essential to every shop. If you already have a pair, buy extras for visitors or employees. You can't be too careful when it comes to shop safety! H5944— #0 Wheel Dresser H5945— #1 Wheel Dresser H5946— #2 Wheel Dresser These wheel dressers expose new grains for aggressive cutting on all types of grinding wheels.
SECTION 5: MAINTENANCE General Grinding Wheels Always be aware of the condition of your machine. Routinely check the condition of the following items and repair or replace as necessary: The grinding wheel should be visually inspected before every use. Take care when storing grinding wheels to keep them free from potential damage due to being dropped or having other items dropped on them. Store all grinding wheels in a dry location.
SECTION 6: SERVICE Troubleshooting Symptom Possible Cause Possible Solution Machine slows when operating. 1. Workpiece pressure is too 1. Reduce workpiece pressure on great. wheel. Machine vibrates when operating. 1. Grinding wheel is unbal- 1. Adjust or tighten wheel mounting anced. nut as necessary. 2. Grinding wheel is damaged. 2. Replace the wheel. 3. Arbor is bent. 3. Inspect arbor and replace if necessary. 4. Bearings are worn or dam- 4. Inspect bearings and replace if aged. necessary.
Parts Breakdown �� �� �� �� �� �� �� �� �� �� �� �� �� �� �� �� �� �� �� �� �� �� �� �� �� �� �� � �� �� �� �� �� �� �� �� � �� �� �� �� �� �� �� �� �� �� �� �� �� �� �� �� �� �� � � � �� �� �� �� �� �� �� �� �� �� �� �� � �� �� � � � � -18- Model H7757 3" Mini Wool Buffer
Parts List REF PART # DESCRIPTION 1 PS49M PHLP HD SCR M3-.5 X 5 2 PH7757002 BASE PLATE 3 PH7757003 RUBBER FOOT 4 PH7757004 BASE 5 PH7757005 MOVEABLE TOOL REST 6 PH7757006 WING BOLT M4-.7 X 10 7 PH7757007 ROCKER SWITCH 8 PH7757008 SWITCH COVER 9 PS02M PHLP HD SCR M4-.7 X 12 10 PH7757010 CAPACITOR 3MFD 250VAC 11 PS21M PHLP HD SCR M4-.7 X 15 12 PN04M HEX NUT M4-.7 13 PH7757013 CORD & PLUG 14 PH7757014 PHLP HD SCR M4-.
WARRANTY AND RETURNS Grizzly Industrial, Inc. warrants every product it sells for a period of 1 year to the original purchaser from the date of purchase. This warranty does not apply to defects due directly or indirectly to misuse, abuse, negligence, accidents, repairs or alterations or lack of maintenance.
WARRANTY CARD Name _________________________________________________________________ Street _________________________________________________________________ City _______________________ State _________________________ Zip _________ Phone # ____________________ Email ________________________ Invoice # _____ Model # ____________________ Order # _______________________ Serial # ______ The following information is given on a voluntary basis.
Send a Grizzly Catalog to a friend: Name________________________________ Street________________________________ City______________State______Zip_______ FOLD ALONG DOTTED LINE Place Stamp Here GRIZZLY INDUSTRIAL, INC. P.O.