MODEL H8067 FLAT IRON STYLE MANDOLIN KIT OWNER'S MANUAL COPYRIGHT © NOVEMBER, 2006 BY GRIZZLY INDUSTRIAL, INC. WARNING: NO PORTION OF THIS MANUAL MAY BE REPRODUCED IN ANY SHAPE OR FORM WITHOUT THE WRITTEN APPROVAL OF GRIZZLY INDUSTRIAL, INC.
�������������������������������������������������������������������� �������������������������������������������������������������������� ������������������������������������������������������������������� ������������������������������������������� �� ���������������������������� �� ������������������������������������������������������������������ �� ���������������������������������������������������� ������������������������������������������������������������������ �������������������������������������
Table of Contents SECTION 1: SAFETY ....................................................................................................................... 2 SECTION 2: INTRODUCTION ......................................................................................................... 3 Foreword .................................................................................................................................... 3 Contact Info .................................................................
SECTION 1: SAFETY Always wear safety glasses or goggles when operating equipment. Everyday glasses or reading glasses are not safety glasses. Be certain the safety glasses you wear meet the appropriate standards of the American National Standards Institute (ANSI). Because there are various ways to cut and join wood, you can make substitutions for the methods stated in this plan. We try to suggest the easiest methods possible. However, only you know your skills with each piece of machinery.
SECTION 2: INTRODUCTION Foreword Contact Info We are proud to offer the Model H8067 Flat Iron Style Mandolin Kit. This kit is a part of a growing Grizzly family of fine woodworking projects. When assembled according to the guidelines set forth in this manual, you can expect years of enjoyment from your mandolin. If you have any comments regarding this manual, please write to us at the address below: We are pleased to provide this manual for the Model H8067 Flat Iron Style Mandolin Kit.
SECTION 3: PARTS INVENTORY Inventory 9 REF PART # DESCRIPTION 1 PH8067001 Mandolin Body 1 2 PH8067002 Neck 1 3 PH8067003 Fretboard 1 4 PH8067004 Bridge 1 5 PH8067005 Tuning Machines 2 6 PH8067006 Tailpiece 1 7 PH8067007 Nut 1 8 PH8067008 Endpin 1 9 PH8067009 Dowels 2 10 PH8067010 Strings 8 11 PH8067011 Bushings 8 12 PH8067012 #3 x 3/4" SS Screw 1 13 PH8067013 #1 x /8" SS Screws 14 3 1 2 3 8 5 4 7 6 Figure 1. Boxed components.
Identification Bridge Tailpiece Fret Nut Neck Endpin Figure 3. Model H8067 main features. Tuner or Tuning Machine Tuning Peg Headstock Figure 4. Model H8067 headstock features.
SECTION 4: SANDING Body Neck The mandolin body was rough sanded at the factory. To get a good finish the body must be sanded further with a series of sandpaper grits. The mandolin neck has been rough sanded at the factory. Personalize the fretboard and neck headstock with additional cutting, inlay, or design work before final sanding. To sand the mandolin body: 1. 2.
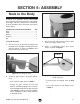
SECTION 5: ASSEMBLY Neck to the Body A precise fit is important for the neck-to-body joint. This joint affects the placement of the strings and bridge, and these determine the sound quality of the mandolin. Dry fit and check all the parts before gluing. Components and Hardware Needed: Qty Neck .................................................................. 1 Body .................................................................. 1 Dowels ...............................................................
5. Align the neck by using the sanding technique described in Step 2. Apply extra pressure toward the part of the neck that needs to be shifted. Note: Check alignment frequently. A little bit of sanding can cause large adjustments. 6. Place the tailpiece on the edge of the soundboard and align it to the center mark. 7. Use a screw or drill a hole with a 1⁄ 16" bit to mark the centers of the screw holes (Figure 8) and then set the tailpiece to the side. Fretboard Nut Figure 9. Marking the nut position.
. Remove the fretboard, turn the mandolin over, and draw a line on the end of the neck where the body intersects it as shown in Figure 11. Extend this line around the neck using a straightedge. 15. Apply a thin coat of wood glue into the dowel holes in the mandolin body, insert the dowels and wipe away excess glue. 16. Spread a thin layer of wood glue on the heel of the neck, the dowels, and the body where it will connect to the neck. 17. Press the neck firmly onto the dowels. 18.
Fretboard Components and Hardware Needed: Qty Mandolin Body................................................... 1 Fretboard ........................................................... 1 To attach the fretboard to the neck: 1. Check to see if the neck is flat by laying it down on an even surface. Brad Nails —If neck is flat, move on to Step 2.
Shaping Neck 7. Fill the wood pores in the neck with a paste filler according to the manufacturer's instructions. The rest of the neck must be shaped to match the width of the fretboard and then sanded smooth. 8. When the paste filler is dry, use “000” grade steel wool to remove the residue and polish the wood surface. Components and Hardware Needed: Qty Mandolin Body................................................... 1 Shaping Fretboard To shape and sand the neck: 1. 2.
2. Final Sanding Use a fine flat file to angle the metal fret ends, as shown in Figure 18. Components and Hardware Needed: Qty Mandolin Body................................................... 1 To prepare the mandolin for finishing: 1. Inspect the entire mandolin under bright lights and take note of any glue residue, dents, scratches, and areas needing further sanding. 2. Carefully scrape away any glue residue with a sharp chisel held perpendicular to the surface as shown in Figure 20. Figure 18.
Finishing Most finishes are hazardous to your health. Wear a NIOSH/OSHA approved respirator with particulate and gas/vapor filters, safety glasses, rubber gloves, and work in a well ventilated area when finishing. Finishing supplies are not included with this mandolin kit. Finishing options include stains, lacquers, varnishes and oil finishes. All can be applied by spray or brush.
Nut Tailpiece The nut holds the peghead end of the strings the correct distance above the frets. It is not necessary to cut the string notches in the nut. The tailpiece holds and separates the ends of the strings. To install the nut: Components and Hardware Needed: Qty Mandolin Body................................................... 1 Tailpiece ............................................................ 1 #1 x 3/8" Stainless Steel Screws ........................ 2 #3 x 3/4" Stainless Steel Screw .....
Tuning Machines Fitting Bridge Components and Hardware Needed: Qty Mandolin Body................................................... 1 Tuning Machines ............................................... 2 Bushings ............................................................ 8 #1 x 3/8" Stainless Steel Screws ...................... 10 Components and Hardware Needed: Qty Mandolin Body................................................... 1 Bridge ................................................................
Placing Bridge 5. Make sure that the bridge is located 350mm (13.8") from the nut and 175mm (6.89") from the 12th fret. (See Figure 28). Components and Hardware Needed: Qty Mandolin Body................................................... 1 Bridge ................................................................ 1 To place the bridge: 1. Use a narrow file to make slots in the bridge. Angle the slots toward the tailpiece. See Figure 27 for an example of string spacing on the bridge.
Winding Strings String Height Components and Hardware Needed: Qty Mandolin Body................................................... 1 Strings ............................................................... 8 Bridge ................................................................ 1 Correct string height is crucial to prevent fret buzz and maximize playability. The string height is measured from the top face of the fret to the bottom of the string (Figure 30). To install the mandolin strings: 1.
Mandolin Body 8th String: 1 ⁄ 64"–1⁄ 32" Tuning String Nut Correct tuning is the most important aspect of performance for a mandolin. If the mandolin is not in tune with itself, or with other instruments in an ensemble, the resulting music will not please the ear. The standard mandolin tuning notes are shown in Figure 33. 1st String: 1⁄ 64" 1st Fret Figure 31. Correct 1st fret string heights. To check the string height at the 12th fret: 1. G Measure the string height at the 12th fret (Figure 32).
SECTION 6: REFERENCE INFO Accessories G7984—Face Shield H1298—Dust Sealed Safety Glasses H1300—UV Blocking, Clear Safety Glasses H2347—Uvex® Spitfire Safety Glasses H0736—Shop Fox® Safety Glasses Safety Glasses are essential to every shop. If you already have a pair, buy extras for visitors or employees.
H5750—Vinyl Washcoat/Sealer, 1Qt H5751—Nitrocellulose Lacquer, Gloss, 1 Qt H5752—Nitrocellulose Lacquer, Gloss, 1 Gal H5753—Nitrocellulose Lacquer, Satin, 1 Qt H5754—Nitrocellulose Lacquer, Satin, 1 Gal H5755—Retarder for Lacquer, 1 Qt H5756—Natural Filler, 1 Pint H5757—Mahogany Filler, 1 Pint H5759—Filler Reducer, 1Qt McFadden's nitrocellulose lacquer is the leading lacquer used by custom guitar builders. It sprays and buffs really well and is capable of giving you a finish that looks "wet.
WARRANTY AND RETURNS Grizzly Industrial, Inc. warrants every product it sells for a period of 1 year to the original purchaser from the date of purchase. This warranty does not apply to defects due directly or indirectly to misuse, abuse, negligence, accidents, repairs or alterations or lack of maintenance.
-22- H8067 Flat Iron Style Mandolin Kit
������������� ���������������������������������������������������������������������������������� � ������������������������������������������������������������������������������������ ����� ����������������������� ������������������������������� ���� ��������������������� ���������������������������� ������ ������������������������ ��������������������������� ���������������������������� ������������������������������� ��������������������������� �������������������������������������������������������������
���������������������� ����� ����� ���� ������������������������ ������������� �������������������������� ���������������������� ����������������������������������� ����������������������������������� ������������������������������������� �������������������������������������� ��������������������������������������
����������������������������������������������������������������������� ������������������������������������� ������������������������������������ ����������������� �������������������������������� ��������������������������������� ���� ��������������������� ������������������