MODEL H8180/H8181 BASS GUITAR KIT OWNER'S MANUAL H8180 H8181 COPYRIGHT © NOVEMBER, 2007 BY GRIZZLY INDUSTRIAL, INC. WARNING: NO PORTION OF THIS MANUAL MAY BE REPRODUCED IN ANY SHAPE OR FORM WITHOUT THE WRITTEN APPROVAL OF GRIZZLY INDUSTRIAL, INC.
�������������������������������������������������������������������� �������������������������������������������������������������������� ������������������������������������������������������������������� ������������������������������������������� �� ���������������������������� �� ������������������������������������������������������������������ �� ���������������������������������������������������� ������������������������������������������������������������������ �������������������������������������
Table of Contents SECTION 1: SAFETY ....................................................................................................................... 2 SECTION 2: INTRODUCTION ......................................................................................................... 3 Foreword .................................................................................................................................... 3 Contact Info .................................................................
SECTION 1: SAFETY Always wear safety glasses or goggles when operating equipment. Everyday glasses or reading glasses are not safety glasses. Be certain the safety glasses you wear meet the appropriate standards of the American National Standards Institute (ANSI). Because there are various ways to cut and join wood, you can make substitutions for the methods stated in this plan. We try to suggest the easiest methods possible. However, only you know your skills with each piece of machinery.
SECTION 2: INTRODUCTION Foreword Contact Info We are proud to offer the Model H8180/H8181 Bass Guitar Kit. This kit is a part of a growing Grizzly family of fine woodworking products. When assembled according to the guidelines set forth in this manual, you can expect years of enjoyment from your guitar.
SECTION 3: PARTS INVENTORY Inventory REF PART# DESCRIPTION 1 Bass Guitar Body (H8180 ) Bass Guitar Body (H8181) Neck Silver Neckplate (H8180) Gold Neckplate (H8181) Silver Tuning Machine (H8180) Gold Tuning Machine (H8181) Wiring Harness Silver Bridge (H8180) Gold Bridge (H8181) Pickup String Control Cover Plate Silver Output Jack (H8180) Gold Output Jack (H8181) Silver Strap Button (H8180) Gold Strap Button (H8181) Compression Spring String Nut Truss Rod Cover Silver Control Knob (H8180) Gold Control Kn
Supplies/Tools Most wood components in this kit are fully machined at the factory and are ready for assembly. A small amount of sanding and finishing is needed to complete your guitar.
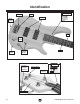
Identification Neck Pocket Bridge Saddle Pickups Strap Button Fret Tone Knob Output Jack Neck Volume Knobs Figure 4. Model H8180/H8181 controls. Tuner or Tuning Machine String Slot Tuning Post Truss Rod Cover Nut Headstock Figure 5. Model H8180/H8181 headstock features.
SECTION 4: ASSEMBLY Shaping Headstock Note: To determine the string slot (Figure 5) locations, you can place the nut on the drawing and mark the slots. If the strings cross the nut at a sharp angle, this increases friction and makes tuning difficult. It also increases the risk of the strings pulling out of the nut slots. The headstock for these models comes unfinished so you can cut it to your own design. These instructions will guide you through designing the shape of the headstock and placing pegholes.
Sanding Body The guitar body has been sanded at the factory, but it is up to you to do the final sanding before the finish is applied. To get a good finish, the body should be sanded with a series of sandpaper grits up to #320 grit. 6. Note: If you want to stain your guitar, the stain should be applied now before continuing with the next step. Stains cannot be applied to the guitar body after the sanding sealer is applied. 7. Components and Hardware Needed: Qty Guitar Body ...............................
Finishing Neck Some of the finishing options include stains, lacquers, varnishes and oil finishes. Traditionally, this style of guitar has a clear finish on the neck. Depending on the type, finishes can be applied with a spray gun, brush, rag, or a spray can. Finish materials and books on finishing instruments can be ordered through Grizzly Industrial or numerous luthier supply catalogs. Components and Hardware Needed: Qty Guitar Neck ....................................................... 1 Figure 8.
5. Apply several thin coats of the finish, following the manufacturer's instructions. Multiple thin coats usually produce a better quality finish than one heavy coat. 6. Sand the entire body with #400 grit wet and dry sandpaper after at least three coats of finish have been applied. DO NOT sand through the finish—be careful on the edges. 7. Apply more finish, sanding between coats, until the finish is the desired thickness.
4. Insert a 3 ⁄ 16" drill bit into each neck hole (Figure 10). While pressing down slightly, twist the drill bit by hand to make pilot holes in the neck. Figure 11. Example of using screw tip depth to set depth stop. Figure 10. Example of making a pilot hole in the neck. 5. 5. Unclamp the neck from the body. Set the neck fretboard face down on the drill press table, and set the depth stop to the mark from Step 4. To determine neck mounting hole depth: To drill mounting holes in the neck: 1. 1. 2.
Positioning Bridge Nut Slot The following steps require you to mark the guitar body. To avoid damaging the finish, place masking tape on the guitar body and gently mark the tape. Components and Hardware Needed: Qty Guitar Body and Neck (Assembled) .................. 1 Bridge ................................................................ 1 To position the bridge: 1.
Mounting Tuners Components and Hardware Needed: Qty Neck .................................................................. 1 Tuners ................................................................ 4 Screws #2 x 1/2 .................................................. 4 Hex Nut Bushings 1/2" ........................................ 4 Flat Washers 1/2" ............................................... 4 To install the tuners: 1. 2.
Wiring Pickups & Output Jack 4. Solder the audio jack wires onto the output jack, as shown in the Wiring Diagram on Page 28 and the Electrical Components on Page 27. This guitar comes with a wiring harness that has most of the components soldered in place. You only need to solder the pickup wires onto the volume control pots and the audio jack wire onto the output jack. If done incorrectly, the soldering can damage the components.
Installing Bridge & Pickups Mounting Screw To reduce humming in your amp, the ground wire must contact the bridge plate. Components and Hardware Needed: Qty Guitar Body ....................................................... 1 Bridge ................................................................ 1 Screws #4 x 1" .................................................. 5 Control Cover Plate ........................................... 1 Screws #4 x 1/2" .................................................
Strap Buttons Installing Nut The strap buttons are positioned on the guitar as shown in Figure 24. Qty Components and Hardware Needed: Guitar Body ....................................................... 1 Nut ................................................................... 1 Neck .................................................................. 1 Neckplate........................................................... 1 Screws #10 x 13/4" .............................................
Truss Rod Cover Winding Strings Components and Hardware Needed: Qty Guitar ................................................................. 1 Truss Rod Cover ............................................... 1 Screw #2 x 3⁄8" ................................................... 1 The correct position of the guitar strings is shown in Figure 27. The thin high "G" string is the "1st" (bottom) string and the thick low "E" string is the "4th" (top).
2. Allow only enough slack in the string for 2-3 rotations around the tuning post. Tuning Post String End Note: If too much slack is allowed, then the string could wind off the tuning post after many successive rotations. If not enough slack is allowed, then the string may not hold the winding tension. 3. Use wire cutters (optional) to cut off excess string. 4. Bend the string at a right angle and insert it into the tuning post slot. 5.
SECTION 5: SETUP General Guitar set up is an art that requires skill, patience and experience. If you have the patience, you can acquire the skill and experience. If you don't have the patience, you may want to have your guitar set up by a qualified guitar technician. This section presents an overview of setup practices. We highly recommended that you research more in-depth methods.
3. Loosen the strings, turn the truss rod cover out of the way, and turn the truss rod nut in the base of the neck (Figure 32) counterclockwise to release tension on the neck. Retighten until the nut begins to grab. String Height Tools Needed Qty Hex Wrench 1.5mm ............................................1 Guitar Capo ........................................................1 Metal Straightedge .............................................1 Steel Ruler (1⁄64" Resolution) ...............................
4th String: 6/64" � � � � � � � � 1st String: 5 /64" Figure 34. Correct 12th fret string heights. 12th Fret 3. Pickup Height Guitar Body Use the included 1.5mm hex wrench to adjust the saddle height setscrews (Figure 35) until the string heights are correct. Pickup height can have a dramatic effect on the audio output signal. The closer the strings are to the pickup, the higher the audio output signal will be.
Tuning Setting Intonation Tuning is an important guitar concept. If the guitar is not in tune, the resulting sound is unpleasant. These instructions explain how to tune by ear. You can also tune by using an electronic tuner such as the Grizzly H3097 Chromatic Tuner shown on Page 23. Tools Needed Qty Phillips Head Screwdriver...................................1 Setting the intonation adjusts the length of the string to correct for flatness/sharpness on each string.
SECTION 6: REFERENCE INFO Accessories T20501—Face Shield, 4" Crown, Clear T20502—Face Shield, 7" Crown, Clear T20448—Economy Clear Safety Glasses T20452—"Kirova" Anti-Relective Glasses T20456—"Dakura" Clear Safety Glasses H0736—Shop Fox® Safety Glasses These glasses meet ANSI Z87.1-2003 specifications. Buy extras for visitors or employees. You can't be too careful with shop safety! T20448 H0818—Fine Prepolishing Paste, 1.
H5750—Vinyl Washcoat/Sealer, 1Qt H5751—Nitrocellulose Lacquer, Gloss, 1 Qt H5752—Nitrocellulose Lacquer, Gloss, 1 Gal H5753—Nitrocellulose Lacquer, Satin, 1 Qt H5754—Nitrocellulose Lacquer, Satin, 1 Gal H5755—Retarder for Lacquer, 1 Qt H5756—Natural Filler, 1 Pint H5757—Mahogany Filler, 1 Pint H5759—Filler Reducer, 1Qt McFadden's nitrocellulose lacquer is the leading lacquer used by custom guitar builders. It sprays and buffs really well and is capable of giving you a finish that looks "wet.
Premier Red Mirror Finish Slicon Carbide Waterproof Sandpaper Model H8912—1000 Grit, 50 Pack Model H8913—1200 Grit, 50 Pack Model H8914—1500 Grit, 50 Pack Model H8915—2000 Grit, 50 Pack Ideal for producing very fine finishes in wet applications. Ultimate flexibility, and environmentally stable; resists humidity-caused curling. 50 sheets per package.
H8787—FAQ: Bass Guitar Care And Setup A hands-on guide to bass guitar repair. With photographs, diagrams, and sketches made by the author, John LeVan, and some provided by manufacturers. Learn how to: clean and condition a guitar, the re-stringing techniques of the professionals, adjust the neck, bridge saddle, string nut, pickups and intonation; and carve string nuts. 80 pages. Figure 51. Model H8787 FAQ Book. H5524—30 Watt Bass Guitar Amplifier • 30 watt output power with luxurious blue power LED.
Electrical Components Ground (To Bridge) Volume Control Pots Tone Control Pot Audio Jack Wires Output Jack Figure 54. Control cavity wiring. Ground Wire Neck Pickup Bridge Pickup Figure 55. Bridge and pickup wiring. Available in color online at www.grizzly.
Wiring Diagram Available in color online at www.grizzly.com �������� �������� ���� ������ ���� Figure 56. Model H8180/H8181 wiring diagram.
������������� ���������������������������������������������������������������������������������� � ������������������������������������������������������������������������������������ ����� ����������������������� ������������������������������� ���� ��������������������� ���������������������������� ������ ������������������������ ��������������������������� ���������������������������� ������������������������������� ��������������������������� �������������������������������������������������������������
���������������������� ����� ����� ���� ������������������������ ������������� �������������������������� ���������������������� ����������������������������������� ����������������������������������� ������������������������������������� �������������������������������������� ��������������������������������������
WARRANTY AND RETURNS �������������������� ��������������������������������������������������������������������������������������������������������������� ����������������������������������������������������������������������������������������������������������� �������������������������������������������������������������������������������������������������������������� ������������������������������������������������������������������������������������������������������������� �����������������������������
����������������������������������������������������������������������� ������������������������������������� ������������������������������������ ����������������� �������������������������������� ��������������������������������� ���� ��������������������� ������������������